
Delivery Zones
Use this page to define where each outlet delivers and what fees apply. Zones can be Distance Based (km from store), Area Based (postcode/suburb), or Polygon (drawn on a map).
Open the screen: Sidebar → Locations Management → Delivery Zones
Plan feature
Delivery Zones requires the custom delivery zones add-on. If the menu item is hidden, your plan may not include it.
Delivery zones list
What it does
Lists zones for the selected Location with search filters, pagination, and view/edit/delete actions.
Step-by-step
- Open Delivery Zones.
- Pick Location (first outlet may auto-select when the page loads).
- Optionally filter by Zone Name, Status, or Zone Type.
- Read the table — Name, Description, Type, Status, Actions.
- Tap Refresh — toast: Delivery zones and restaurants have been refreshed on success.
- Tap Add New Zone (+) to create (needs CREATE permission).
Filters
| Filter | What it does |
|---|---|
| Location | Required — zones load for this restaurant only |
| Zone Name | Search — placeholder Search by zone name… |
| Status | All Status, Active (default), or Inactive |
| Zone Type | All Types, Distance Based, Area Based, Polygon |
What the table shows
| Column | Meaning |
|---|---|
| Name | Zone label |
| Description | Text plus detail badge: km range, Area: {suburb}, {postcode}, or Map area (N points) |
| Type | Distance Based, Area Based, or Polygon badge |
| Status | Active or Inactive |
| Actions | View, Edit, Delete |
Loading / empty: Loading delivery zones…; No delivery zones found.
Default status filter
The list opens on Active zones. Set Status to All Status to see inactive zones.
Common mistakes / FAQs
- List never loads. Select a Location — the API requires
restaurant_id. - “Please log in to view delivery zones.” Session expired — sign in again.
Add a delivery zone
What it does
Creates a zone with geometry (distance, postcode, or polygon) and one or more delivery charge tiers.
Step-by-step
- Tap Add New Zone (+).
- In the add dialog, enter Name* and optional Description.
- Select Restaurant (defaults to first in list if unset).
- Choose Zone Type*:
- Distance Based — From Distance* and To Distance* in km.
- Area Based — search Postcode, pick one result from the dropdown (postcode + suburb).
- Polygon — draw on Delivery Area (Map) with at least 3 points.
- Under Delivery Charges, complete at least one row:
- Minimum Order Amount* — basket threshold.
- Delivery Charge* — fee when threshold is met.
- Tap + to add another tier; remove extra rows when allowed.
- Toggle Active on (default) or off.
- Save — success: Delivery zone created successfully.
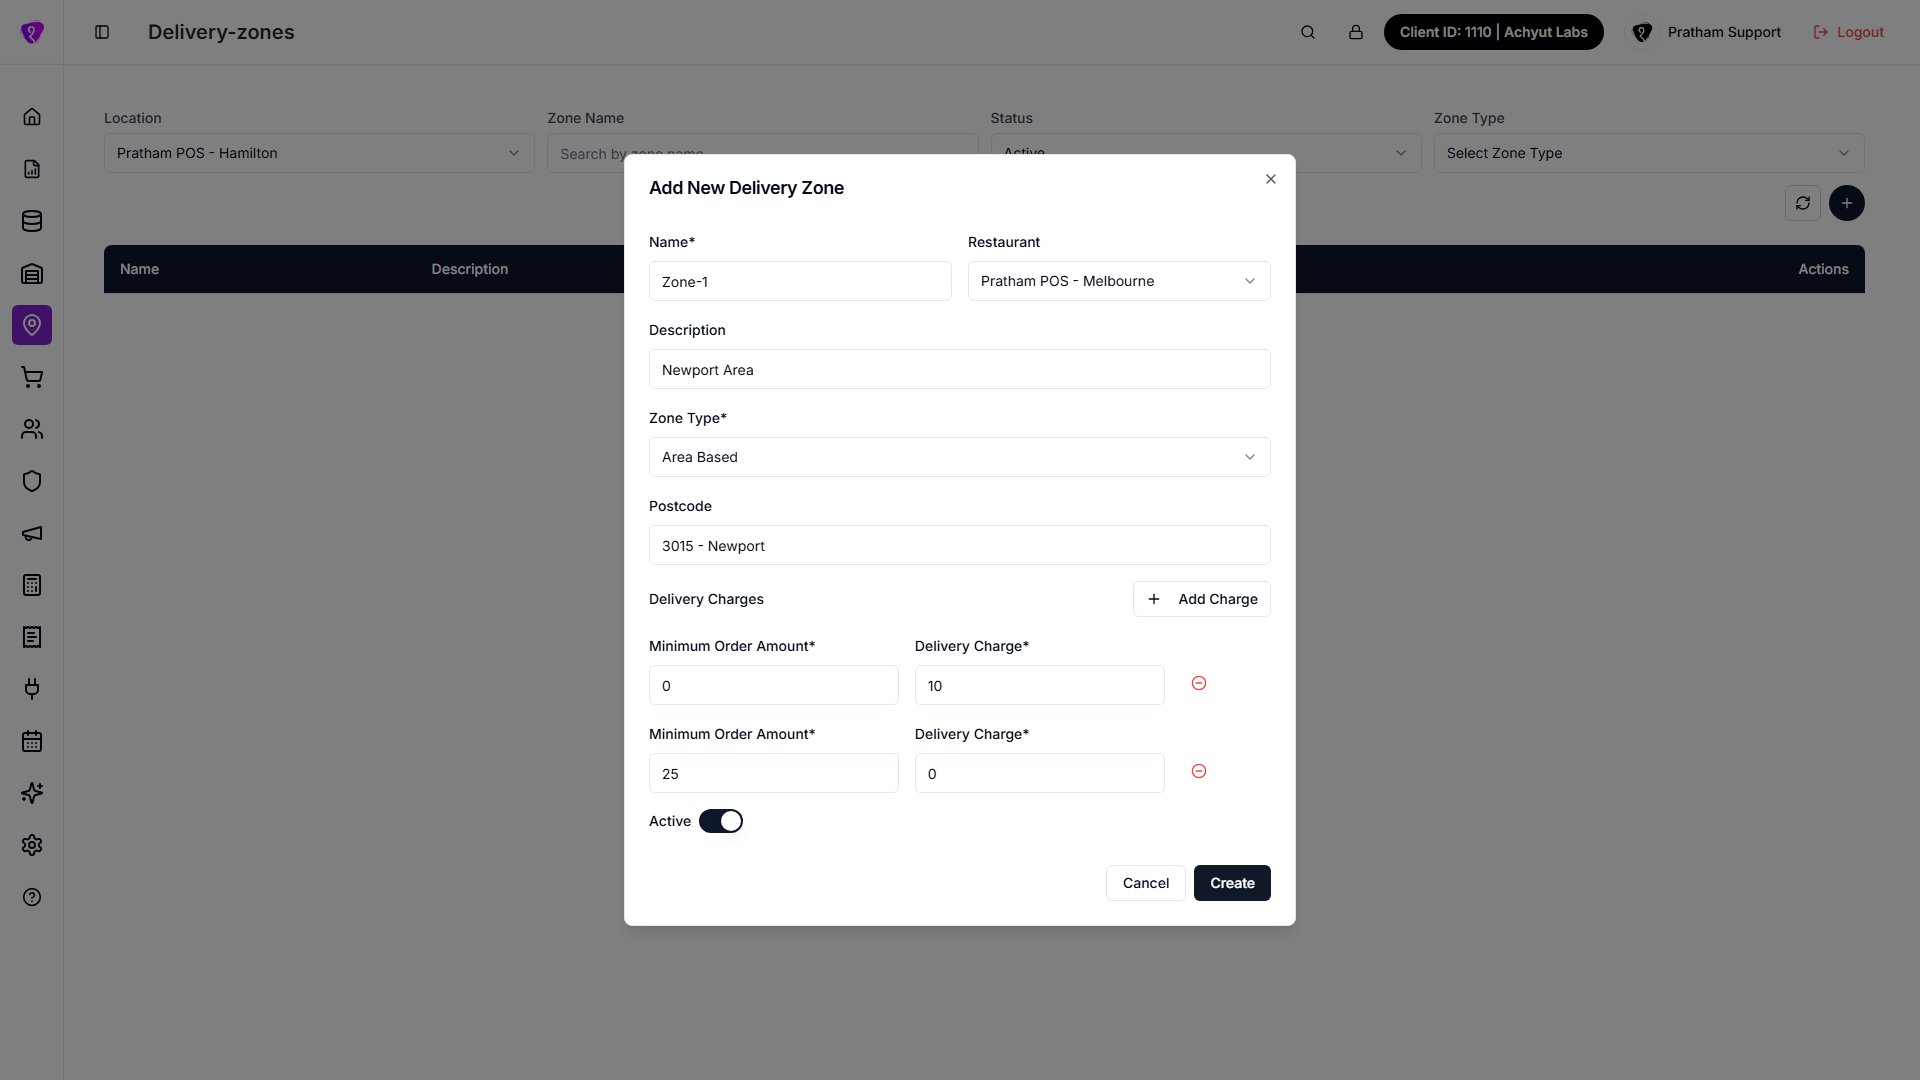 Caption: Area-based zone with postcode search and delivery charges
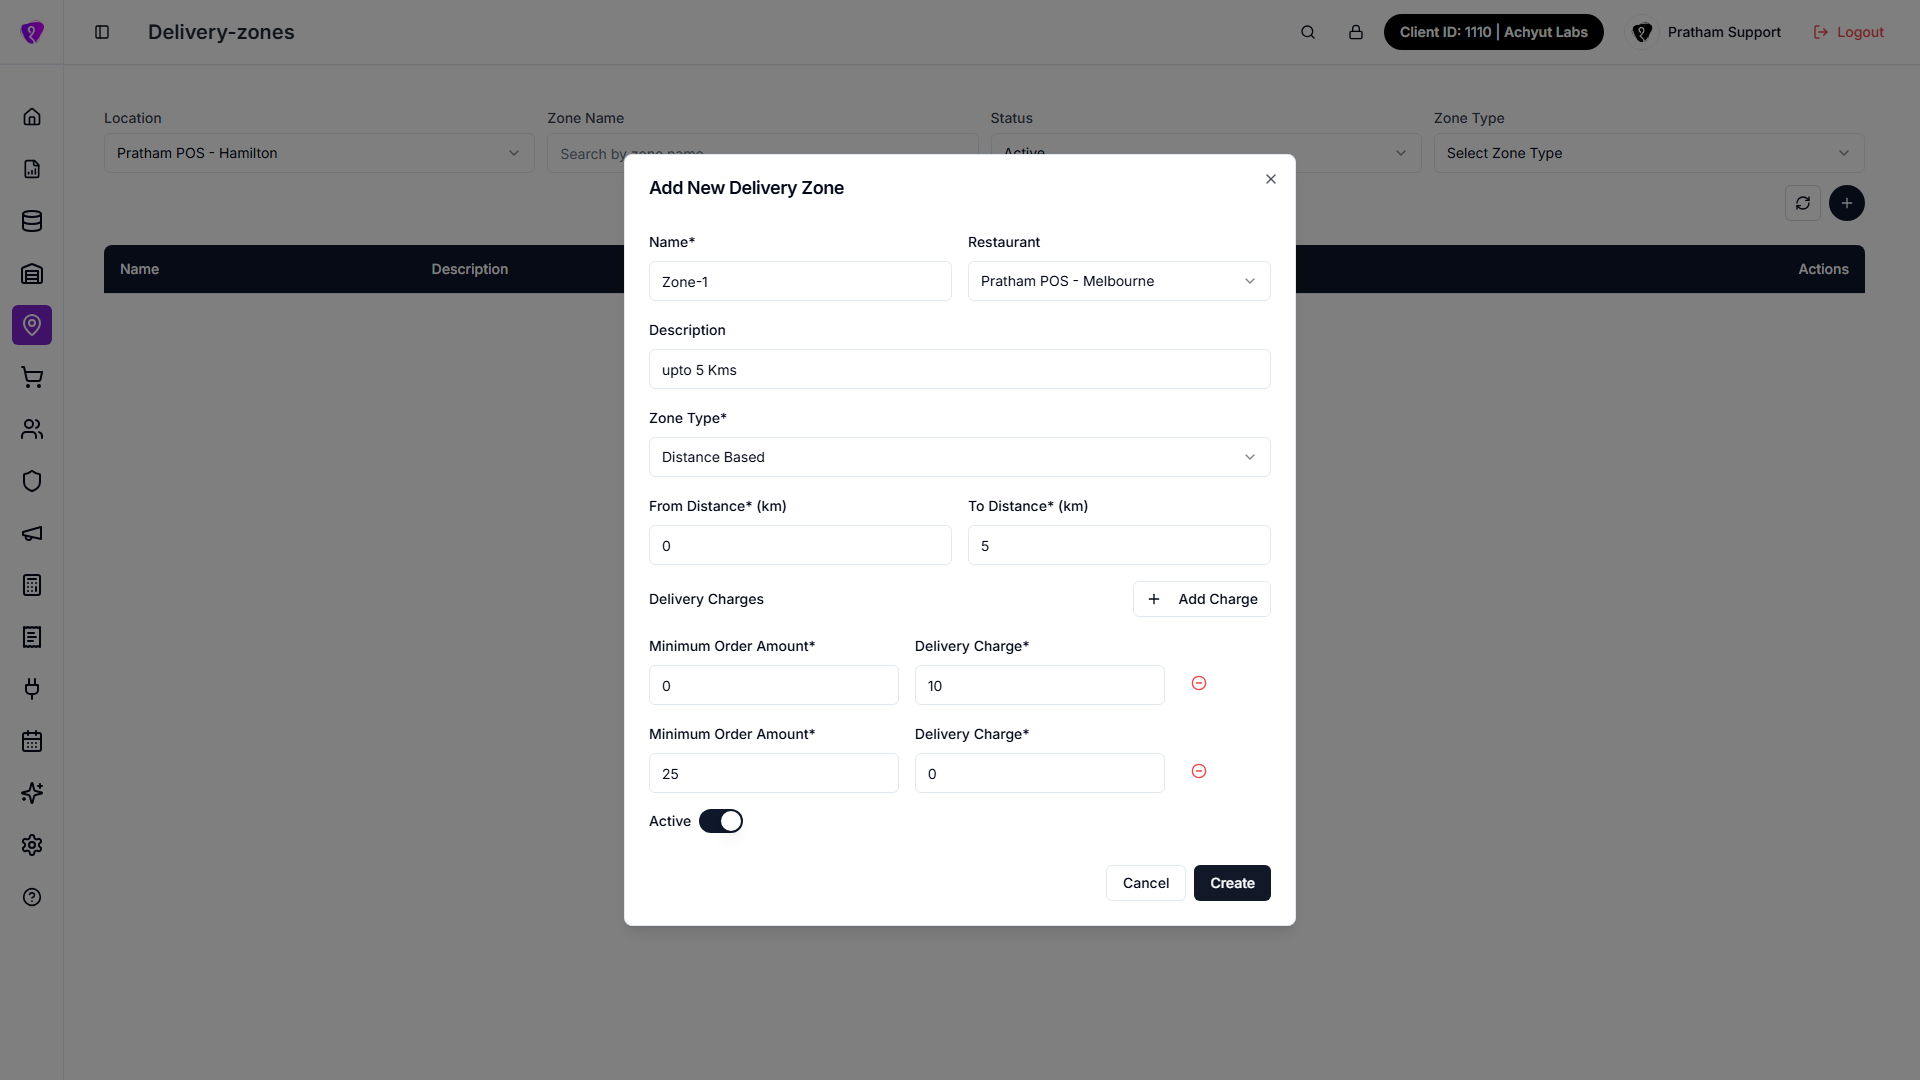 Caption: Distance-based zone with km range and delivery charges
Add zone — fields
| Field | Required? | Notes |
|---|---|---|
| Name | Yes | Zone display name |
| Restaurant | Yes | Outlet this zone belongs to |
| Description | No | Optional notes |
| Zone Type | Yes | Distance, Area, or Polygon |
| From / To Distance (km) | Yes (distance) | Outer/inner km band from store |
| Postcode | Yes (area) | Must select from search results, not free text only |
| Delivery Area (Map) | Yes (polygon) | Minimum 3 points |
| Minimum Order Amount | Yes per charge row | At least one complete tier |
| Delivery Charge | Yes per charge row | Paired with minimum order |
| Active | No | Switch — inactive zones are not used at checkout |
Validation messages
| Message | Fix |
|---|---|
| Name is required | Enter Name |
| Restaurant is required | Select Restaurant |
| From distance is required / To distance is required | Fill km fields for distance zones |
| Postcode is required | Pick a postcode from the search dropdown |
| Draw a delivery area with at least 3 points | Complete the map polygon |
| At least one charge item is required | Add minimum order + delivery charge |
Polygon drawing
Save only after the map shows a closed area with at least three points.
Common mistakes / FAQs
- Postcode search returns nothing. Wait for debounced search (~400ms); try postcode only (e.g.
4077) or suburb name. - Create failed with server error. Read the error toast — overlapping zones or invalid distance range may be rejected.
Edit a delivery zone
What it does
Updates zone geometry, charge tiers, description, or active status.
Step-by-step
- Tap Edit (pencil) on a row.
- Change fields in the same dialog layout as add (restaurant usually fixed).
- Save — success: Delivery zone updated.
Common mistakes / FAQs
- Charges did not update. Ensure every charge row has both Minimum Order Amount and Delivery Charge filled.
View a delivery zone
What it does
Read-only view of all zone fields and charges.
Step-by-step
- Tap View (eye) on a row.
- Review fields — you cannot change values in view mode.
- Close the dialog.
No separate print
Use View to read details; export or reporting is not on this screen.
Delete a delivery zone
What it does
Permanently removes a zone after confirmation.
Step-by-step
- Tap Delete (trash) on a row.
- Confirm in the delete dialog.
- On success: Delivery zone deleted successfully; list refreshes.
Deletion is permanent
If you only need to stop using a zone temporarily, Edit and turn Active off instead.
Common mistakes / FAQs
- Delete failed. Another process may reference the zone — read the error toast or deactivate the zone.
Permissions
| What you need | Why |
|---|---|
| DELIVERY ZONES module permission | Open the screen |
| CREATE | Add New Zone (+) |
| UPDATE | Edit (pencil) |
| DELETE | Delete (trash) |
| READ | List and View |
Related
- Locations Management overview
- Location — Delivery On/Off and online delivery settings
- POS Delivery charges — how fees appear at checkout
Test after save
Place a test order with an address inside and outside the zone to confirm the correct Delivery Charge tier applies.