
Items
Use this page to add and manage menu items — finished products, ingredients, and packaging with prices, per-location overrides, variants, modifiers, inventory, and dietary tags. This is the newer items screen (marked NEW in the menu).
Open the screen: Sidebar → Master Data Management → Items
Set up master data first
Create Categories, Product Attributes, Modifiers Categories, and Modifiers before you build items. Assign categories and add-ons inside the item dialog.
Legacy Item Library
Item Library is the older list at /items. Prefer Items for location overrides, variants, and the tabbed dialog.
Items list
What it does
Shows all products with filters, row selection, drag-to-reorder, pagination, and bulk actions.
Step-by-step
- Open Master Data Management → Items.
- Wait if the table shows Loading items….
- Use filters to narrow the list. Name and barcode searches update shortly after you stop typing.
- Read the table — checkbox, drag handle, Name, Item Type, Category, Price, Online Price, Barcode, Inventory Tracked, Status, and Actions (⋮ menu).
- Tap Refresh to reload. Toast: Data Refreshed.
- Use pagination at the bottom to change page or rows per page.
- Tap a row to open View Item, or use the ⋮ menu for more actions.
Filters
| Filter | What it does |
|---|---|
| Item Name | Search by name. Tap X to clear. |
| Barcode | Search or scan a barcode |
| Item Type | All Types, Finished Product, Ingredient, or Packaging Item |
| Category | All Categories or one category |
| Status | All Status, Active, or Inactive |
Toolbar buttons
| Button | What it does |
|---|---|
| Refresh | Reload the list |
| Import | Open Import Products CSV dialog |
| Clone Location | Copy all products from one outlet to another |
| Add Item | Open the create item dialog |
Row actions (⋮ menu)
| Action | What it does |
|---|---|
| View Details | Read-only item view |
| Edit Item | Open edit dialog |
| Duplicate Item | Quick duplicate |
| Delete Item | Remove item (confirm dialog) |
Bulk actions (when rows are selected)
| Button | What it does |
|---|---|
| Set Active | Activate all selected items |
| Set Inactive | Deactivate all selected items |
| Bulk Edit | Edit shared fields for selection |
| Clone | Duplicate all selected items |
| Delete | Delete all selected items |
Find inactive items
Set Status to All Status or Inactive to see retired products.
Common mistakes / FAQs
- I see “No items found matching your filters”. Clear filters or widen Status and Item Type.
- I do not see Add Item, Import, or Edit. Ask your administrator for CREATE or UPDATE permission on Item Library / ITEM.
Add an item
What it does
Creates a new menu item using the tabbed item dialog.
Step-by-step
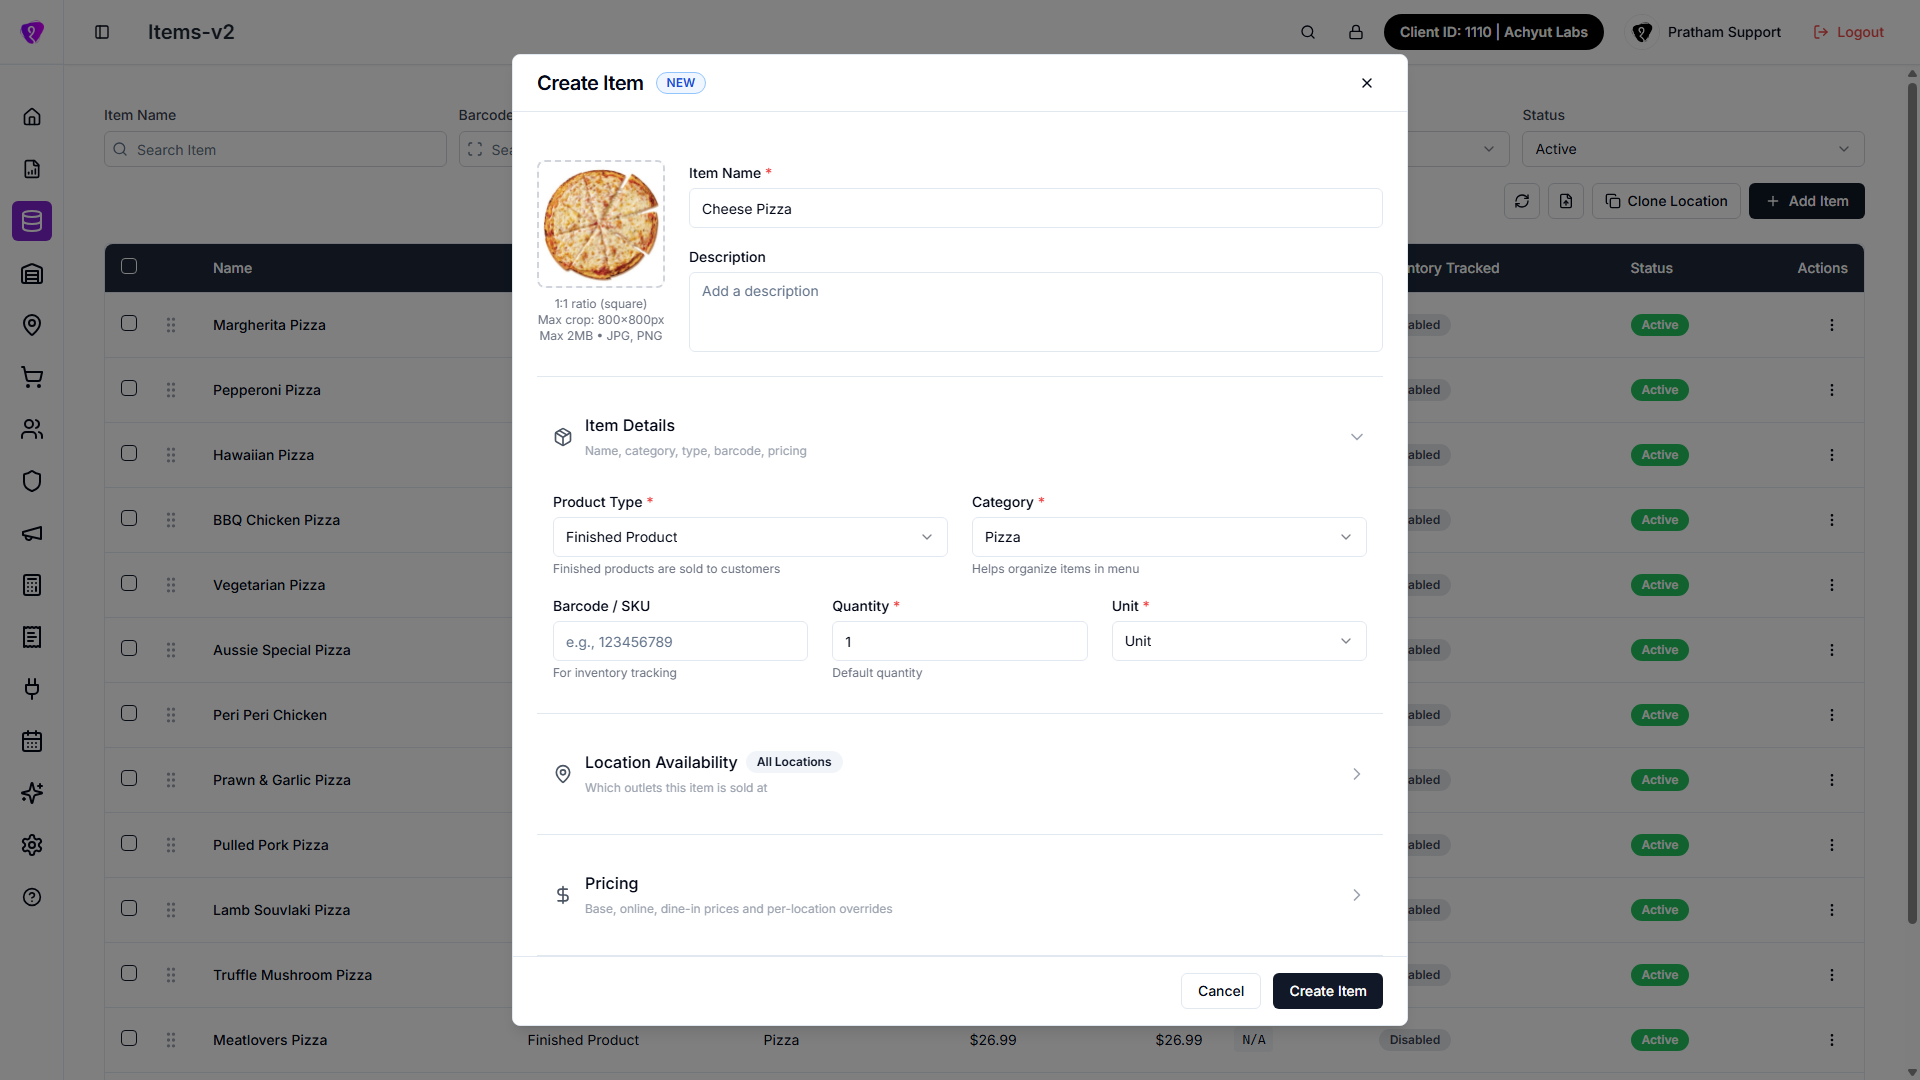
- Tap Add Item.
- In the Create Item dialog, upload an image (optional), enter Item Name, and add a Description if needed.
- Open the Basics tab — set Product Type, Category, Pack Size, Unit, and Location Availability (finished products).
- Set Price on Basics if you are not using variants.
- Open Pricing & Options to add variants, attributes, or modifier groups.
- Open Inventory and Advanced for stock, tax, discounts, loyalty, and dietary tags as needed.
- Tap Create Item.
- When successful, you see Item created successfully and the dialog closes.
Dialog tabs
| Tab | What it covers |
|---|---|
| Basics | Item details, location availability, base pricing (hidden when variants exist) |
| Pricing & Options | Variants or attributes, modifier groups |
| Inventory | Stock tracking, costs, reorder levels |
| Advanced | Discounts, tax, loyalty, dietary tags, location settings, active status |
Minimum fields (finished product)
| Field | Required? | Notes |
|---|---|---|
| Item Name | Yes | |
| Category | Yes | Select a real category |
| Pack Size | Yes | Must be greater than 0 |
| Unit | Yes | |
| Price | Yes* | On Basics when not using variants |
| Locations | Yes* | Pick outlets under Location Availability |
| Discount type | Yes* | Required when any discount amount is greater than 0 |
Common mistakes / FAQs
- “Item name is required”. Enter a name before you save.
- “Please select a discount type when applying discounts”. Pick Discount Type when any discount field is filled.
- “Category is required for finished products”. Select a category on Basics.
Edit an item
What it does
Updates an existing item across all tabs.
Step-by-step
- Open the ⋮ menu and tap Edit Item, or use the edit action on the row.
- In the Edit Item dialog, change fields on any tab.
- Tap Save Changes.
- When successful, you see Item updated successfully and the dialog closes.
View an item
What it does
Opens the item dialog in read-only mode.
Step-by-step
- Tap View Details from the ⋮ menu, or tap the row.
- The dialog title shows View Item. All fields are disabled.
- Browse each tab without saving.
- Tap Cancel to close.
Product variants (sizes and options)
What it does
Lets one menu item sell as separate versions (for example Small, Medium, Large), each with its own price.
Also available as its own screen
The same variants can be managed from the standalone Variants screen under Master Data Management — useful when you want to jump straight to a product's variants without opening the full item dialog.
Step-by-step
- Open Add Item or Edit Item on a Finished Product.
- Fill Basics first — Item Name, Category, Unit, and Location Availability.
- Tap the Pricing & Options tab.
- Expand Pricing Options.
- Tap Use Variants (not Use Attributes).
- Tap Quick Fill (S/M/L) for starter rows, or tap Add Variant for each size.
- Enter Variant Name and Price for each row. Tap the star to set the default variant.
- Tap Save Changes on the item dialog — variants save with the product.
Variants table columns
| Column / control | Purpose |
|---|---|
| Drag handle | Reorder variants |
| Chevron (›) | Expand barcode, inventory, location prices, and Kitchen Tags (KOT) |
| Star | Default variant pre-selected on POS |
| Variant Name | Label shown to staff and customers |
| Unit | Measurement unit for this variant |
| Price | Standard / in-store price |
| Online | Online ordering price |
| Dine-in | Dine-in channel price |
Kitchen Tags (KOT)
Inside the expanded variant row, tick which Kitchen Tags send this variant to the right kitchen printer/station. Type a name under Add new KOT tag... and tap Add to create a new tag on the spot — it's selected automatically.
Variants hide base pricing
When variants exist, the Pricing section on Basics is hidden — set prices on each variant row instead.
Variants vs Attributes
An item uses one pricing style. Variants = fixed sizes with own prices. Attributes = combinations with price adjustments. Switching between them deletes the other setup after you confirm.
Common mistakes / FAQs
- I do not see Pricing Options. Variants are only for Finished Product items.
- Prices on Basics disappeared. That is normal when variants are active — edit prices on variant rows.
Attributes (add-ons that adjust the price)
What it does
The alternative to Variants — customer-selectable options (like "Extra Cheese +$2" or "Large Size +$3") that add to or subtract from the base price, instead of separate fixed-price versions.
Step-by-step
- On Pricing & Options, tap Use Attributes.
- Tap Select Existing Attribute to reuse one from your attributes catalog, or Create New Attribute to build one on the spot.
- For a new attribute, enter Attribute Name, add rows under Options (option name + price adjustment), tick Default on one, then tap Save Attribute.
- Expand the attribute's Selection rules — tick Required if the customer must pick at least one, and set Min / Max for how many they can choose.
- Under Options, drag rows to reorder, adjust each Price change, and star one as Default.
- Optionally set up Combination Pricing for an extra charge when two specific options are picked together.
Existing attributes are shared and read-only
An attribute added via Select Existing Attribute is reused across every product that has it — its name, options, and prices can't be edited from this item (badge: Shared · read-only). Use Create New Attribute if you need different options or prices just for this item.
Selection rules
| Control | What it does |
|---|---|
| Required | Customer must pick at least one option |
| Min / Max | How many options the customer can choose |
Options table
| Column | What it does |
|---|---|
| Drag handle | Reorder options |
| Default (star) | Pre-selected option — only one per attribute |
| Option name | Label shown to the customer |
| Price change | Added to (or subtracted from) the base price; shows the resulting total price live |
| Trash | Remove the option |
Positive amounts (+$2) increase the price; negative amounts (-$1) decrease it.
Combination Pricing (optional, needs 2+ attributes)
Add an extra charge for one specific pairing of options — e.g. "Large" + "Stuffed Crust" costs more than either option alone. Pick a primary attribute and value, a second attribute and value, then an extra charge. Once you add one rule, every other rule must use the same primary attribute — tap Clear All to start over. A duplicate pairing shows This rule already exists. Please select different attribute combinations.
Common mistakes / FAQs
Can I edit an existing (shared) attribute's options or prices from here?
No — reused attributes are read-only on this item to keep them consistent everywhere they're used. Edit the attribute itself from wherever attributes are managed, or use Create New Attribute for a one-off version.
Modifier groups on an item
What it does
Attaches add-on categories (like "Sauces" or "Toppings", set up under Modifiers Categories) to this item, with per-item pricing.
Step-by-step
- On Pricing & Options, scroll to Modifiers and tap Add modifier group.
- Choose a group, then choose which of its options apply to this item, and confirm (✓).
- Set Price and Online price for each option — these apply to every selected location by default.
- Toggle an option's switch off if it shouldn't be offered on this item.
- If this item sells at 2+ locations, tap Override per location to set different prices, or turn an option off, at specific outlets only.
No modifier groups yet?
If nothing appears in the picker, create groups first on Modifiers Categories, then come back here to attach them.
An amber notice appears if a selected option has since been turned off in the modifiers catalog — it won't show to customers until reactivated there. Required/optional behaviour for a group itself is set on Modifiers Categories, not overridden per item.
Inventory tab
What it does
Turns on stock tracking for this item — counted separately at each outlet it's sold at — plus reorder levels and cost.
Step-by-step
- Open the Inventory tab and toggle Track Inventory on.
- Confirm or change Purchase Unit (defaults to the item's primary unit).
- If your purchase unit differs from the primary unit, enter Conversion Factor — how many primary units are in one purchase unit.
- Enter Opening Stock per location.
- Optionally set Standard Cost, Reorder Level, Min Stock Level, and Max Stock Level.
- For ingredients, optionally toggle Perishable Item and enter Shelf Life (days).
Variants track their own stock
If this product uses Variants and any variant has its own inventory tracking on, this tab is replaced with a note pointing you to that variant on Pricing & Options instead.
Validation messages
- Primary unit is required when inventory is enabled. — set the item's Unit on Item Details first.
- Purchase unit is required when inventory is enabled.
- Conversion factor is required when using different unit types.
- Shelf life is required for perishable ingredients.
Turning tracking off discards your settings
If you've already entered stock levels, reorder points, or shelf life, turning Track Inventory off asks you to confirm — it discards what you entered.
Advanced tab
Covers discounts, tax, loyalty, dietary tags, per-location kitchen/online settings, and the item's active status.
Discounts
Hidden for ingredients and packaging items. Set a master Discount Type, then In-Store, Online, and Dine-in Discount amounts. Add a location under the override list to set different discounts (or none) at specific outlets — leave a field blank there to inherit the master value.
Tax
Pick one: Use category tax (default — follows the item's category), No tax (never taxed, even if the category has a tax group), or a specific tax group ticked from the list (only groups available at this item's selected locations are shown). If a chosen group isn't configured at every selected location, a warning names which ones would charge no tax.
Loyalty & Rewards
Requires the Customer loyalty add-on.
| Field | What it does |
|---|---|
| Points Earned on Purchase | How many loyalty points a customer earns buying this item |
| Allow Redemption | Lets customers spend their loyalty points to buy this item |
Dietary Tags
Tick tags from your tenant's tag categories (set up under Item Tags) — for example allergens or dietary labels. Some tags let you add a short free-text value. If no tag categories exist yet, a shortcut takes you to Item Tags to create some.
Location Settings
Only shown once you've picked at least one location. Turn Same settings for all locations off if outlets need to differ; otherwise set once for all of them:
| Control | What it does |
|---|---|
| Kitchen Tags | Which kitchen printer/station this item routes to |
| Available Online | Shows the item on online ordering |
| Available on Uber Eats | Syncs the item to Uber Eats — turn off to mark it out of stock there |
| Restrict Attribute Combinations | Only allow pre-defined attribute combos (shown only when this item uses Attributes) |
Half & Half and Active status
Half & Half participation and pricing aren't set here — a note points you to the dedicated Half n Half page. Active is a simple switch at the bottom — turn it off to hide the item without deleting it.
Clone location products
What it does
Copies all active products from one outlet to another, including pricing and modifiers.
Step-by-step
- Tap Clone Location on the items list.
- In Clone Location Products, select From (source location) and To (target location).
- Tap Clone Products.
- Wait for the success message. Existing products at the target are skipped.
Reorder items
What it does
Changes display order within a category.
Step-by-step
- Drag the grip handle on a row up or down.
- Drop the row in the new position.
- Wait for Item sequence has been updated successfully.
Delete an item
What it does
Permanently removes an item from the list.
Step-by-step
- Open the ⋮ menu and tap Delete Item, or select rows and tap bulk Delete.
- In the confirmation dialog, read the warning.
- Tap Delete to confirm, or Cancel to keep the item.
Deletion removes the item
Prefer Set Inactive if you only want to stop selling an item without deleting its history.
Import items from CSV
What it does
Creates many products at once from a spreadsheet.
Step-by-step
- Tap the Import icon.
- In Import Products, tap Sample CSV to download the template if needed.
- Toggle Show field reference to see column help.
- Upload a
.csvfile. - Tap Import.
- Review per-row results. Tap Import another file to run again.
Download a blank template: Items V2 import template (CSV)
CSV columns
| Column | Header name | Notes |
|---|---|---|
| Item name | name | Required |
| Description | description | Optional |
| Barcode | barcode | Optional |
| Product type | product_type | finished_product, ingredient, or packaging_item |
| Category ID | category_id | Required for finished products |
| Measurement unit ID | measurement_unit_id | Required |
| Quantity | quantity | Optional number |
| Base price | price | Required number |
| Online price | online_price | Optional |
| Dine-in price | dine_in_price | Optional |
| Discount type ID | discount_type_id | Optional |
| Discount | discount | Optional |
| Online discount | online_discount | Optional |
| Dine-in discount | dine_in_discount | Optional |
| Locations | restaurant_ids | Comma-separated outlet IDs, e.g. 101,102 |
| Status | status | 1 = active, 0 = inactive |
Use UTF-8 for special characters
Save the CSV as UTF-8 if names include accents or non-English characters.
Common mistakes / FAQs
- “Only CSV files are supported”. Select a
.csvfile, not Excel.xlsx. - Row errors in import results. Fix the named column on that row and import again.
Permissions
| What you need | Why |
|---|---|
| Item Library / ITEM module permission | See the Items menu and list |
| CREATE on ITEM | Add Item, Import, Clone Location, Duplicate |
| UPDATE on ITEM | Edit Item, Bulk Edit, reorder, Set Active / Inactive |
| DELETE on ITEM | Delete Item, bulk Delete |