
Customers
Use this page to add customers, search your customer database, view profiles and order history, and export records for reporting.
On this page: add customer · view customer · edit customer · export CSV · deactivate customer
Open the screen: Sidebar → User Management → Customers
Registered vs guest customers
This screen is for registered customer accounts. For one-off checkout profiles without a full account, use Guest Customers.
Customer list
What it does
Shows registered customers with contact details, groups, reward points, and status. Filter the list, then view, edit, or export.
Step-by-step
- Open User Management → Customers.
- Wait if the table shows Loading customer data….
- Use Search, Status, or Created At Location to narrow the list. The list updates automatically when you change a filter.
- Read the table - ID, Name, Email, Phone, Groups, Reward Points, Status, and Actions.
- Tap the refresh button (circular arrow) to reload manually.
- Use pagination at the bottom to change page or rows per page.
Filters
| Filter | What it does |
|---|---|
| Search | Find by name, email, or phone. Placeholder: Search by name, email or phone. Tap X in the field to clear |
| Status | All, Active, or Inactive (defaults to Active) |
| Created At Location | All Locations, No Location, or one outlet |
What the table shows
| Column | Meaning |
|---|---|
| ID | Customer record ID |
| Name | Full name |
| Email address | |
| Phone | Country code + phone number, or - if empty |
| Groups | Customer group badges, or - if none |
| Reward Points | Loyalty points balance shown in the list |
| Status | Active or Inactive badge |
| Actions | View (eye) and Edit (pencil) |
Find inactive customers
Change Status from Active to All or Inactive to see deactivated accounts.
Common mistakes / FAQs
- I see “No customers found.” No one matches your filters. Clear Search or set Status to All.
- I do not see Add Customer or Edit. Ask your administrator for CREATE or UPDATE permission on Customers.
Export customers to CSV
What it does
Downloads a CSV file of all customers matching your current filters - not only the current page.
Step-by-step
- Set Search, Status, and Created At Location to match the customers you want.
- Tap the download button (next to refresh).
- Wait if the icon shows a spinner.
- When complete, you see Export complete and the CSV file downloads.
Export needs read access
The download button requires READ permission on Customers.
Common mistakes / FAQs
- Export failed. Try refresh, then export again. If it keeps failing, contact support.
- Wrong customers in the file. Check your filters before exporting - the CSV uses the same filters as the table.
Add a customer
What it does
Creates a new registered customer with contact details and optional address and groups.
Step-by-step
- Tap Add Customer.
- In the Add New Customer dialog, enter Full Name (at least 2 characters).
- Enter Email.
- Select Country Code and enter Phone Number (9–10 digits, numbers only).
- Toggle Active on or off (defaults to on).
- If you need a delivery or billing address, turn Include Address on and fill every address field (all become required).
- Optionally select Customer Groups if your organisation uses groups.
- Tap Save Changes.
- When successful, you see Customer created successfully and the dialog closes.
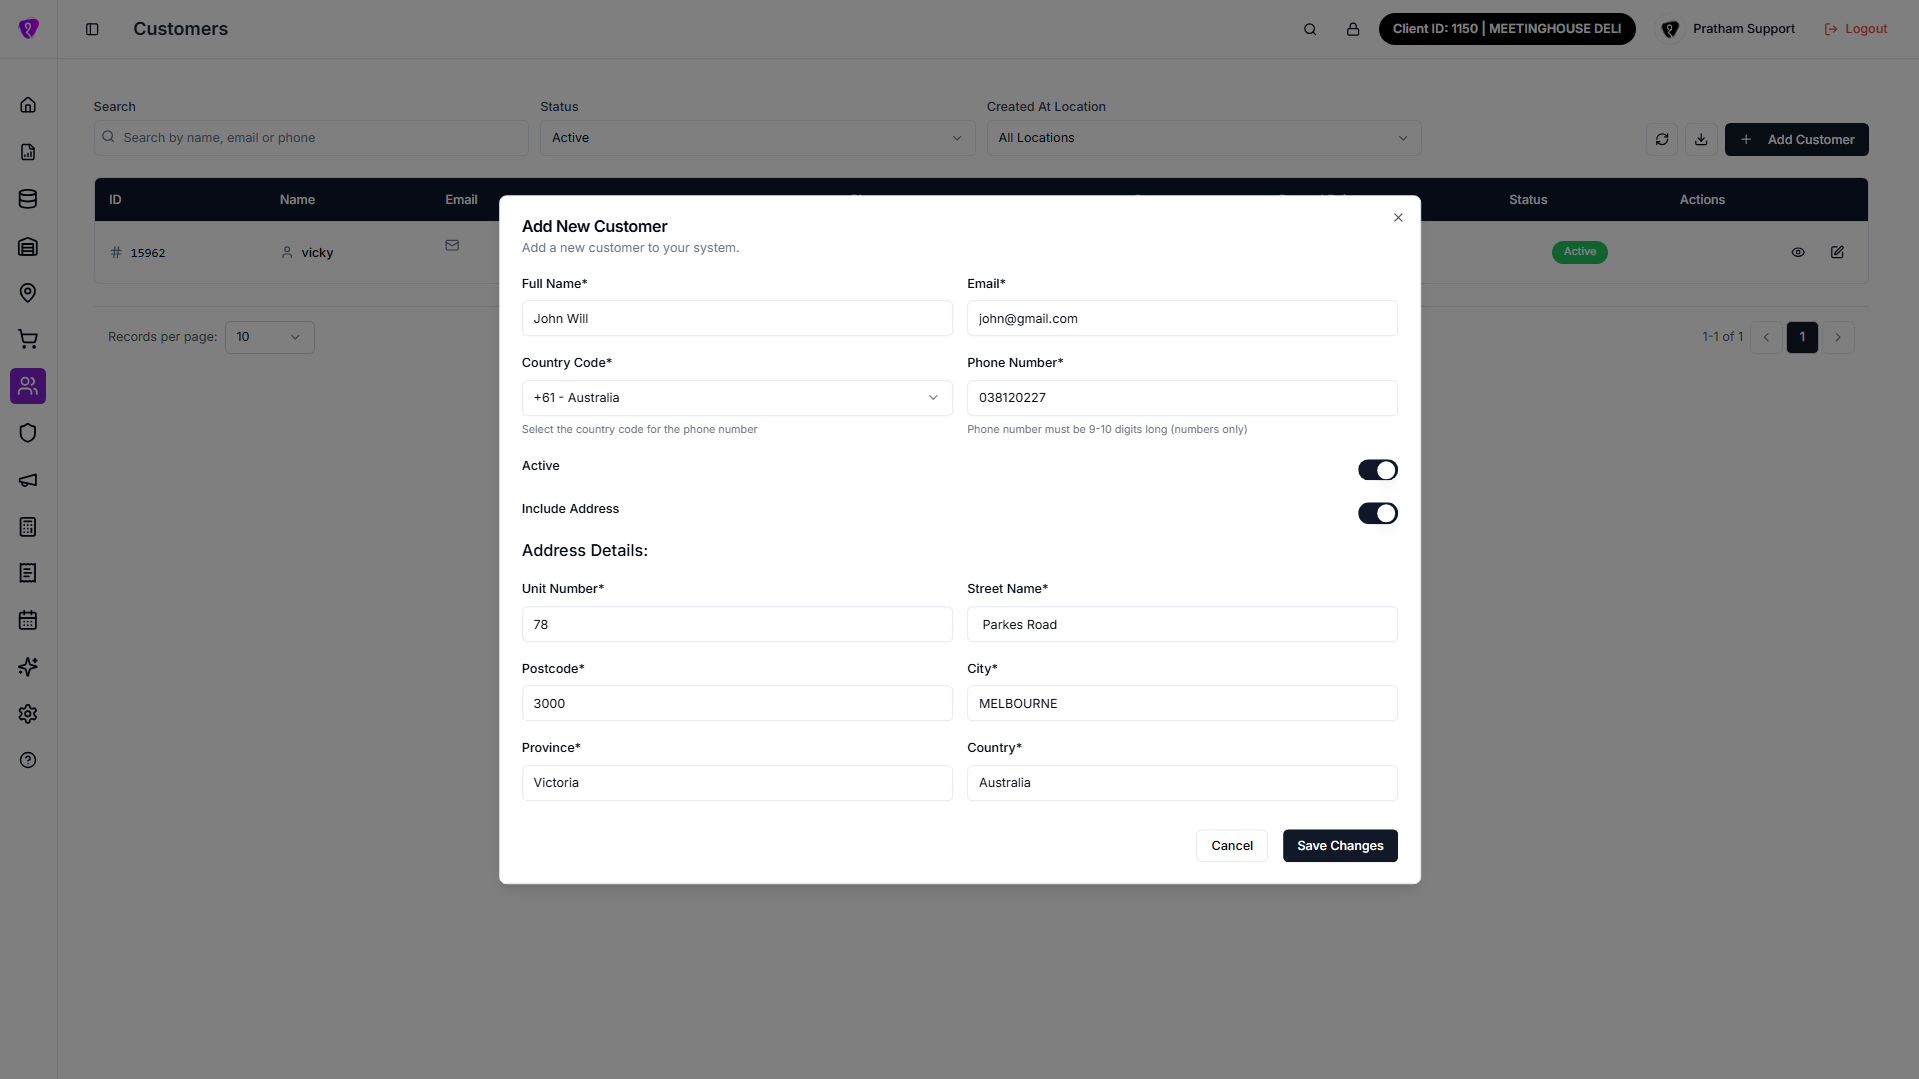
Customer fields
| Field | Required? | What to enter |
|---|---|---|
| Full Name | Yes | At least 2 characters |
| Yes | Valid email address | |
| Country Code | Yes | +91 India, +61 Australia, +1 USA, +1 Canada, or +64 New Zealand |
| Phone Number | Yes | 9–10 digits, numbers only |
| Active | No | Toggle off to create an inactive customer |
| Include Address | No | Turn on only if you need to save an address |
| Customer Groups | No | Multi-select; section appears only if groups exist in your system |
When Include Address is on - all required
| Field | Required? |
|---|---|
| Unit Number | Yes |
| Street Name | Yes |
| Postcode | Yes |
| City | Yes |
| Province | Yes |
| Country | Yes |
Country code on new customers
When adding a customer, Country Code may default from your organisation’s tenant settings.
Common mistakes / FAQs
- “Name must be at least 2 characters”. Enter the customer’s full name.
- “Invalid email address”. Enter a full email with @ and domain.
- “Unit Number is required” (or other address errors). Turn Include Address off if you do not need an address, or fill every address field.
- I do not see Customer Groups. No groups are set up yet - create them under Customer Groups first.
View a customer
What it does
Opens a read-only profile with contact details, groups, address, and - when your plan includes it - order and loyalty analytics.
Step-by-step
- In the table, tap View (eye icon) on the row.
- The View Customer dialog opens. All fields are read-only - there is no Save Changes button.
- Scroll through contact details, Active status, address (if saved), and Customer Groups.
- If available, read Customer Analytics - creation date, location, order counts, order totals, first/last order dates, and loyalty points.
- Close the dialog with X or tap outside the dialog.
Customer Analytics (view only)
Shown when your subscription includes Customer profiles & order history. You may see:
| Card | Meaning |
|---|---|
| Creation Date | When the customer account was created |
| From Created Location | Outlet where the account was created |
| Total Orders Count | Lifetime number of orders |
| Total Orders Amount | Lifetime order value |
| First Order Date | Date of their first order |
| Last Order Date | Date of their most recent order |
| Total / Available / Redeemed Loyalty Points | Shown when customer loyalty is enabled on your plan |
Analytics may not appear
If Customer Analytics is missing or shows a plan message, your tenant may not have the customer profiles & order history or customer loyalty add-on. Contact your administrator.
Common mistakes / FAQs
- “Loading analytics…” stays on screen. Wait a moment. If it does not load, try closing and opening View again.
- Reward points in the table differ from analytics. The table shows the list value; analytics may include more detail when loyalty is enabled.
Edit a customer
What it does
Updates an existing customer’s contact details, address, groups, or active status.
Step-by-step
- In the table, tap Edit (pencil icon) on the row.
- In the Edit Customer dialog, change the fields you need.
- User Name is shown for existing customers (system-assigned login identifier).
- Toggle Include Address on or off. When on, fill or update all address fields.
- Update Customer Groups if needed.
- Tap Save Changes.
- When successful, you see Customer updated successfully and the dialog closes.
Address on edit
When you edit an existing customer, Include Address may already be on if an address was saved previously.
Common mistakes / FAQs
- Failed to update customer. Check required fields and try again.
- Address errors after turning Include Address on. Every address field is required while the switch is on.
Deactivate a customer
What it does
Marks a customer inactive without deleting their record or order history.
Step-by-step
- Tap Edit on the customer row.
- Toggle Active off.
- Tap Save Changes.
Personal data
Only export or share customer data according to your organisation’s privacy policy.
Permissions
| What you need | Why |
|---|---|
| Customers module permission | See the Customers menu and list |
| READ on Customers | Export CSV |
| CREATE on Customers | Tap Add Customer |
| UPDATE on Customers | Tap Edit (pencil) |
View (eye) does not need a separate permission - any user who can open the Customers page can view profiles.