
Transactions
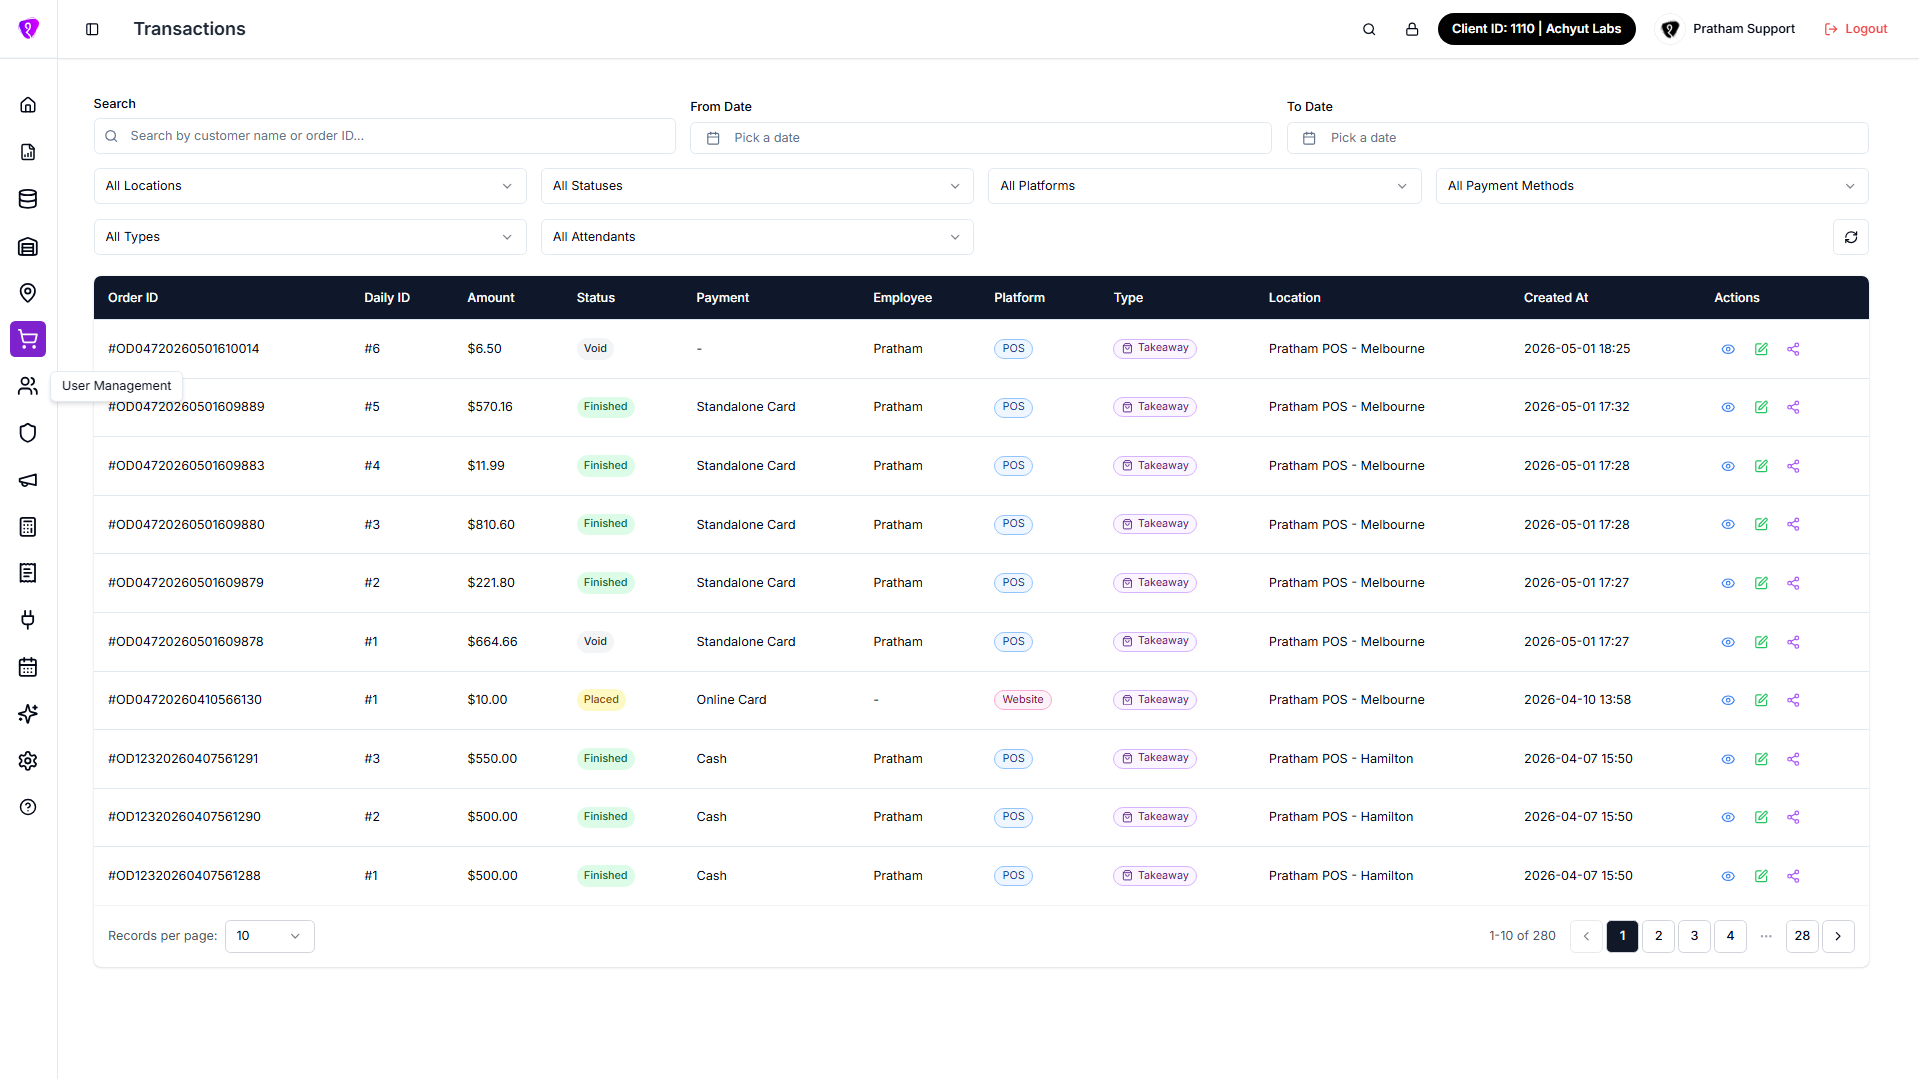
Use this page to browse and search past orders — amounts, payment methods, platforms, locations, and status. Open an order for full details, change status when permitted, or send a receipt by email or SMS. New orders are created in POS or online ordering, not here.
Open the screen: Sidebar → Order Management → Transactions
Lookup screen only
Use Transactions for support queries and order history. To issue a refund, use POS — then review history under Order Refunds.
Transactions list
What it does
Shows a filterable, paginated list of orders with key summary columns and row actions.
Step-by-step
- Open Order Management → Transactions.
- Use filters to narrow the list (see tables below). Search and the amount range wait about a second after you stop typing.
- Tap Advanced filters to reveal Platform, Invoice, Payment Method, Order type, Attendant, and Amount range — a badge shows how many advanced filters are active.
- Read the table — Order ID, Daily ID, Amount, Status, Payment, Employee, Platform, Type, Location, Created At, and Actions.
- Tap the Created At column header to sort newest-first or oldest-first — it's the only sortable column.
- Tap the refresh button to reload orders and filter options, or Clear filters to reset everything.
- Use pagination at the bottom to change page or rows per page.
Filters
Every dropdown filter now lets you tick more than one option — picking several inside one filter widens it (an order matches if it hits any of them), while different filters narrow the list together (an order must match all of them).
| Filter | What it does |
|---|---|
| Search | Matches order ID, customer name, email, phone, company, or payment reference |
| From Date | Start of date range, in your store's timezone — tap Pick a date |
| To Date | End of date range — cannot be before From Date |
| Location | All Locations or tick one or more outlets |
| Status | All Statuses or tick one or more statuses |
Advanced filters (behind the Advanced filters toggle)
| Filter | What it does |
|---|---|
| Platform | All Platforms or tick one or more channels |
| Invoice | Invoice orders or Non-invoice orders — leave both unticked for all |
| Payment Method | All Payment Methods or tick one or more methods |
| Order Type | All Types or tick one or more (dine-in, delivery, etc.) |
| Attendant | All Attendants or tick one or more staff members |
| Amount range | Min / Max order total — leave either box blank for an open end |
Dates match when the order was placed
From Date / To Date filter on Created At, shown in your store's timezone.
Row actions
| Action | What it does |
|---|---|
| View Order (eye) | Open read-only order details |
| Edit Order Status (pencil) | Change order status (requires permission) |
| Send Order Receipt (share) | Email or SMS receipt to customer |
An Invoice badge appears next to the Order ID for orders where a Tax Invoice was sent (from Create Order). A refunded order always shows Refunded in the Status column, even if the underlying status name hasn't caught up yet.
Widen your date range
If an order is missing, clear From Date / To Date or set Location to All Locations.
Common mistakes / FAQs
- I see "No orders found". Widen filters or extend the date range.
- Edit status is disabled. Ask your administrator for UPDATE permission on Transactions.
- "The minimum is above the maximum, so nothing can match." Fix the Amount range so Min is not greater than Max.
View an order
What it does
Opens a scrollable summary of one order — line items, totals, customer, delivery or pickup, and payments.
Step-by-step
- Tap View Order (eye icon) on the row.
- Review the sections below in the details window.
- Tap X in the header to close.
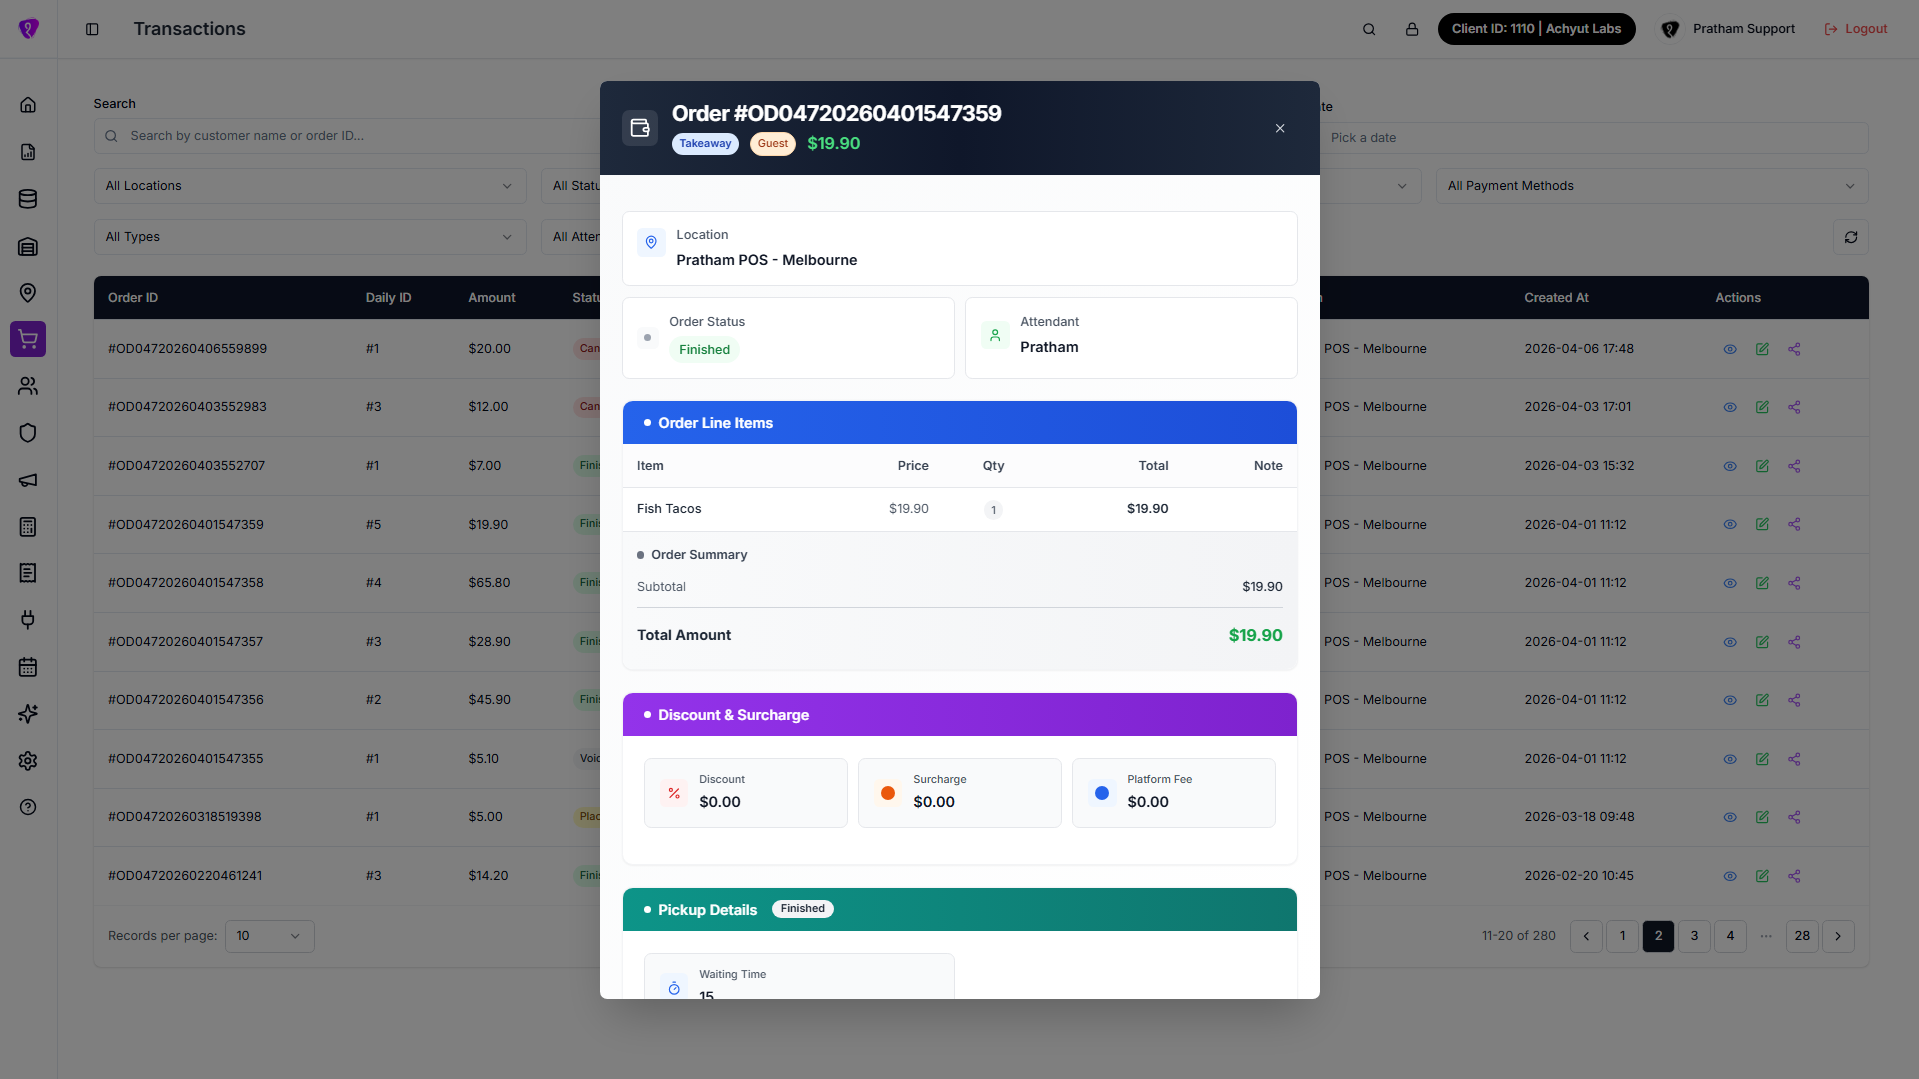
What the details window shows
| Section | What you see |
|---|---|
| Header | Order #, order type, guest or registered customer, total amount |
| Summary | Location, Platform, Order Status, Attendant |
| Void/Cancelled reason | Shown only when the order was voided or cancelled |
| Order Line Items | Items, quantities, prices, modifiers, combos, half-and-half portions, notes |
| Order Summary | Subtotal, discounts, surcharges, fees, tax breakdown, Total Amount |
| Discount & Surcharge | Discount, surcharge, and platform fee summary |
| Pickup / Delivery Details | Times, address, fees, DoorDash tracking when linked |
| Customer Details | Name, Phone, Email, Address — or Guest |
| Payment Details | Payment Method and Amount Paid per method |
| Refund Details | Shown only on a refunded order — total refunded, remaining refundable, and each refund event (tender, time, reason) |
An Invoice badge appears in the header when a Tax Invoice was sent for this order.
Third-party orders
Uber Eats or DoorDash orders without mapped line items show a simplified item list and totals from the partner platform.
Change order status
What it does
Moves one order to a new status in your workflow (for example preparing → ready → completed).
Step-by-step
- Tap Edit Order Status (pencil icon) on the row — not from the view dialog.
- In Update Order Status, read Current Status.
- Select New Status from the dropdown.
- If the order was already fulfilled and you're moving it to a cancelled-type status, choose Write off as loss (stock stays deducted — use this for most refunds) or Return to stock (items are physically back and resellable), and optionally enter a Reason.
- Optionally reassign a payment row to a different Payment Method if it was recorded wrong — amounts stay the same, only the method changes.
- Tap Update Status.
- When successful, you see Order updated successfully.
Status change is on the table row
Open Edit Order Status from the list — not from the order details window.
Refunded orders lock their status
If an order has been refunded, New Status is replaced with a locked notice: This order is refunded — its status is locked so the refund record stays correct.
Common mistakes / FAQs
- "Please select a status to update." Pick a New Status before you save.
- "Cannot change status…" Your workflow may not allow that transition — pick another status or ask a supervisor.
Send order receipt
What it does
Emails or texts an order receipt to the customer or a custom address.
Step-by-step
- Tap Send Order Receipt (share icon) on the row.
- In Send Order Receipt, select Email, SMS, and/or Custom Email.
- For Custom Email, enter an address in the field shown.
- Tap Send Receipt.
- When successful, you see a success message for the channel used.
Common mistakes / FAQs
- “Please select at least one channel…” Turn on Email or SMS, or enter Custom Email.
- “Please enter a valid email address.” Fix the custom email format.
Permissions
| What you need | Why |
|---|---|
| Transactions module permission | See the Transactions menu and list |
| UPDATE on Transactions | Tap Edit Order Status |
Viewing orders and sending receipts require page access only.