
Item Tags
Use this page to create and manage tag categories and the tags inside them. Tags label menu items for dietary info, allergens, and other customer-facing labels (for example Vegan, Gluten-free, Contains nuts).
Open the screen: Sidebar → Master Data Management → Item Tags
Item Tags vs Tags vs Kitchen Tags
Item Tags (this page) are dietary and menu labels shown on products. Tags under Settings is a separate, simpler screen for general-purpose name-only labels. Kitchen tags (which route items to a kitchen printer/station) are a different feature again, set per location item under Location Items.
Tag categories list
What it does
Shows all tag categories with icon, description, tag count, and type. Add, view, edit, or delete categories from the table.
Step-by-step
- Open Master Data Management → Item Tags.
- Wait if the table shows Loading….
- Read the table — Icon, Category, Description, Tag Count, Type, and Actions.
- Tap Add Category to create a new category.
What the table shows
| Column | Meaning |
|---|---|
| Icon | Emoji icon for the category, or - if none |
| Category | Category name |
| Description | Short description or - |
| Tag Count | Number of tags in the category (for example 3 tags) |
| Type | Custom (your outlet) or System (built-in, read-only) |
| Actions | View (eye), Edit (pencil), Delete (trash) |
System categories are view-only
System rows cannot be edited or deleted. Tap View to see their tags.
Common mistakes / FAQs
- I see “No categories found. Create your first category!”. Tap Add Category to create your first one.
- Edit and Delete are greyed out. That row is a System category — only Custom categories can be changed.
Add a tag category
What it does
Creates a new tag category and optional tags in one step.
Step-by-step
- Tap Add Category.
- In the Create Category dialog, enter Name.
- Enter Slug (auto-fills from the name — you can edit it).
- Optionally enter Description, pick an Icon (Emoji), and set Color.
- To add tags now, tap Add Tag in the Tags section.
- For each tag, enter Name and Slug; optionally set Shortcode (3char), Description, Icon, and Color.
- Tap Create Category & Tags.
- When successful, you see a success message and the dialog closes.
Category fields
| Field | Required? | What to enter |
|---|---|---|
| Name | Yes | Category title (for example “Dietary Preferences”) |
| Slug | Yes | URL-safe ID (for example dietary) |
| Description | No | Brief explanation of the category |
| Icon (Emoji) | No | Pick an emoji for the category |
| Color | No | Hex colour such as #4CAF50 or #FFF |
Tag fields (inside the category)
| Field | Required? | What to enter |
|---|---|---|
| Name | Yes | Tag label (for example “Vegan”) |
| Slug | Yes | URL-safe ID (for example vegan) |
| Shortcode (3char) | No | Up to 3 characters (for example VEG) |
| Description | No | Optional note about the tag |
| Icon | No | Emoji for the tag |
| Color | No | Hex colour such as #4CAF50 |
Slug and shortcode fill automatically
When you type a Name, the Slug and Shortcode often fill in for you. Check them before you save.
Common mistakes / FAQs
- "Name and slug are required". Fill both fields on the category.
- "Invalid Color Code". Use a valid hex value such as #4CAF50 or #FFF.
- "All tags must have name and slug". Complete every new tag row before you save. Editing an existing category shows a slightly different message — "All existing tags must have name and slug" — for incomplete rows under Existing Tags.
View a tag category
What it does
Opens a read-only view of a category and all its tags.
Step-by-step
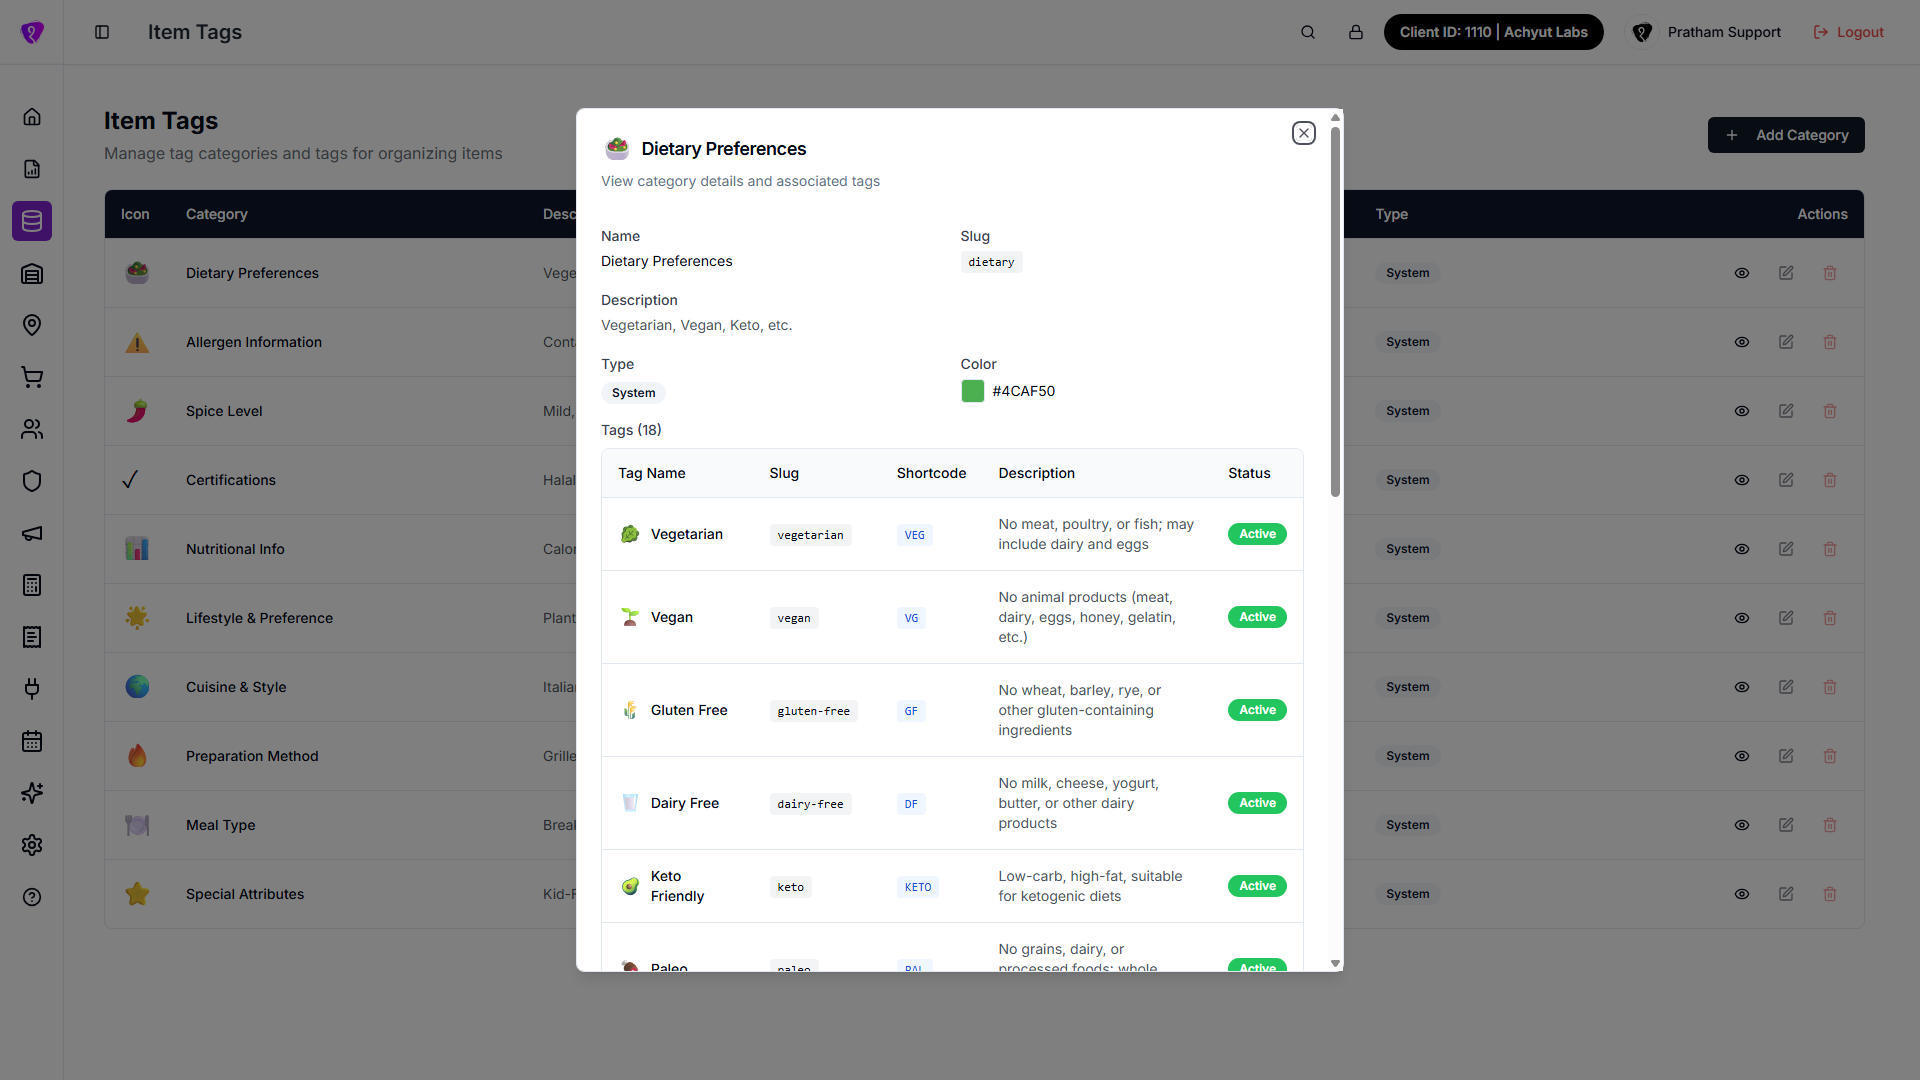
- In the table, tap View (eye icon) on the row.
- Review Name, Slug, Description, Type, Color, and the tags list.
- Tap Close or dismiss the dialog.
Edit a tag category
What it does
Updates a Custom category and manages its existing and new tags.
Step-by-step
- In the table, tap Edit (pencil icon) on a Custom row.
- In the Edit Category dialog, change category fields as needed.
- Under Existing Tags, edit tag fields or tap the trash icon to remove a tag.
- Under Add New Tags, tap Add Tag to create more tags.
- Tap Update Category.
- When successful, you see a success message and the dialog closes.
Deleting a tag is immediate
Tapping trash on an existing tag removes it right away — there is no undo step.
Common mistakes / FAQs
- Edit is disabled on a row. That category is System — only Custom categories can be edited.
Delete a tag category
What it does
Permanently removes a Custom category and its tags.
Step-by-step
- In the table, tap Delete (trash icon) on a Custom row.
- Confirm Delete Category: Are you sure you want to delete this category? This action cannot be undone.
- Tap Delete to confirm, or Cancel to keep the category.
Deletion cannot be undone
The confirmation only warns that the action can't be undone — it doesn't spell out the consequences. Deleting a category also removes all tags inside it, so items that used those tags may lose their labels.
Attach tags to items
What it does
Links tags from this page to individual menu items so customers see dietary and allergen labels.
Step-by-step
- Open Items (or Item Library) and tap Add Item or Edit on a row.
- In the item dialog, expand Dietary Tags (Items V2) or Product Tags (Item Library).
- Tick the tags you want under each category.
- If a tag asks for a value, enter it and tap Save.
- Tap Save Changes or Create Item on the item dialog.
Create tags here first
If no categories appear in the item form, create categories and tags on this page first. Use the Create Tag Categories link in the item form if shown.
Permissions
| What you need | Why |
|---|---|
| Item Tags module permission | See the Item Tags menu and list |
| CREATE on Item Tags | Tap Add Category or Add Tag |
| UPDATE on Item Tags | Tap Edit or Update Category |
| DELETE on Item Tags | Tap Delete on a category or tag |