
Categories
Use this page to add and manage product categories — the menu sections customers see (for example “Mains” or “Drinks”), plus ingredient and packaging groups used behind the scenes. Set names, types, images, display order, and active status.
Open the screen: Sidebar → Master Data Management → Categories
Categories come before items
Set up categories here before you add menu items under Items or Item Library. Items are assigned to a category when you create or edit them.
Categories list
What it does
Shows all categories with ID, name, type, status, and display order. Filter the list, reorder rows, then add, view, or edit categories.
Step-by-step
- Open Master Data Management → Categories.
- Wait if the table shows a loading spinner.
- Use filters to narrow the list (see table below). The list updates when you change a filter.
- Read the table — Id, drag handle, Category, Type, Status, Seq No, and Actions.
- Tap the refresh button (circular arrow) to reload manually.
- Use pagination at the bottom to change page or rows per page.
Filters
| Filter | What it does |
|---|---|
| Category Name | Search by category name |
| Sequence No | Filter by display order number |
| Type | Show All Types, Product, Ingredient, or Packaging |
| Status | Show All, Active, or Inactive |
What the table shows
| Column | Meaning |
|---|---|
| Id | Category record ID |
| Drag handle | Grip icon — drag a row to change display order (see Reorder categories) |
| Category | Category name |
| Type | Product, Ingredient, or Packaging |
| Status | Active (green) or Inactive (red) badge |
| Seq No | Display order — lower numbers appear first on POS and online menus |
| Actions | View (eye) and Edit (pencil) |
Find inactive categories
Set Status to All or Inactive to see categories you turned off.
Common mistakes / FAQs
- I see “No categories found matching your filters”. No row matches your filters. Clear the search fields or set Status to All.
- I do not see Add Category, Import, or Edit. Ask your administrator for CREATE or UPDATE permission on Categories.
Add a category
What it does
Creates a new category with a name, type, optional image, and display settings.
Step-by-step
- Tap Add Category.
- In the Add Category side panel, enter Category Name.
- Select Category Type — Product, Ingredient, or Packaging.
- Toggle Status on for Active or off for Inactive (defaults to Active).
- Optionally toggle Minimum Age on and enter an age if this group is age-restricted.
- Optionally upload a Category Image (see Category image below).
- Tap Create Category.
- When successful, you see a success message and the panel closes. The new row appears in the table.
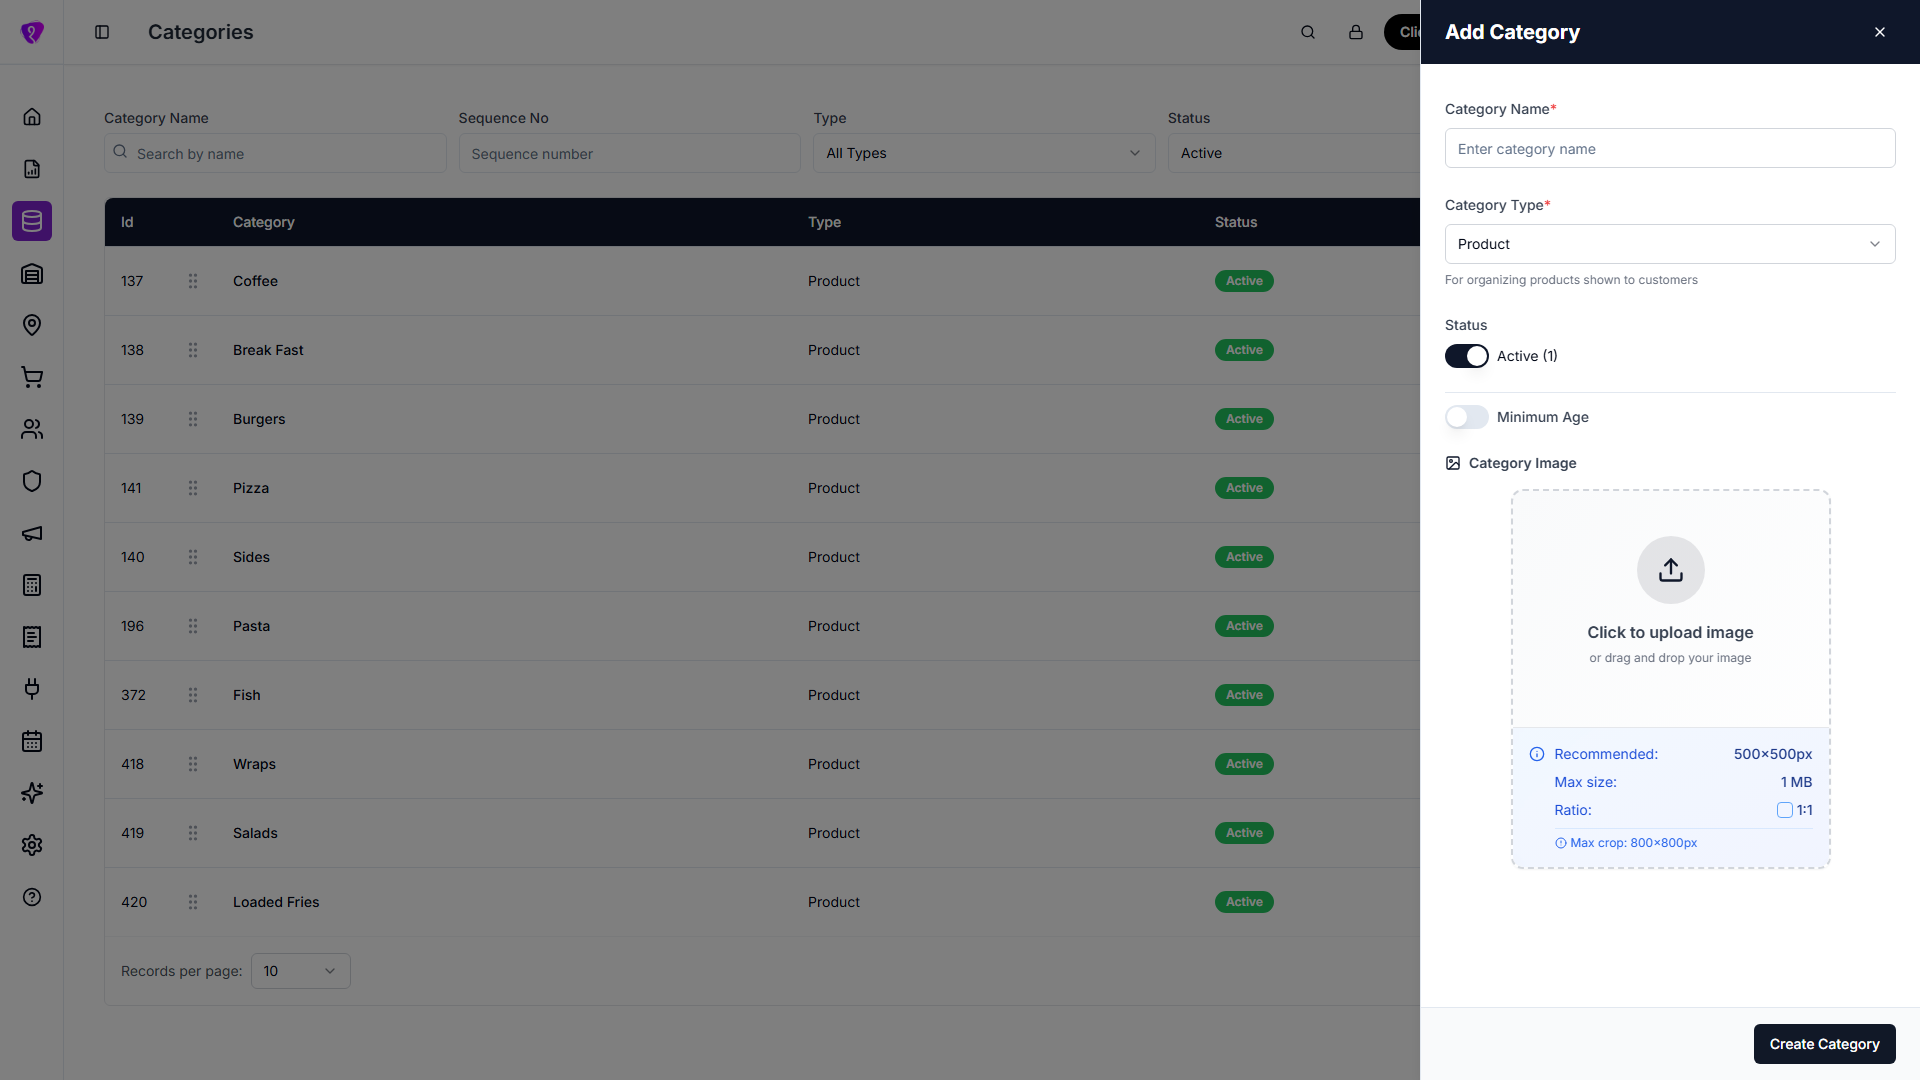
Category fields
| Field | Required? | What to enter |
|---|---|---|
| Category Name | Yes | Name shown in admin and on menus (for example “Beverages”) |
| Category Type | Yes | Product — customer-facing menu sections; Ingredient — raw materials; Packaging — boxes, bags, containers |
| Status | No | Toggle on for Active, off for Inactive |
| Minimum Age | No | Toggle on only for age-restricted groups; enter 0–150 when the toggle is on |
| Category Image | No | Square image for POS and online menus — see Category image |
Pick the right type
Use Product for menu sections customers browse. Use Ingredient or Packaging only for back-of-house stock grouping — they do not replace product categories on the customer menu.
Common mistakes / FAQs
- “Category name is required”. Enter a name before you tap Create Category.
- “Please enter a minimum age when minimum age is enabled.” Turn Minimum Age off, or enter a number.
- “Minimum age must be a number between 0 and 150.” Enter a whole number in that range.
Category image
What it does
Adds or changes the picture shown for a category on POS and online ordering. Images are cropped to a square before upload.
Step-by-step
- In the Add Category or Edit Category panel, scroll to Category Image.
- Tap the upload area, or drag and drop an image file onto it.
- In the crop dialog, adjust the crop box, zoom, or rotation as needed.
- Tap Apply (or the confirm control) to accept the cropped image.
- Review the preview and image details (file name, size, dimensions).
- Tap Create Category or Update Category to save the category.
When editing an existing image
- Hover over the image preview.
- Tap Change Image to pick a new file and crop it again.
- Or tap Delete, confirm in the dialog, then save the category if you changed other fields.
Image rules
| Rule | Value |
|---|---|
| Recommended size | 500×500 px |
| Aspect ratio | 1:1 (square) |
| Maximum file size | 1 MB |
| Maximum crop size | 800×800 px |
| File types | Image files only (JPG, PNG, and similar) |
Prepare images before upload
Use a square image near 500×500 px and under 1 MB. You spend less time cropping and avoid upload errors.
Common mistakes / FAQs
- “Image too large”. Choose a file under 1 MB, or resize it before upload.
- “Invalid file type”. Select an image file, not a PDF or document.
- “Updating Image…” stays on screen. Wait for the upload to finish before you close the panel.
View a category
What it does
Opens a read-only view of a category’s details without changing anything.
Step-by-step
- In the table, tap View (eye icon) on the row.
- The panel title shows View Category. Fields are not editable.
- Review Category Name, Category Type, Status, Minimum Age, and Category Image.
- Tap Close at the bottom, or tap X in the header.
No separate view page
There is no full-screen view. To read details without saving, open View and close the panel instead of Edit.
Edit a category
What it does
Updates an existing category’s name, type, status, minimum age, or image.
Step-by-step
- In the table, tap Edit (pencil icon) on the row.
- The panel title shows Edit Category. ID is shown read-only.
- Change the fields you need.
- Update the image if required (see Category image).
- Tap Update Category.
- When successful, you see a success message and the panel closes.
Common mistakes / FAQs
- Details saved but image update failed. Category text fields may already be saved. Open Edit again and retry the image change.
- Edit is disabled. Ask your administrator for UPDATE permission on Categories.
Reorder categories
What it does
Changes the display order of categories on POS and online menus. Lower Seq No values appear first.
Step-by-step
- In the table, find the row you want to move.
- Drag the grip handle on that row up or down.
- Drop the row in the new position.
- Wait for the success message — the new order saves to the server automatically.
Reorder on one page at a time
Pagination shows one page of categories. Reorder within the current page, or change Records per page to see more rows before you drag.
Common mistakes / FAQs
- “Failed to update category order”. Refresh the list and try again. If it keeps failing, check your network or ask an administrator.
Deactivate a category
What it does
Hides a category from active use without deleting its record or linked items.
Step-by-step
- Tap Edit on the category row.
- Toggle Status off (Inactive).
- Tap Update Category.
Inactive categories stay linked
Turning a category Inactive does not remove items assigned to it. Review linked items under Items or Item Library if you retire a menu section.
Import categories from CSV
What it does
Creates many categories at once from a spreadsheet file.
Step-by-step
- Tap the Upload icon next to Add Category.
- Wait while the import dialog loads module types.
- Drag a CSV file into the upload area, or tap to browse and select one.
- Review the selected file name and size.
- Tap Import Categories.
- When successful, you see a success message. The dialog closes and the list refreshes.
Download a blank template: Categories import template (CSV)
CSV column format
| Column | Accepted header names | Notes |
|---|---|---|
| Category name | category, name, or category_name | If missing, a placeholder like Category 1 is used. |
| Status | status | Active, 1, or numeric 1 → active; anything else → inactive. |
| Image / attachment | attachment | Optional URL or path as your process expects. |
| Sequence number | seq_no or sequence | Integer; defaults to row order (1, 2, 3…). |
module_type is set by the app during import — you do not need a column for it.
Use UTF-8 for special characters
Save the CSV as UTF-8 if category names include accents or non-English characters.
Common mistakes / FAQs
- “Please select a valid CSV file.” Only
.csvfiles are accepted. - Import failed after upload. Read the error toast for server validation details. Fix the CSV and import again.
Permissions
| What you need | Why |
|---|---|
| Categories module permission | See the Categories menu and list |
| CREATE on Categories | Tap Add Category or Import |
| UPDATE on Categories | Tap Edit, change images, reorder rows |