
Product Attributes
Use this page to add and manage product attributes — reusable options or rules (for example size, spice level, or add-on choices) that you later link to individual menu items. Each attribute can have multiple values with prices and display order.
Open the screen: Sidebar → Master Data Management → Product Attributes
Create attributes before linking to items
Set up attributes and their values here first. Then attach them to products under Items, Item Library, or item attribute settings.
Attributes list
What it does
Shows all product attributes with type, selection rules, status, and display order. Filter the list, expand a row to manage values, then add, view, or edit attributes.
Step-by-step
- Open Master Data Management → Product Attributes.
- Wait if the table shows Loading….
- Use filters to narrow the list (see table below). The name search updates shortly after you stop typing.
- Read the table — expand control, drag handle, Id, Name, Display Name, Attribute Type, Is Required, Min, Max, Sequence, Status, and Actions.
- Tap the chevron on a row to expand or collapse its values.
- Tap the refresh button (circular arrow) to reload the list and any expanded values.
- Use pagination at the bottom to change page or rows per page.
Filters
| Filter | What it does |
|---|---|
| Attribute Name | Search by attribute name. Tap X to clear. |
| Status | Show All, Active, or Inactive (defaults to Active) |
What the table shows
| Column | Meaning |
|---|---|
| Expand control | Chevron — tap to show or hide values for that attribute |
| Drag handle | Grip icon — drag a row to change attribute display order |
| Id | Attribute record ID |
| Name | Internal attribute name |
| Display Name | Label shown on POS and online ordering |
| Attribute Type | Text, Number, Single select, or Multiple select |
| Is Required | Required or Not Required badge |
| Min / Max | Minimum and maximum selections allowed per order |
| Sequence | Display order — lower numbers appear first |
| Status | Active (green) or Inactive (red) badge |
| Actions | View (eye) and Edit (pencil) |
Find inactive attributes
Set Status to All or Inactive to see attributes you turned off.
Common mistakes / FAQs
- I see “No attributes found”. No row matches your filters. Clear the search box or set Status to All.
- I do not see Add Attribute or Edit. Ask your administrator for CREATE or UPDATE permission on Product Attributes.
Add an attribute
What it does
Creates a new product attribute with selection rules and display settings.
Step-by-step
- Tap Add Attribute.
- In the Add New Attribute dialog, enter Name.
- Enter Display Name.
- Select Type — Text, Number, Single select, or Multiple select.
- Select Status — Active or Inactive.
- Enter Min Selections and Max Selections.
- Toggle Required on if customers must choose this attribute.
- Tap Create Attribute.
- When successful, you see a success message and the dialog closes. The new row appears in the table.
Attribute fields
| Field | Required? | What to enter |
|---|---|---|
| Name | Yes | Internal name used in admin (for example size) |
| Display Name | Yes | Customer-facing label (for example “Choose your size”) |
| Type | Yes | Text, Number, Single select, or Multiple select |
| Status | Yes | Active or Inactive |
| Min Selections | Yes | Minimum choices — use 0 if optional |
| Max Selections | Yes | Maximum choices — at least 1 |
| Required | No | Toggle on to make this attribute mandatory on linked items |
Match type to how customers choose
Use Single select or Multiple select when the attribute has predefined values (for example Small, Medium, Large). Use Text or Number for free-form input.
Common mistakes / FAQs
- Attribute saved but no choices appear on POS. Add values to the attribute (see Attribute values) and link the attribute to an item.
- Customers can pick too many options. Lower Max Selections to match your menu rules.
Attribute values
What it does
Manages the individual choices under an attribute (for example “Small”, “Medium”, “Large”) with prices, default flag, and display order.
Step-by-step
- In the table, tap the chevron on the attribute row to expand it.
- Review the values sub-table — Value, Base Price, Default, Sequence, Status, and Actions.
- To add a value, tap Add Value.
- In the Add Value dialog, enter Value and Display Value.
- Enter Base Price.
- Toggle Default on if this value should be pre-selected.
- Toggle Active on or off.
- Tap Submit.
- When successful, you see a success message and the value appears in the sub-table.
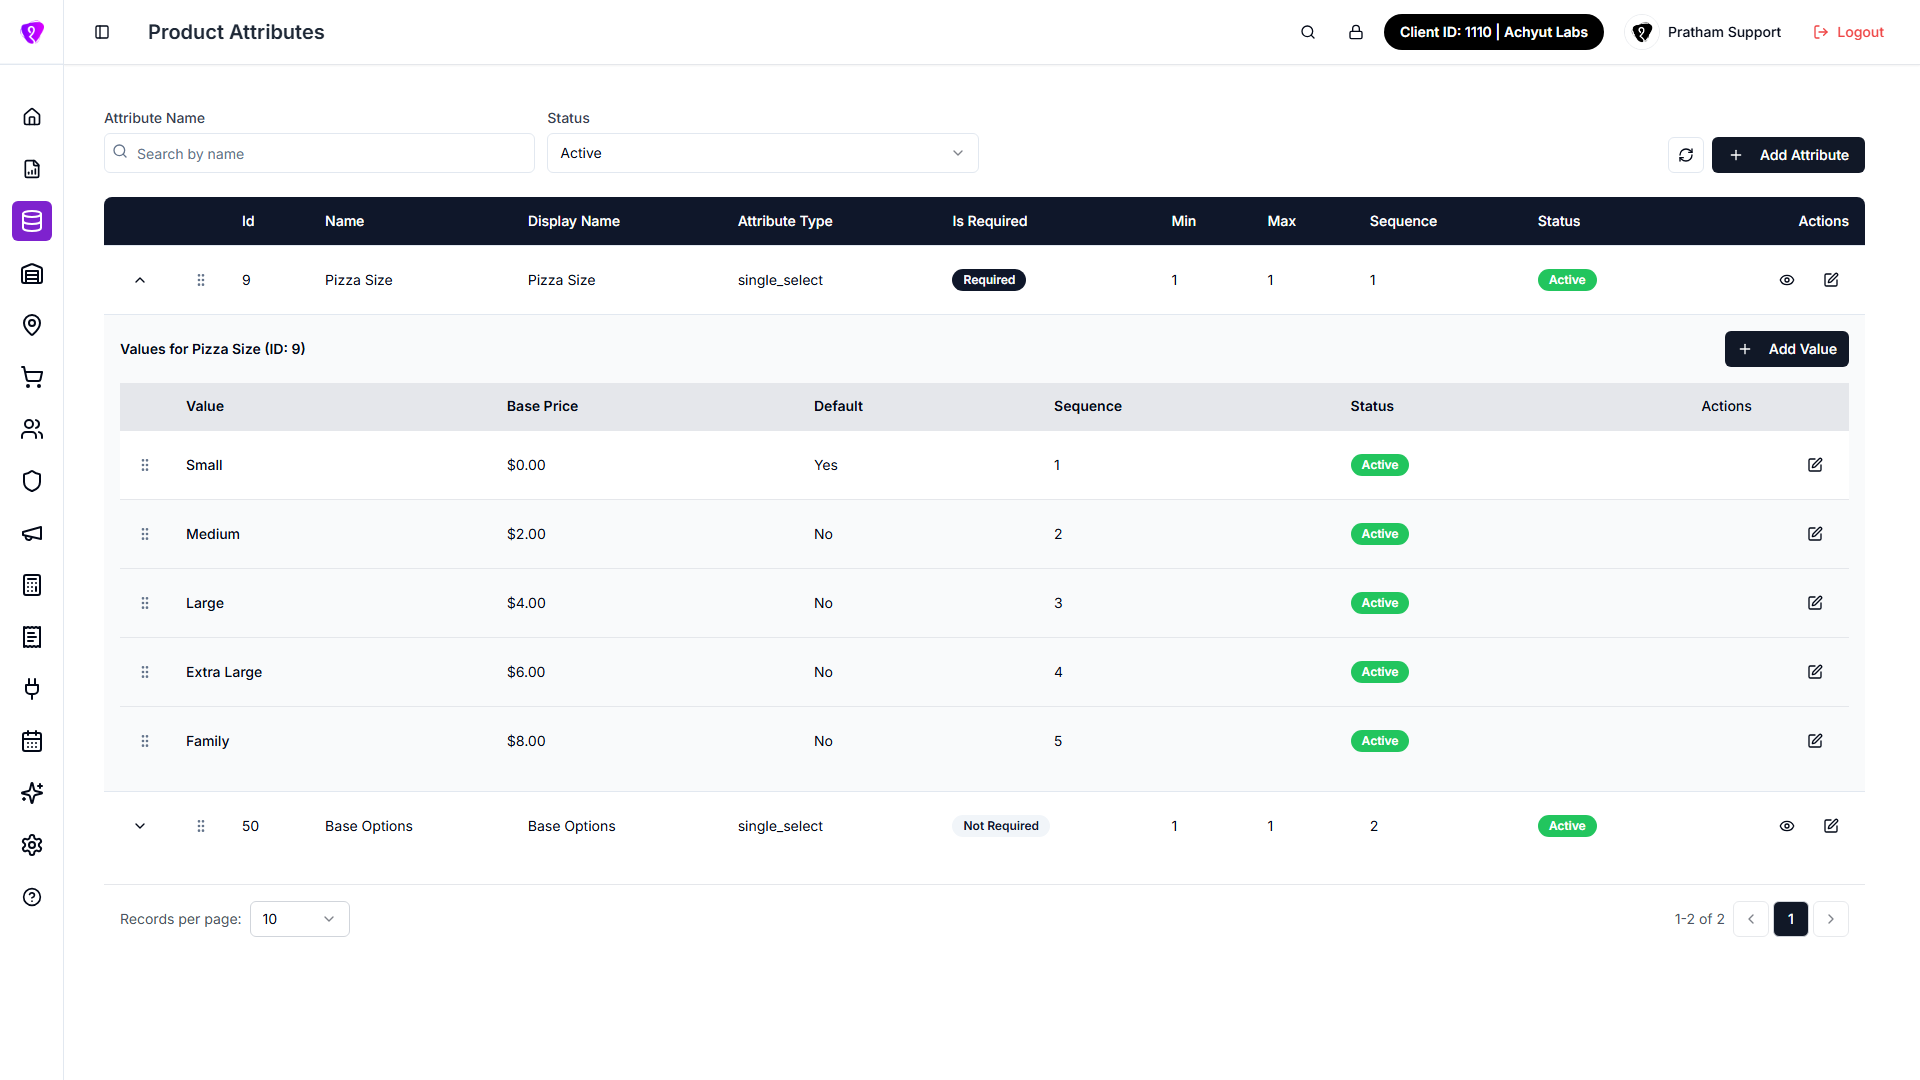
Value fields (add)
| Field | Required? | What to enter |
|---|---|---|
| Value | Yes | Internal value name (for example large) |
| Display Value | Yes | Label shown to customers (for example “Large”) |
| Base Price | Yes | Price for this value — enter 0 if no extra charge |
| Default | No | Toggle on to pre-select this value |
| Active | No | Toggle off to hide this value while keeping the record |
Common mistakes / FAQs
- I see “No values added for this attribute.” Tap Add Value and create at least one choice for select-type attributes.
- Price looks wrong on the item. Base Price here is the attribute value price. Item-level price adjustments are set separately in item attribute settings.
Edit an attribute value
What it does
Updates an existing value’s label, price, default flag, or status.
Step-by-step
- Expand the attribute row.
- In the values sub-table, tap Edit (pencil icon) on the value row.
- In the Edit Value dialog, change the fields you need.
- Tap Save Changes.
- When successful, you see a success message and the dialog closes.
Common mistakes / FAQs
- Edit is disabled. Ask your administrator for UPDATE permission on Product Attributes.
View an attribute
What it does
Opens a read-only view of an attribute’s settings without changing anything.
Step-by-step
- In the table, tap View (eye icon) on the attribute row.
- The dialog title shows View Attribute. Fields are not editable.
- Review Name, Display Name, Type, Status, Min Selections, Max Selections, and Required.
- Tap Close.
No separate view page
There is no full-screen view. To read details without saving, open View and close the dialog instead of Edit.
Edit an attribute
What it does
Updates an existing attribute’s name, type, selection rules, status, or per-location availability.
Step-by-step
- In the table, tap Edit (pencil icon) on the attribute row.
- In the Edit Attribute dialog, change the fields you need.
- Optionally set Location Availability (see below).
- Tap Save Changes.
- When successful, you see a success message and the dialog closes.
Location availability (edit only)
What it does
Turns an attribute on or off for a specific outlet without changing it everywhere.
Step-by-step
- In the Edit Attribute dialog, scroll to Location Availability.
- Select a Location from the dropdown.
- Toggle Attribute Status on to enable the attribute at that location, or off to disable it.
- Wait for the success message — each toggle saves automatically.
Location toggles save immediately
You do not need to tap Save Changes for location on/off switches. They update as soon as you toggle.
Common mistakes / FAQs
- Attribute is active but missing at one store. Open Edit, select that location under Location Availability, and toggle it on.
Reorder attributes and values
What it does
Changes the display order of attributes in the list, or values within an expanded attribute. Lower Sequence numbers appear first.
Reorder attributes
- In the main table, drag the grip handle on an attribute row up or down.
- Drop the row in the new position.
- Wait for the success message — the new order saves automatically.
Reorder values
- Expand the attribute row.
- Drag the grip handle on a value row up or down.
- Drop the row in the new position.
- Wait for the success message.
Reorder on one page at a time
Dragging only reorders within the page you're viewing. Use Previous / Next or a page number to move to another page — Records per page just changes how many rows fit on one page, it doesn't move you between pages.
Common mistakes / FAQs
- "Failed to update attribute order". Refresh the list and try again.
- Reordering a value says "Access Denied". Reordering values needs UPDATE permission. Reordering attributes themselves isn't restricted in the interface the same way.
Deactivate an attribute
What it does
Hides an attribute from active use without deleting its record or linked values.
Step-by-step
- Tap Edit on the attribute row.
- Select Inactive under Status.
- Tap Save Changes.
Inactive attributes stay linked
Turning an attribute Inactive does not remove it from items that already use it. Review linked items under Items or Item Library if you retire an option group.
Permissions
| What you need | Why |
|---|---|
| Product Attributes module permission | See the Product Attributes menu and list |
| CREATE on Product Attributes | Tap Add Attribute or Add Value |
| UPDATE on Product Attributes | Tap Edit, change location toggles, and reorder values. Reordering attributes themselves isn't blocked in the interface without it. |