
Staff
Use this page to add and manage employee accounts - who they are, which role they have, which locations they work at, and how they sign in to POS or admin.
Open the screen: Sidebar → User Management → Staff
Roles control access
A staff member’s role decides what they can open in admin and POS. Set up roles under Security → Roles before assigning them here.
Staff list
What it does
Shows all staff members with photo, contact details, role, location, and status. Filter the list, then add or edit accounts.
Step-by-step
- Open User Management → Staff.
- Wait if the table shows Loading….
- Use filters to narrow the list (see table below). The list updates automatically when you change a filter.
- Read the table - photo, Id, Name, Type (role), Location, Username, Email, Phone No, Status, and Actions.
- Tap the refresh button (circular arrow) to reload manually.
- Use pagination at the bottom to change page or rows per page.
Filters
| Filter | What it does |
|---|---|
| Name | Search by staff name |
| Search by email address | |
| Phone | Search by phone number |
| Location | Show All Locations or one outlet |
| Role | Show All Roles or one role |
| Status | All, Active, or Inactive (defaults to Active) |
What the table shows
| Column | Meaning |
|---|---|
| Photo | Profile picture or initials |
| Id | Staff record ID |
| Name | Full name |
| Type | Role name (for example Manager, Cashier) |
| Location | Assigned outlet(s). Multiple locations show as +N more - hover to see all |
| Username | Login username |
| Email address | |
| Phone No | Country code + phone number |
| Status | Active or Inactive badge |
| Actions | Edit (pencil) |
Find inactive staff
Change Status from Active to All or Inactive to see deactivated accounts.
Common mistakes / FAQs
- I see “No staff members found”. No one matches your filters. Clear filter fields or set Status to All.
- I do not see Add Staff or Edit. Ask your administrator for CREATE or UPDATE permission on Staff.
Add a staff member
What it does
Creates a new employee account with login details and location access.
Step-by-step
- Tap Add Staff.
- In the Add Staff Member dialog, stay on the Staff Details tab.
- Enter Full Name.
- Select Role.
- Enter Email and select Country Code.
- Enter Phone Number (9–10 digits, numbers only).
- Enter Password (required for new staff).
- Optionally enter 4-Digit Passcode, Max Working Hours, and Base Wage (Per Hour).
- Toggle Active on or off (defaults to on).
- Under Location assignment, select one or more Locations / Restaurants - at least one is required.
- Choose how to save:
- Tap Submit to create the account immediately (you can skip the photo).
- Tap Next to open Profile Picture, upload a photo, then tap Complete.
- When successful, you see a success message and the dialog closes.
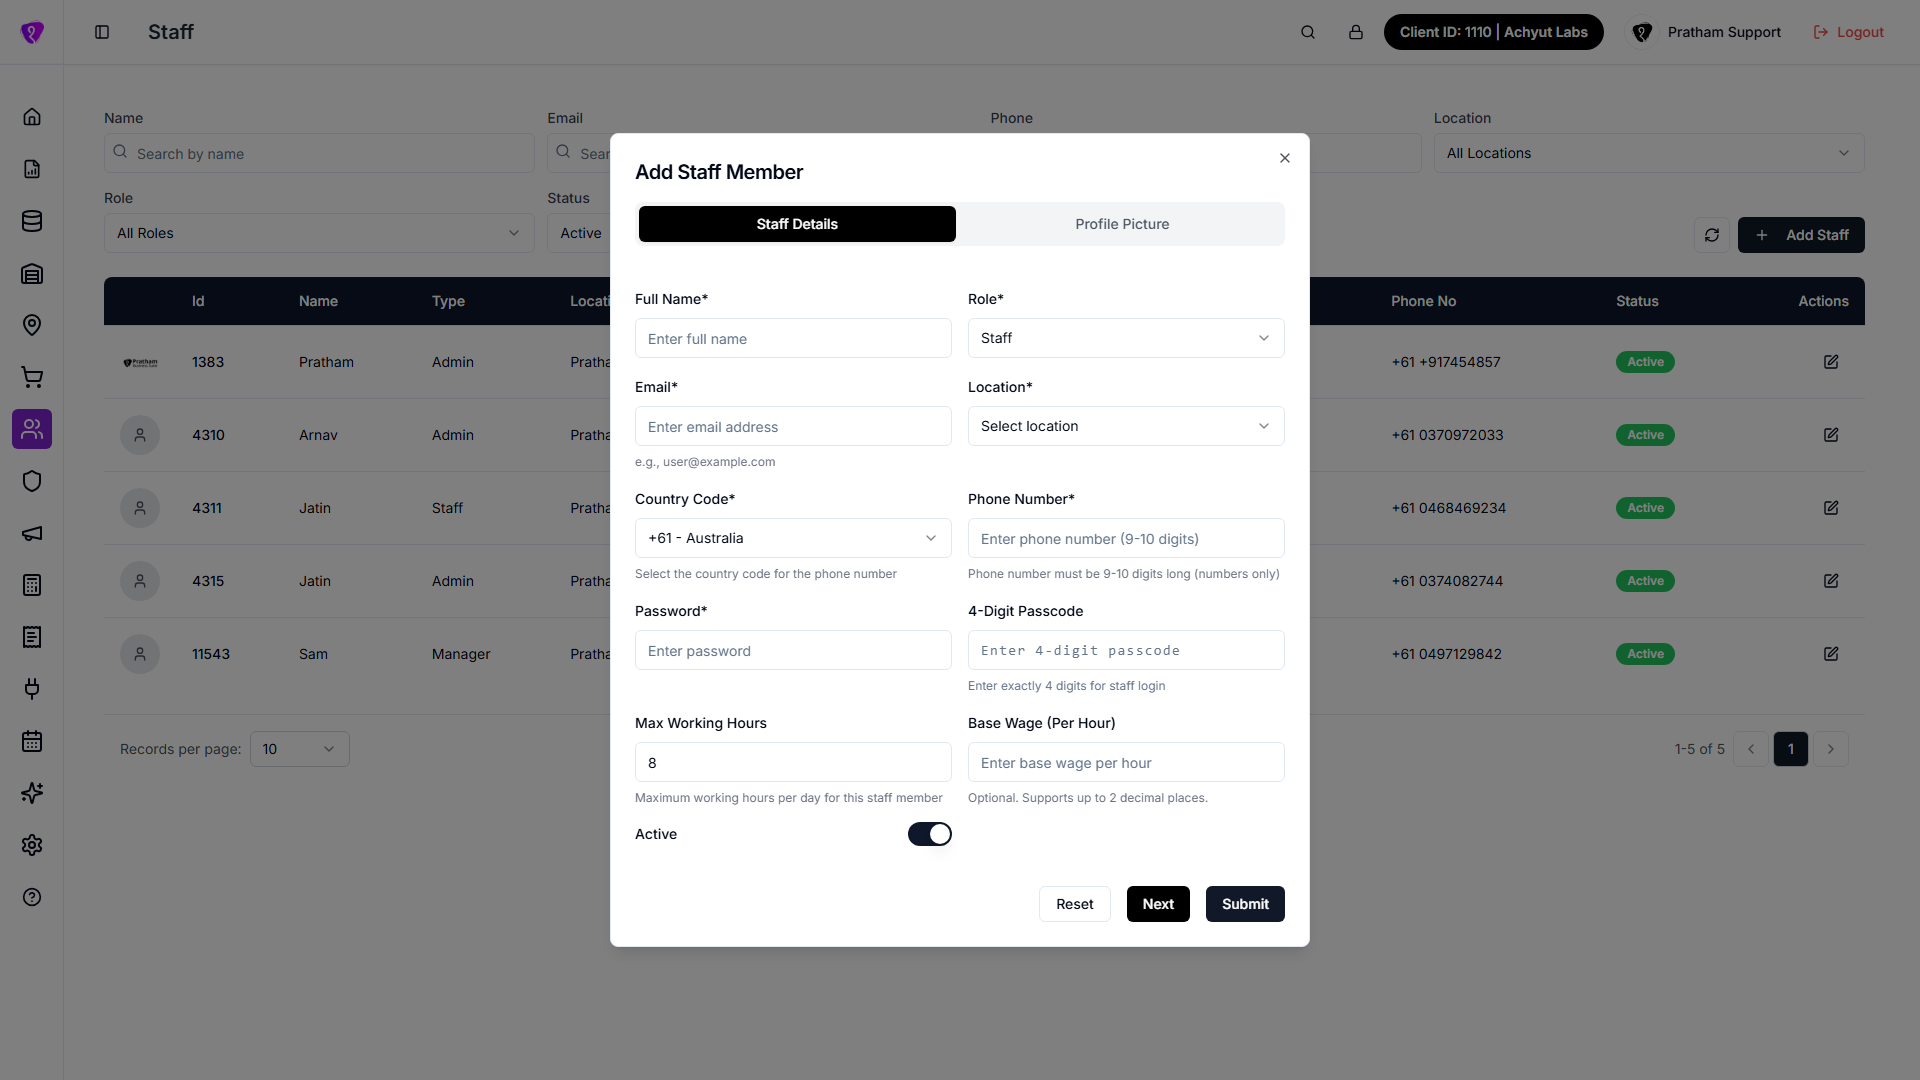
Staff Details fields
| Field | Required? | What to enter |
|---|---|---|
| Full Name | Yes | Employee’s full name |
| Role | Yes | Pick from your organisation’s roles |
| Yes | Valid email address | |
| Country Code | Yes | +91 India, +61 Australia, +1 USA, +1 Canada, or +64 New Zealand |
| Phone Number | Yes | 9–10 digits, numbers only |
| Password | Yes (add only) | Login password for admin/POS |
| 4-Digit Passcode | No | Quick POS login code - exactly 4 digits if used |
| Max Working Hours | No | Hours per day (defaults to 8) |
| Base Wage (Per Hour) | No | Hourly wage, up to 2 decimal places |
| Active | No | Toggle off to create an inactive account |
| Locations / Restaurants | Yes | Select at least one outlet |
Username is created for you
When adding staff, you do not type a username - the system assigns it after the account is created. You can see it later in the table or when you Edit the staff member.
Common mistakes / FAQs
- “Email format is not valid”. Enter a full email with @ and domain (for example
user@example.com). - “Phone number must be 9-10 digits…”. Enter only numbers, 9 or 10 digits long.
- “Passcode must be exactly 4 digits”. Enter four numbers, or leave blank.
- “Please assign at least one location.” Pick at least one outlet under Locations / Restaurants.
Profile picture (add or edit)
What it does
Upload or change the staff member’s profile photo shown in the table and on their account.
Step-by-step
- In the Add Staff Member or Edit Staff Member dialog, tap the Profile Picture tab.
- Upload or change the image using the controls on screen.
- Tap Complete to save the photo (and any unsaved detail changes).
- Tap Back to return to Staff Details without leaving the dialog.
Skip the photo on create
Tap Submit on Staff Details if you do not need a photo right away. Edit the staff member later to add one.
Edit a staff member
What it does
Updates an existing employee’s details, locations, password, or photo.
Step-by-step
- In the table, tap Edit (pencil icon) on the row.
- Wait if you see Loading staff data….
- On Staff Details, change the fields you need. Username is shown but cannot be changed.
- Password - leave blank to keep the current password; enter a new value only to change it.
- 4-Digit Passcode - leave blank to keep the current passcode; enter 4 digits only to change it.
- Update Locations / Restaurants if their outlets changed.
- Tap Submit to save details, or Next → Profile Picture → Complete to also update the photo.
- Tap Reset to undo unsaved changes on the form.
No separate view screen
There is no read-only profile page. To read details without saving, open Edit and tap Cancel or close the dialog instead of Submit.
Common mistakes / FAQs
- “No changes detected”. You saved without changing any fields - that is normal.
- Staff details saved but image upload failed. Details were saved; try uploading the photo again from Profile Picture.
Deactivate a staff member
What it does
Stops someone from signing in without deleting their record.
Step-by-step
- Tap Edit on the staff row.
- Toggle Active off.
- Tap Submit.
Do not share passwords when someone leaves
Deactivate their account instead of giving their login to another person.
Permissions
| What you need | Why |
|---|---|
| Staff module permission | See the Staff menu and list |
| CREATE on Staff | Tap Add Staff |
| UPDATE on Staff | Tap Edit (pencil) |
Role permissions (what menus they can open after login) are set under Security → Roles, not on this page alone.