
Location
Use this page to add and manage outlets — names, addresses, service types, contact details, working hours, and location settings (online ordering, POS, table booking, website, holidays, and charges).
Open the screen: Sidebar → Locations Management → Location
Outlets before items
Create locations here before Location Items, deals, or accurate reports. Most admin screens filter by outlet.
Location list
What it does
Shows every outlet you can manage with filters, pagination, and row actions for view, edit, working hours, and settings.
Step-by-step
- Open Locations Management → Location.
- Wait if the table shows Loading locations….
- Use filters to narrow the list (see table below). The list updates when you change a filter.
- Read the table — ID, Name, Location type, Owner, Receiver email, Service type, Phone, Status, Actions.
- Tap the refresh button (circular arrow) to reload manually.
- Use pagination at the bottom to change page or rows per page.
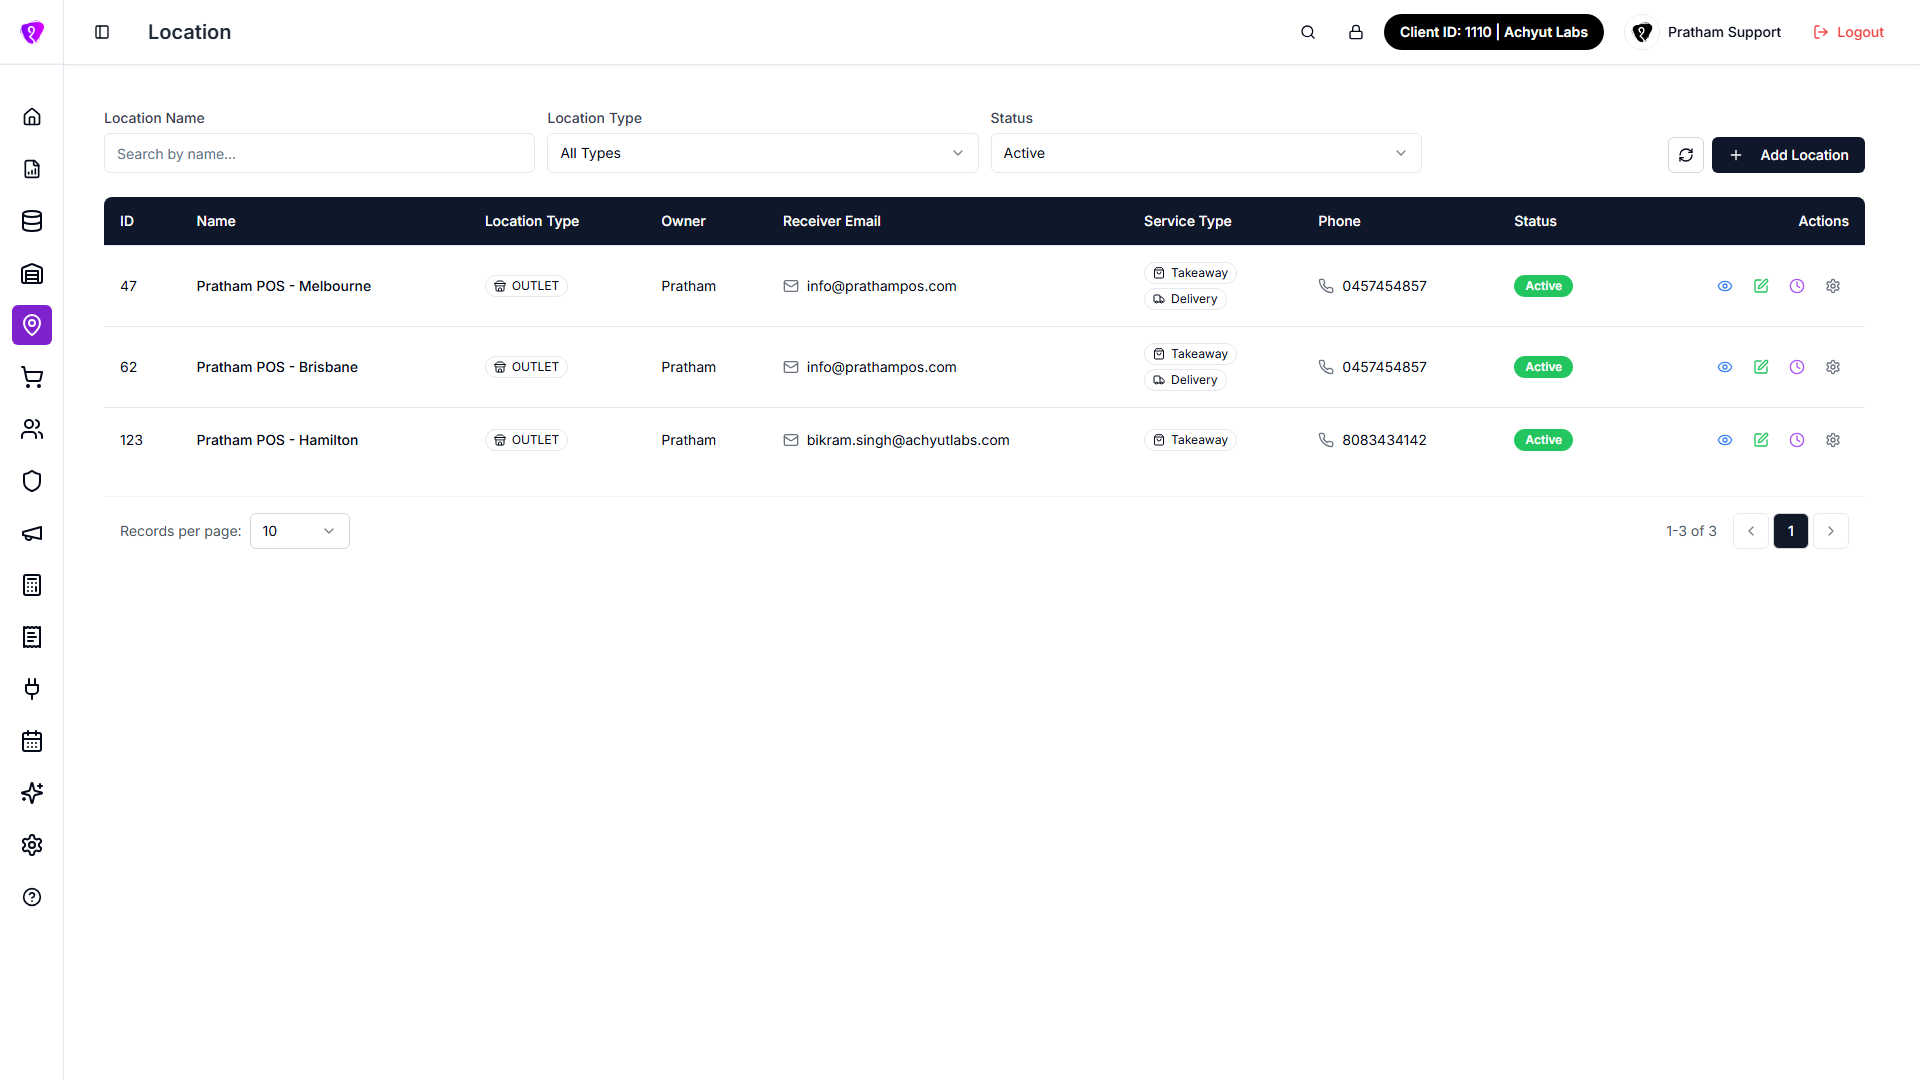 Caption: Location list with search, filters, and row actions
Filters
| Filter | What it does |
|---|---|
| Location name | Search by name — placeholder Search by name…; X clears |
| Location type | All types or one type — Brand rows themselves don't appear as a filter option, only in the table's Location type column |
| Status | All status, Active, or Inactive |
What the table shows
| Column | Meaning |
|---|---|
| ID | Internal number for support |
| Name | Outlet or brand name |
| Location type | Badge with icon (store vs brand, etc.) |
| Owner | Linked owner name, or — |
| Receiver email | Email for order notifications (mail icon) |
| Service type | Badges: Dine in, Takeaway, Delivery (only types enabled for that outlet) |
| Phone | Main phone with icon, or — |
| Status | Active (green), Inactive (red), or Permanently Closed (dark, with a power-off icon) |
| Actions | View, Edit, Working hours, Settings, Close Location Permanently (see below) |
Row actions
| Icon | Tooltip | What it does |
|---|---|---|
| Eye | View | Opens View Location — same form as add/edit, read-only |
| Pencil | Edit | Opens Edit Location (needs UPDATE permission) |
| Clock | Working hours | Opens Edit opening hours for that outlet |
| Gear | Settings | Opens Location settings multi-step wizard |
| Power off (red) | Close Location Permanently | Permanently closes an outlet (not shown for Brand rows) — see Permanently close a location below |
Permanently closed outlets are locked
Once an outlet is Permanently Closed, Edit, Working hours, and Settings are all disabled — only View still works. There is no way to reopen it from this screen.
Find inactive outlets
Set Status to All status or Inactive to see deactivated locations.
Common mistakes / FAQs
- I see “No locations found.” No row matches your filters. Clear Location name or set Status to All status.
- I do not see Add location (+). Ask your administrator for CREATE on Location, or check whether your plan outlet limit is reached (limit banner on screen).
Add a location
What it does
Creates a new outlet with address, service types, timezone, order email, image, and active status.
Step-by-step
- Tap Add location (+) on the list toolbar.
- In Add Location, complete Basic Information and Address Information.
- Tick at least one Service Types checkbox — Dine in, Takeaway, and/or Delivery.
- Select Timezone and set Online Ordering if needed.
- Upload Location Image (required on create).
- Set Location Status to Active or Inactive.
- Tap Create Location (or the primary save button shown).
- When successful, you see a success message and the dialog closes; the new row appears in the list.
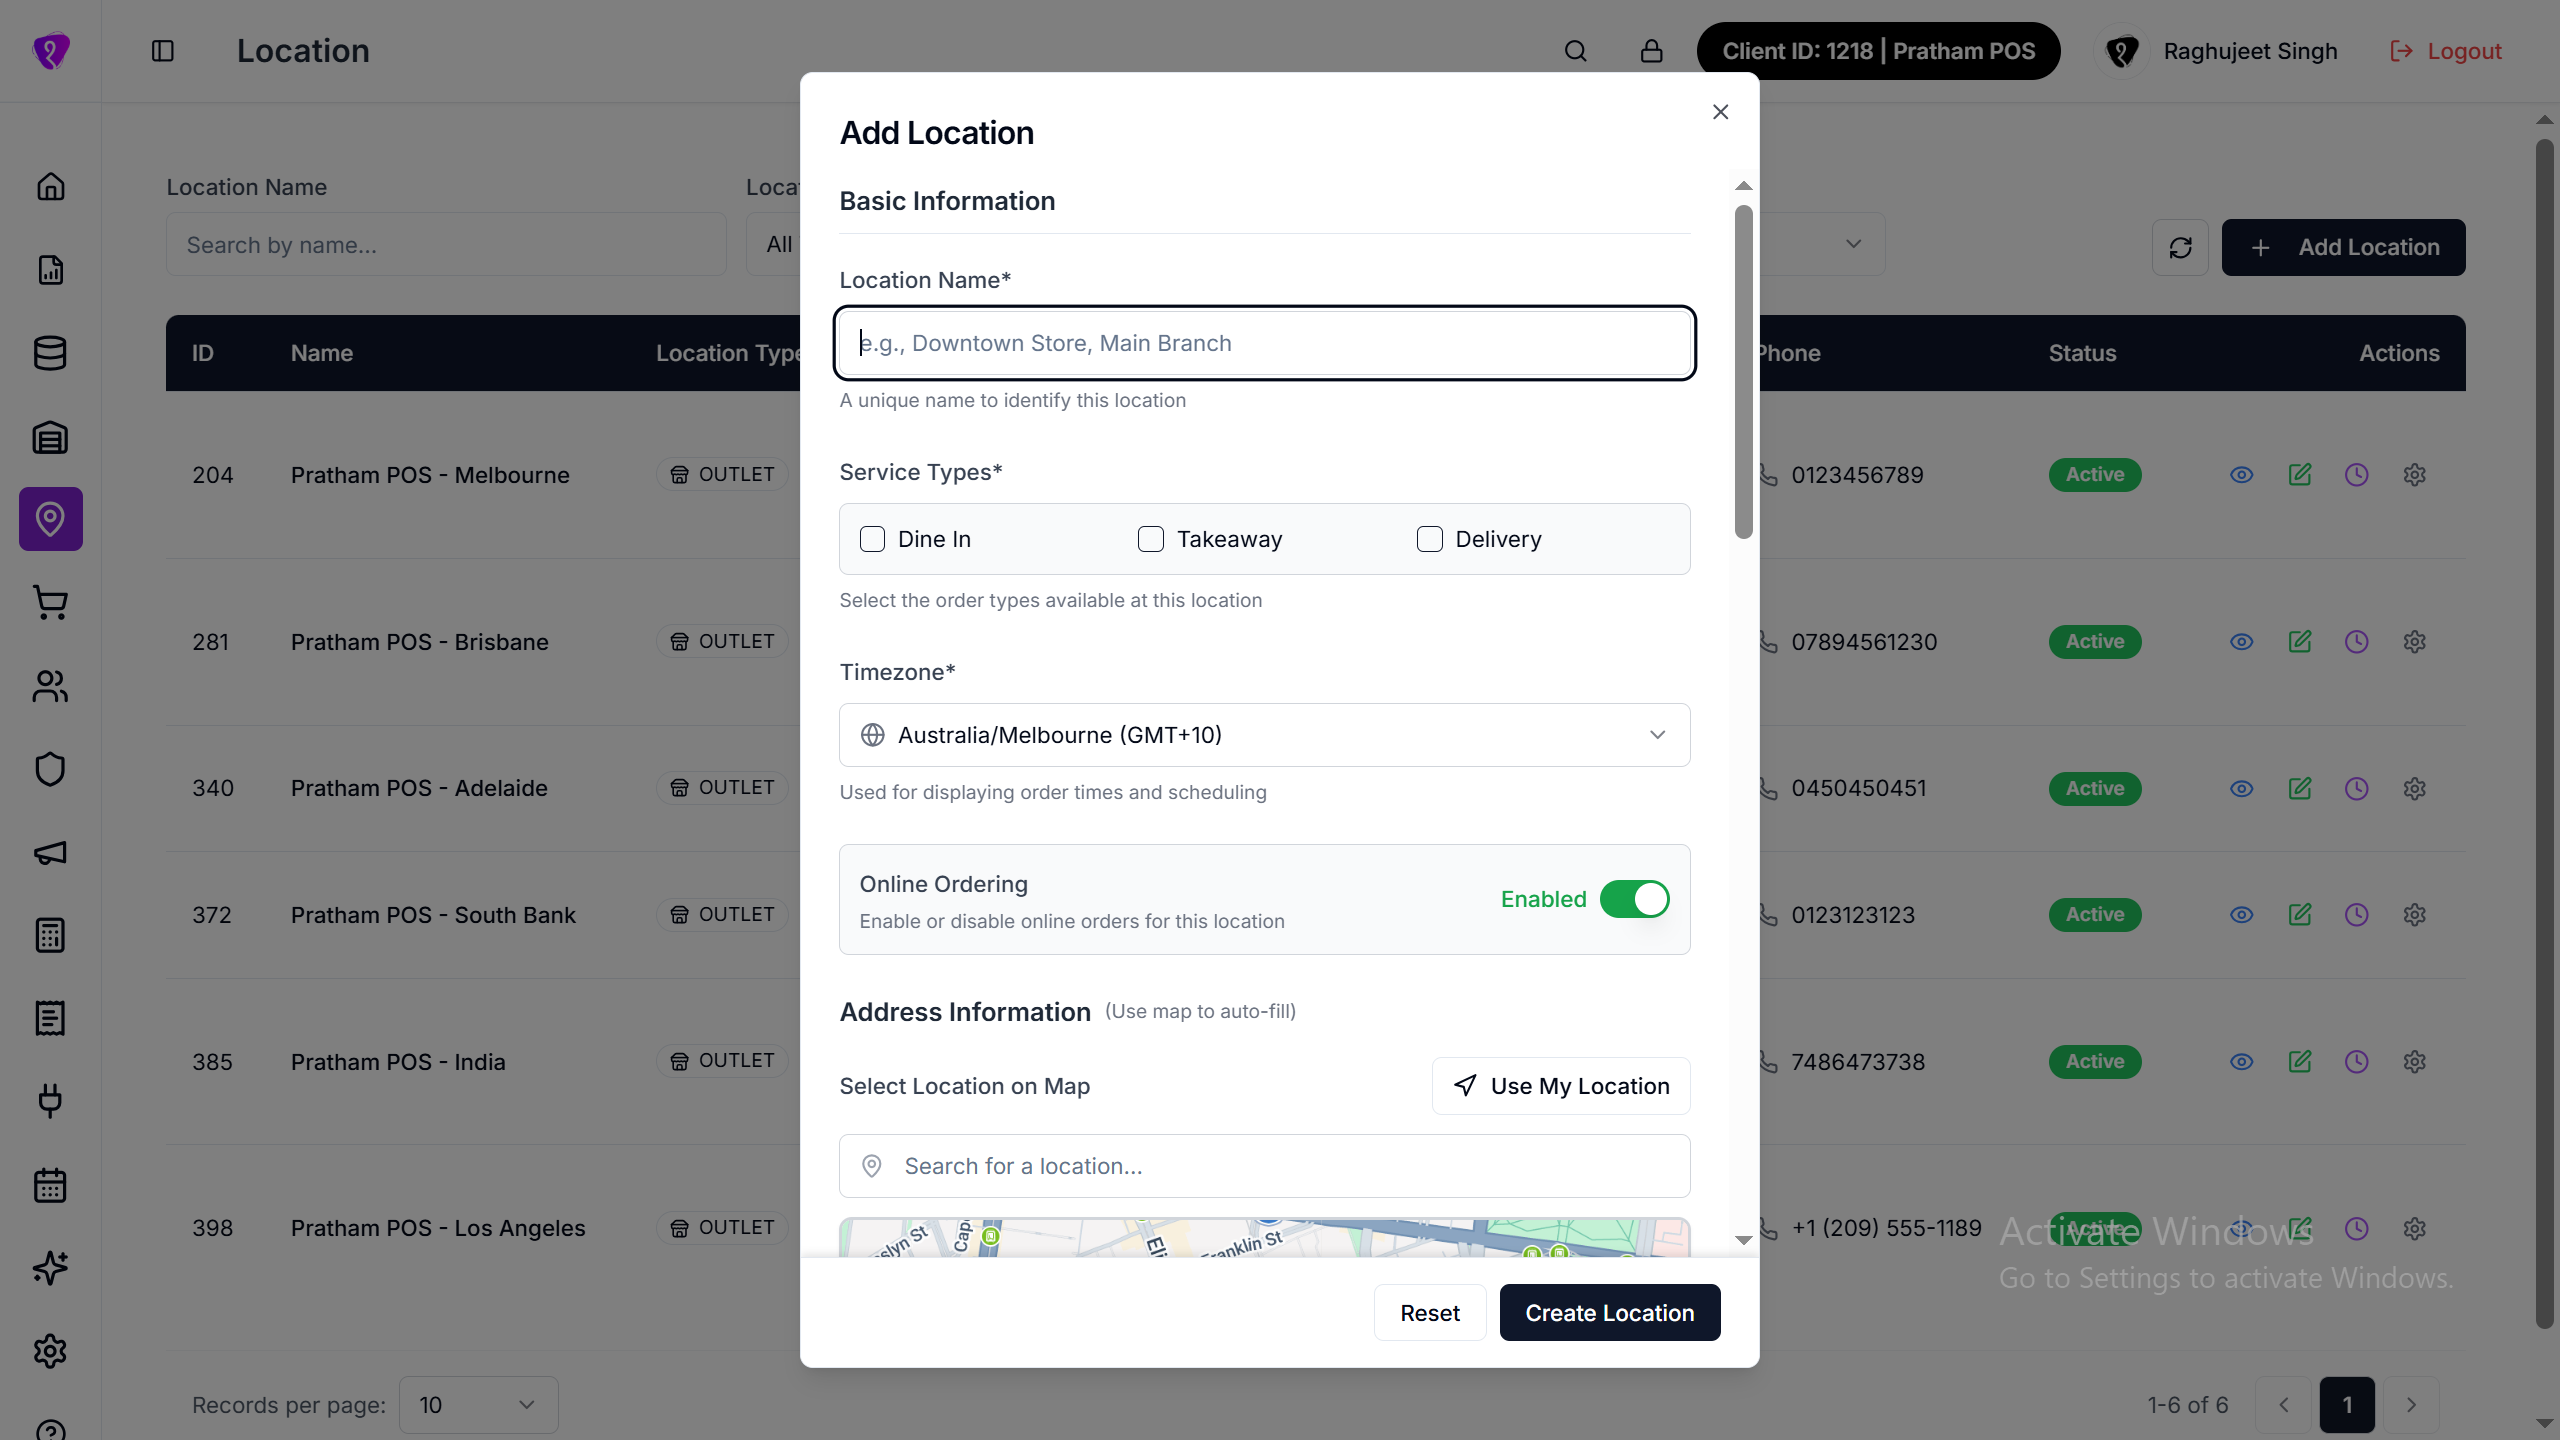
Basic Information fields
| Field | Required? | What to enter |
|---|---|---|
| Location Name | Yes | Unique outlet name — placeholder e.g., Downtown Store, Main Branch |
| Service Types | Yes | At least one of Dine in, Takeaway, Delivery |
| Timezone | Yes | Used for order times and scheduling — Select timezone |
| Online Ordering | No | Switch — Enabled / Disabled for online orders at this outlet |
Location type
New outlets are created as outlet type in the system. A separate Location type picker is not shown on the add/edit form in the current UI.
Address Information fields
| Field | Required? | What to enter |
|---|---|---|
| Map / Google Places | No | Search or pick on map to auto-fill address (hidden in view-only mode) |
| Unit / Suite Number | Marked * | e.g. Unit 5, Shop 12 |
| Street Address | Marked * | e.g. 123 Main Street |
| City | Marked * | e.g. Los Angeles |
| Postal / Zip Code | Marked * | e.g. 90038 |
| State / Province | Marked * | Depends on Country — Select state/province |
| Country | Yes | Select country — changing country refreshes province list |
| Latitude / Longitude | No | e.g. -37.8136 / 144.9631 — may fill from map |
Address fields aren't strictly enforced
The address sub-fields above show an asterisk, but the form doesn't currently block saving if you leave one blank. Fill them in anyway — accurate addresses matter for delivery zones, receipts, and maps.
Contact and media fields
| Field | Required? | What to enter |
|---|---|---|
| Primary Phone | Yes | Digits only, 9–10 long — placeholder e.g., 9876543210 |
| Secondary Phone | No | Optional second number, same digits-only rule — placeholder e.g., 9123456780 |
| Order Notification Email | Yes | All order notifications go here — e.g. orders@yourstore.com |
| Location Image | Marked * (add) | Upload Image / Change Image — recommended 800×800px, max 5MB, JPG or PNG. Not actually enforced — you can save without one, though it's best practice to add one |
| Location Status | No | Switch — Active or Inactive (defaults to active) |
Validation messages (toast)
| Message | Fix |
|---|---|
| Name is required | Enter Location Name |
| At least one service type is required | Tick a Service Types checkbox |
| Email for receiving orders is required | Enter Order Notification Email |
| Timezone is required | Select Timezone |
| Invalid file type / File too large | Use JPG/PNG under 5MB for Location Image |
Common mistakes / FAQs
- Create button does nothing. Scroll the dialog — required address or image fields may be missing.
- Province list is empty. Select Country first, then open State / Province again.
Edit a location
What it does
Updates an existing outlet’s master data (address, phones, service types, image, status). Behaviour toggles (delivery fees, POS lock, etc.) live in Location settings (gear), not here.
Step-by-step
- In the table, tap Edit (pencil) on the row.
- Wait if the dialog is loading existing data.
- Change the fields you need (same layout as Add Location).
- Tap Update Location (primary button).
- On success, the dialog closes and the list refreshes.
View vs edit
View (eye) opens View Location — {name} with the same fields read-only. Close with Close — nothing is saved.
Common mistakes / FAQs
- I changed online fees but POS is unchanged. Open Settings (gear) — fees and POS behaviour are in the Location settings wizard, not the main edit dialog.
- Image delete only on edit. Trash on the image preview removes the current image when editing an existing location that already had one.
Working hours
What it does
Sets opening and closing times per service type (dine-in, takeaway, delivery). Only tabs for service types enabled on the outlet are shown.
Step-by-step
- On the location row, tap Working hours (clock).
- Dialog title: Edit Opening Hours — subtitle shows Set weekly hours for {outlet name}.
- Open each tab — Dine in, Takeaway, Delivery — as shown.
- For each day of the week:
- Turn the day on or off with the switch.
- When on, set Opens and Closes (time picker).
- Tap Add period to add another range (split shift); tap Remove on a range to delete it.
- Optional: tap Copy to other order type(s) to copy the current tab's slots to other service types (confirm destinations, then tap Apply copy in the copy dialog).
- Tap Save Hours to save (Saving… while working), or Reset Tab to clear all times on the tab you're viewing.
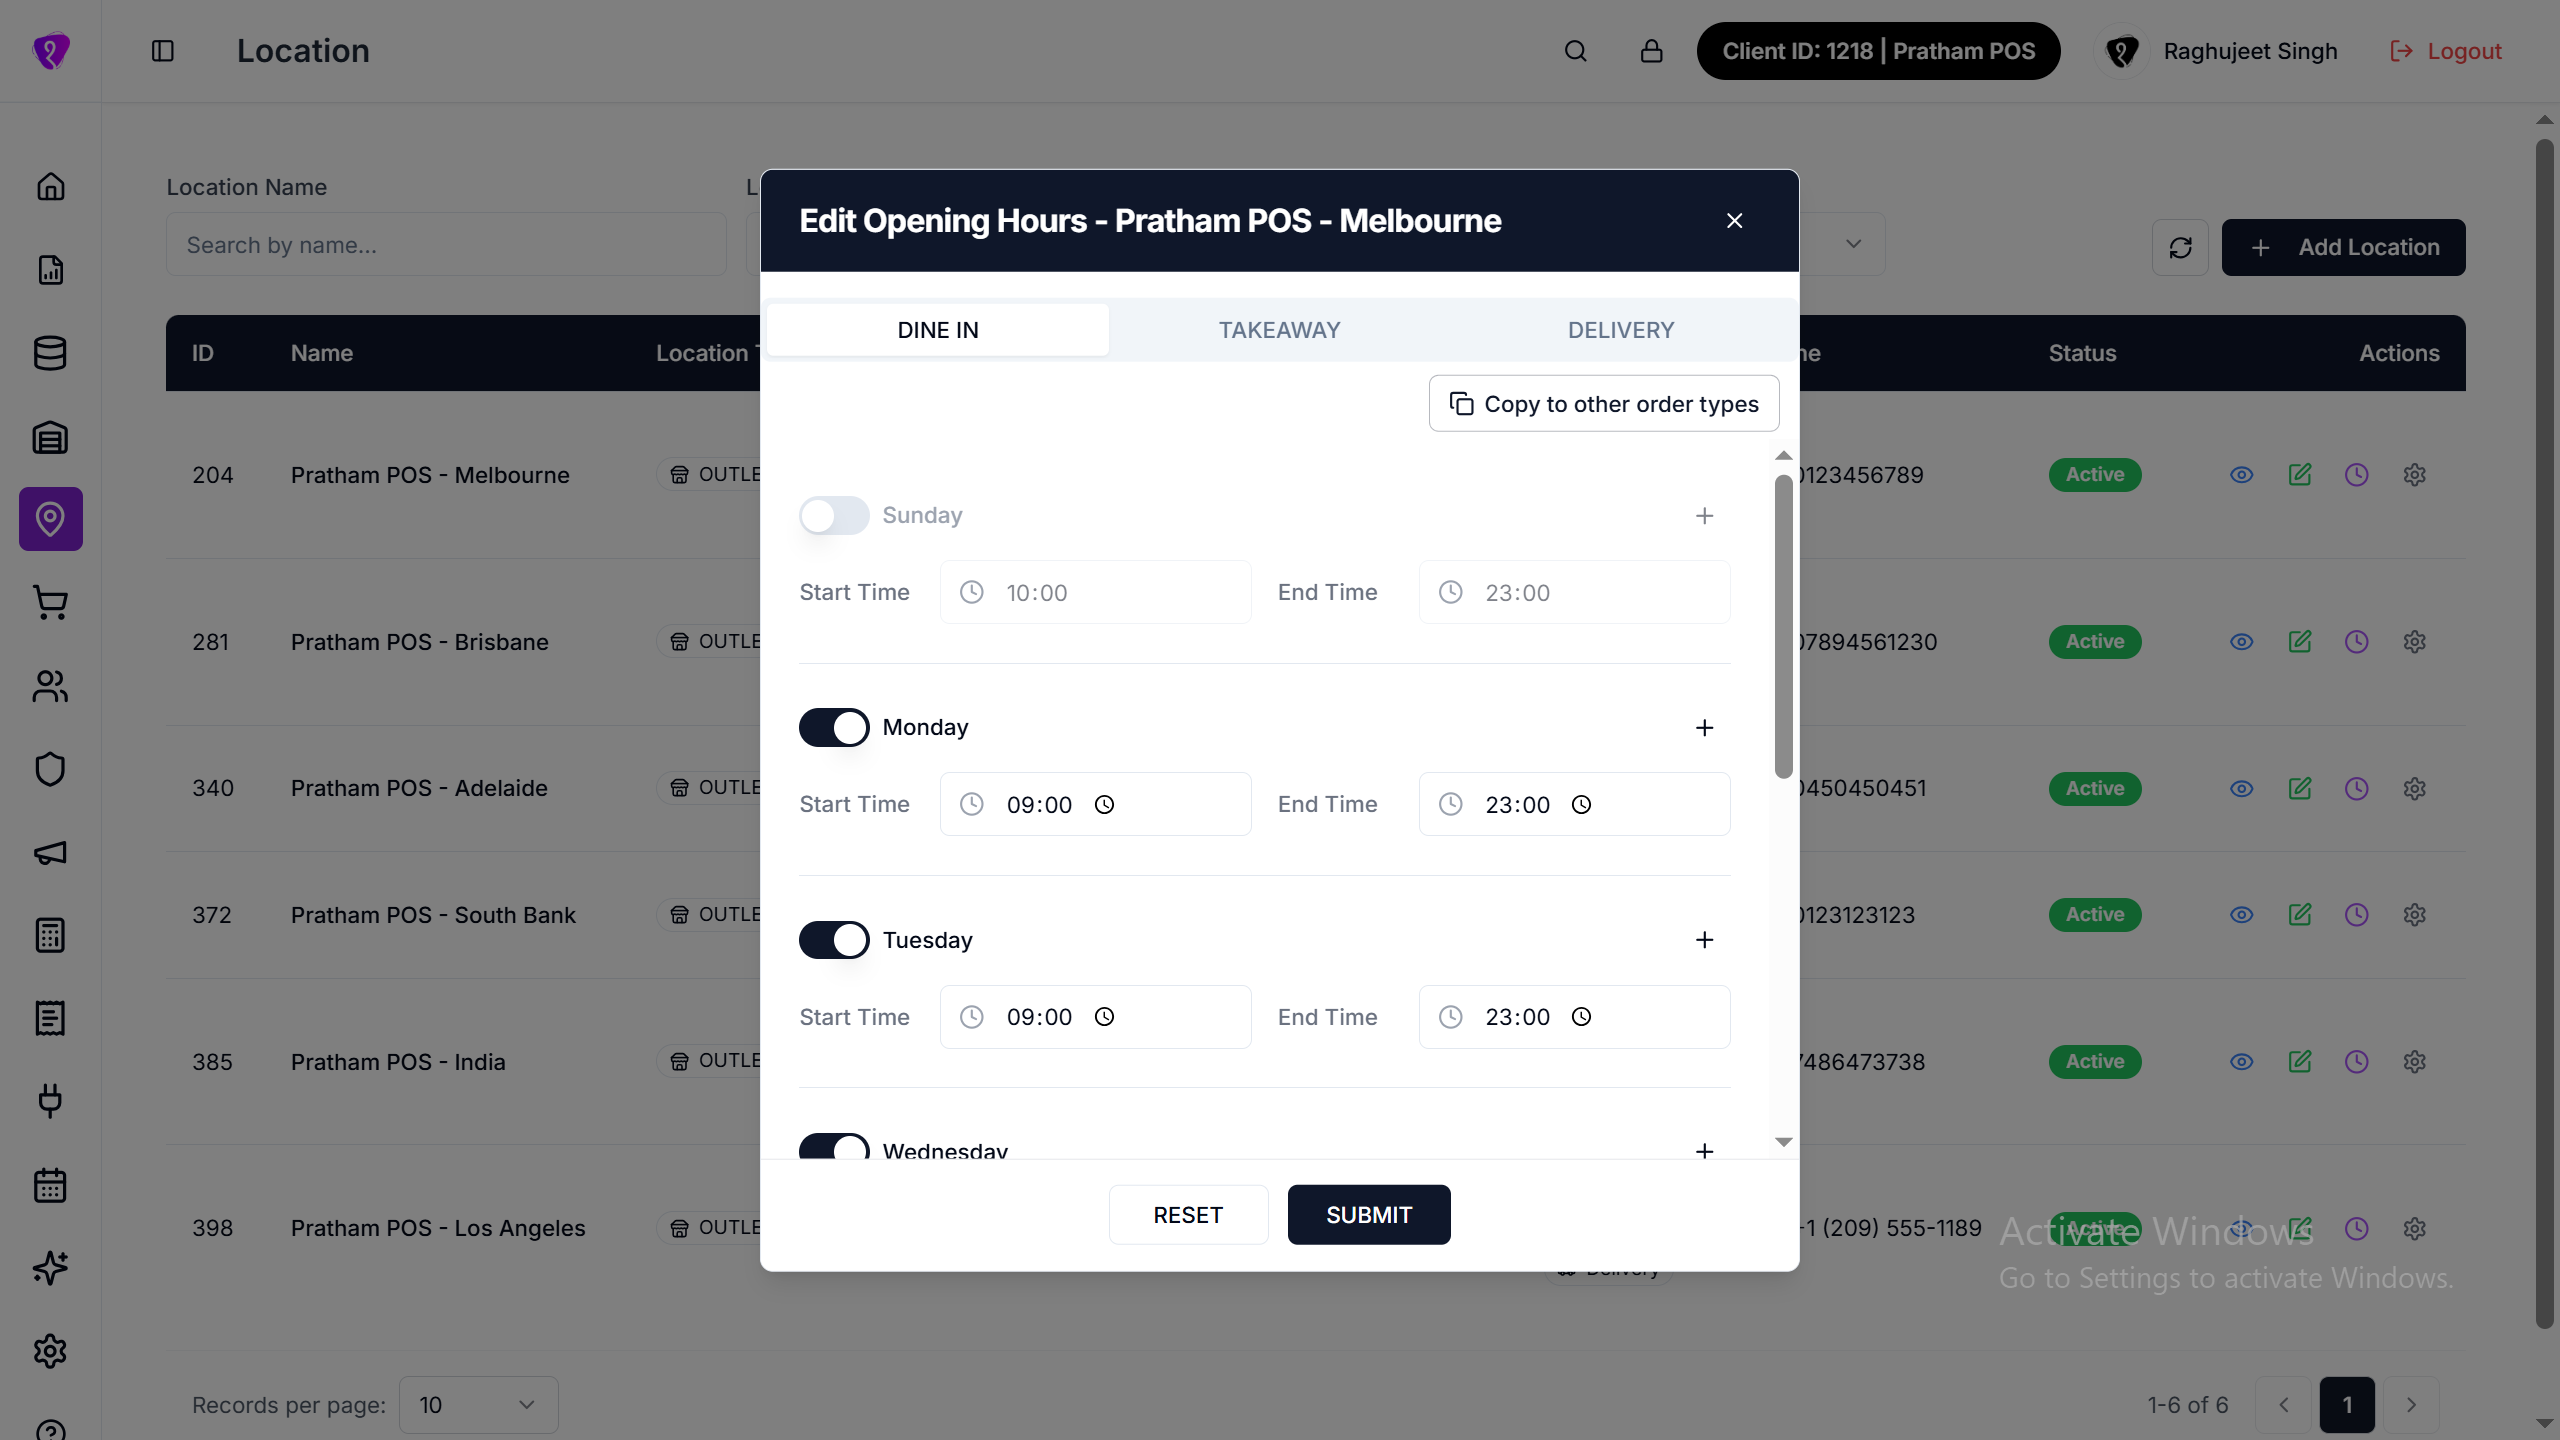
Copy opening hours dialog
- From a service-type tab, tap Copy to other order type(s).
- Under Copy into, tick Takeaway and/or Delivery (whichever tabs exist).
- Confirm — slots copy from the tab you were on.
Enabled days need valid times
Save Hours stays disabled until every enabled day has complete Opens and Closes times for every range.
Reset Tab clears times, it doesn't undo
Reset Tab blanks every time on the tab you're currently viewing so you can re-enter them — it does not restore your last-saved hours. Use it only if you actually want to start that tab over.
Common mistakes / FAQs
- I do not see a Takeaway or Delivery tab. Enable that service type on the main Edit Location form first.
- "Time slot already exists…" after copy. Use Reset Tab and Save Hours again, or edit conflicting slots manually.
Location settings
What it does
Opens the Location Settings wizard (subtitle: Configure operational settings for {outlet name}): online order rules, POS defaults, table booking, website banner, third-party links, holidays, and charge rules. This is separate from the add/edit address dialog.
Step-by-step
- Tap Settings (gear) on a location row.
- Use the step strip — General → Online Orders → POS → Reservations → Website → Holidays (last step only when the outlet is already saved in the system).
- Tap any step name in the strip to jump, or use Back / Next at the bottom.
- Fill General required fields before leaving that step.
- Tap Save Changes from any step to save (Saving… while working).
Holidays step visibility
The Holidays step (which holds both Holidays and Charge Rules) appears only when the app has a saved restaurant id for that outlet. Brand-new locations may not show it until the outlet exists as a full record — save the location, then open Settings again.
General settings
What it does
Site reference, settings address, tax ID, phone, and master channel switches.
Required fields
| Field | Notes |
|---|---|
| Location Reference* | Short label; placeholder suggests using the location name |
| Street Address* | First line shown in settings |
| Suburb / City & State* | Second line |
| ABN / Tax ID* | Digits — placeholder XX XXX XXX XXX, formatted 2-3-3-3 |
| Contact Phone* | International-style — placeholder +61 987 654 321 |
Switches
| Switch | Meaning |
|---|---|
| Gift Cards | Gift cards on/off at this outlet |
| Cloud Printing | Cloud print integration on/off |
| Pay at Store | Pay-at-store option on/off |
| Online Ordering | Master online ordering on/off |
| Delivery Orders | Delivery channel master switch |
| Takeaway Orders | Takeaway channel master switch |
| Auto-Refund Declined Orders | Automatically refunds the customer when an online order is declined |
| Post-Order Follow-Up Email | Sends a follow-up email after order completion — reveals a Review URL field (e.g. your Google review link) when on |
Invoice Payment Details
Bank details printed on tax invoices for bank-transfer payments — all optional.
| Field | Notes |
|---|---|
| Account Name | Name on the bank account |
| Bank Name | Your bank's name |
| BSB | Placeholder 6-digit BSB |
| Account Number | Bank account number |
| PayID | Placeholder Email or mobile PayID |
| Payment Terms (days) | Placeholder 7 |
| Invoice Note | Free text, e.g. Please use the invoice number in the transaction description. |
Common mistakes / FAQs
- Please fill all required fields in General before proceeding (tapping Next) or ...before submitting (tapping Save Changes) — the wizard returns to General if any required field above is empty.
Online Orders settings
What it does
Delivery charge, minimums, pickup/delivery slot timing, discounts, and service charge for online channels.
| Field | Notes |
|---|---|
| Delivery Fee | Amount added for delivery orders |
| Minimum Order for Discount* | Minimum basket before online discount applies |
| Pickup Lead Time (min) | Lead time before pickup can start |
| Pickup Slot Interval (min)* | Length of each pickup slot in minutes |
| Delivery Lead Time (min) | Lead time before delivery can start |
| Delivery Slot Interval (min)* | Length of each delivery slot in minutes |
| Online Order Discount* | Fixed or Percentage plus amount |
| Service Charge | Fixed or Percentage plus amount |
Tips & Gratuity
Optional tipping for online and POS channels. Tips are tracked separately and never counted as sales.
| Field | Notes |
|---|---|
| Online Tipping | Switch — show tip options at website checkout |
| POS Tipping | Switch — allow staff to add tips on the POS payment screen |
| Tip Presets (%) | Comma-separated percentages shown as quick-select buttons, e.g. 10, 15, 20 (default) |
| Custom Tip Amount | Switch — let customers enter their own tip instead of presets only. Disabled (forced on) until you enter at least one Tip Preset |
Tip presets must be valid
Every preset percentage must be greater than 0. If not, you'll see Tip Presets must be greater than 0. when you try to save or move to the next step.
Needs Online Ordering
The whole Online Orders step, including Tips & Gratuity, is only usable when your plan includes online ordering. Otherwise it shows dimmed with an upgrade prompt.
POS Settings
What it does
POS search radius, cashup time, slot gaps, default order type, and auto-lock behaviour.
| Field | Helper text (summary) |
|---|---|
| Address Search Radius (km) | Radius for address search on POS |
| Daily Cash-Up Start | Daily time when cash-up should begin (half-hour list) |
| Pickup Slot Gap (minutes) | Interval between pickup slots |
| Minimum Advance Order Time (minutes) | Minimum time before pickup/delivery time |
| Default Order Type | Dine In, Takeaway, or Delivery for new POS orders |
| POS Auto-Lock Timer | Off, After Every Order, or 1 / 5 / 10 / 15 minutes inactivity |
Table Reservation settings
What it does
Enables table booking and sets party size and slot rules. Requires table reservation entitlement when the section is gated on your plan.
| Field | Notes |
|---|---|
| Enable Table Reservations | Master switch — fields below hide when off |
| Maximum Party Size | Largest party size — minimum 1 |
| Booking Slot Duration (min) | Bookable slot length — minimum 15 |
| Advance Booking Window (min) | How long a table is held — minimum 30 |
Website settings
What it does
Customer-facing website banner and third-party order button redirects.
| Field | Notes |
|---|---|
| Banner Message | Up to 500 characters — counter shows n/500 characters |
| Uber Eats | Switch + Order Redirect URL when on |
| DoorDash | Switch + Order Redirect URL when on |
| Kravein | Switch + Order Redirect URL when on |
| Custom Delivery Partner | One extra slot — always visible; enter a Partner Name and turn on the switch to reveal Order Redirect URL |
Info on screen: third-party order buttons on your website; enable each and set redirect URLs.
Holidays & Charges
Open: Location → Settings (gear) → step Holidays (saved outlets only) — this one step contains both Holidays and Charge Rules.
Holidays list is on top; Charge Rules below. Add, edit, or delete here saves immediately — you do not need UPDATE for these alone.
Holidays — list
| Column | Meaning |
|---|---|
| Holiday Name | Name (e.g. Christmas Day) |
| Date | Closure date |
| Type | Recurring or One-time |
| Status | Active, Inactive, Upcoming, or Passed |
| Actions | Edit, Delete |
Filter: All Holidays, Active (today only), Inactive, Upcoming, Passed.
Add a holiday
- Tap Add Holiday.
- Fill the form → tap Add Holiday.
| Field | Required? | Notes |
|---|---|---|
| Holiday Name | Yes | e.g. New Year Day |
| Holiday Date | Yes | Cannot be before today — applies when adding and editing |
| Recurring | No | No = one-time, Yes = every year |
New holidays default to Active. Status (Active/Inactive) appears only in Edit.
Edit — change fields + Status → Update Holiday
Delete — trash icon → confirm
Charge Rules — discount & surcharge
What it does
Add or update automatic discount and surcharge rules for this outlet. When an order matches the rule (day, time, date range, and other limits), the amount is applied on POS, the website, or both — no need to enter it manually on each order.
Add a rule
- Tap Add Rule.
- Set Charge Type to DISCOUNT (amount off the order) or SURCHARGE (amount added).
- Choose Apply For — Only POS, Only Website, or Both.
- Set Type (Fixed Amount or Percentage) and Value.
- Optionally set days, time slots, min/max order amount, holiday behaviour, and Valid From / Valid Until.
- Tap Create Rule — saves immediately (no UPDATE on the wizard).
Update a rule
- Tap Edit on the rule row.
- Change any field — for example update Value, switch Charge Type, change Apply For, or set Status to Inactive to stop the rule.
- Tap Update Rule.
List columns
| Column | Meaning |
|---|---|
| Name | Rule name + description |
| Type | DISCOUNT or SURCHARGE |
| Apply For | POS, Website, or Both |
| Amount | Fixed $ or % |
| Day | Selected weekdays; blank = all days |
| Time Slots | e.g. 09:00 - 17:00 |
| Status | Active / Inactive |
| Priority | Higher number wins if rules overlap |
| Actions | Edit, Delete |
Form fields
| Field | Required? | Notes |
|---|---|---|
| Rule Name | Yes | Short label |
| Charge Type | Yes | DISCOUNT or SURCHARGE |
| Apply For | Yes | Only POS, Only Website, or Both |
| Type | Yes | Fixed Amount or Percentage |
| Value | Yes | Dollar amount or % (e.g. 10 = $10 or 10% by type) |
| Days of Week | No | Tick specific days; leave all unticked for every day |
| Priority | Yes | Default 1 — higher wins when multiple rules match |
| Min / Max Order Amount | No | Optional basket limits |
| Holiday Behavior | No | Always Apply, Exclude Holidays, or Holidays Only |
| Status | No | Active / Inactive |
| Description | No | Optional note in list |
| Valid From / Valid Until | Yes | Date range the rule can run |
| Time Slots | Pre-filled with one slot | Start–end time(s); Add Time Slot for more — at least one always remains |
Delete — trash icon → confirm
TIP
For holiday surcharges, add dates under Holidays first, then set Holiday Behavior to Holidays Only on the surcharge rule.
Deactivate a location
What it does
Stops the outlet from being used for new operations without deleting history. This is reversible — flip Location Status back to Active any time.
Step-by-step
- Tap Edit on the location row (or open View and switch to edit if your role allows).
- Toggle Location Status to Inactive.
- Save the location.
Prefer inactive over delete
There is no casual delete on the list — deactivate outlets you no longer operate instead of reusing another outlet's record.
Common mistakes / FAQs
I reactivated a location and got "Plan limit reached" — what now?
Reactivating counts against your plan's location limit like adding a new one. Open Subscription to upgrade, or free up a location first.
Permanently close a location
What it does
Permanently closes an outlet — a stronger, irreversible action separate from the Active / Inactive toggle. Closing frees up its slot against your plan's location limit, so you can add a new location in its place.
Step-by-step
- On the outlet's row, tap Close Location Permanently (red power-off icon) — only shown for outlet-type locations, not Brand rows.
- Confirm Close Location Permanently: Are you sure you want to permanently close "{name}"? This cannot be undone. Once closed, it will no longer count against your location limit, and you'll be able to add a new location in its place if your plan allows.
- Tap Close Permanently (Closing... while working), or Cancel to back out.
- On success: Location closed — the row shows Permanently Closed and greys out.
This cannot be undone
Unlike Inactive, a permanently closed location cannot be reopened. Use Deactivate instead if you might use the outlet again later.
Once closed, Edit, Working hours, and Settings are disabled for that row — only View remains available.
Permissions
| What you need | Why |
|---|---|
| LOCATION module permission | See Location in the menu and open the list |
| CREATE on Location | Tap Add location (+); may also require available outlet limit on your subscription |
| UPDATE on Location | Edit, Working hours, Settings, Close Location Permanently |
| READ | View (eye) and list access |
If an action icon is missing or disabled, your role or plan limit blocks it.