
Item Library
Use this page to add and manage menu items — products, ingredients, and packaging with prices, categories, images, and location availability. This is the older item list; many teams now use Items (marked NEW in the menu) for newer features.
Open the screen: Sidebar → Master Data Management → Item Library
Prefer Items (NEW) for new work
Items supports location price overrides, variants, and a tabbed item dialog. Use Item Library only if your administrator standardises on this screen.
Create attributes first
If none exist yet, the attribute picker inside Assign Attributes shows No attributes found. Create attributes first in Product Attributes.
Items list
What it does
Shows all products with type, price, category, inventory tracking, and status. Filter the list, select rows for bulk actions, reorder items, then add, view, or edit.
Step-by-step
- Open Master Data Management → Item Library.
- Wait if the table shows Loading items….
- Use filters to narrow the list (see table below). Name and barcode searches update shortly after you stop typing.
- Read the table — checkbox, drag handle, ID, Name, Item Type, Price, Online Price, Barcode, Inventory Tracked, Category, Seq No, Status, and Actions.
- Tap the refresh button to reload. Toast: Data Refreshed.
- Use pagination at the bottom to change page or rows per page.
- Tap a row (outside checkbox or actions) to open View Item.
Filters
| Filter | What it does |
|---|---|
| Item Name | Search by name. Tap X to clear. |
| Barcode | Search or scan a barcode. Tap X to clear. |
| Item Type | All Types, Finished Product, Ingredient, or Packaging Item (defaults to Finished Product) |
| Category | All Categories or one active category |
| Status | All Status, Active, or Inactive (defaults to Active) |
Toolbar buttons
| Button | What it does |
|---|---|
| Refresh | Reload the list |
| Import | Open CSV import dialog |
| Add Item | Open the add item dialog |
What the table shows
| Column | Meaning |
|---|---|
| Checkbox | Select row for bulk actions |
| Drag handle | Grip icon — drag to change display order |
| ID | Product record ID |
| Name | Item name; may show veg / non-veg / egg indicator |
| Item Type | Finished Product, Ingredient, or Packaging |
| Price | Standard price |
| Online Price | Online ordering price |
| Barcode | Barcode value or N/A |
| Inventory Tracked | Enabled or Disabled |
| Category | Category name or Uncategorized |
| Seq No | Display order within the category |
| Status | Active or Inactive badge |
| Actions | View, Edit, Copy, Assign Attributes |
Widen your search
Set Item Type to All Types or Status to All Status if an item does not appear.
Common mistakes / FAQs
- I see "No items found matching your filters". Clear filters or set Status to All Status.
- I do not see Add Item or Import. Ask your administrator for CREATE permission on Item Library.
- I do not see Edit. Ask your administrator for UPDATE permission on Item Library.
Add an item
What it does
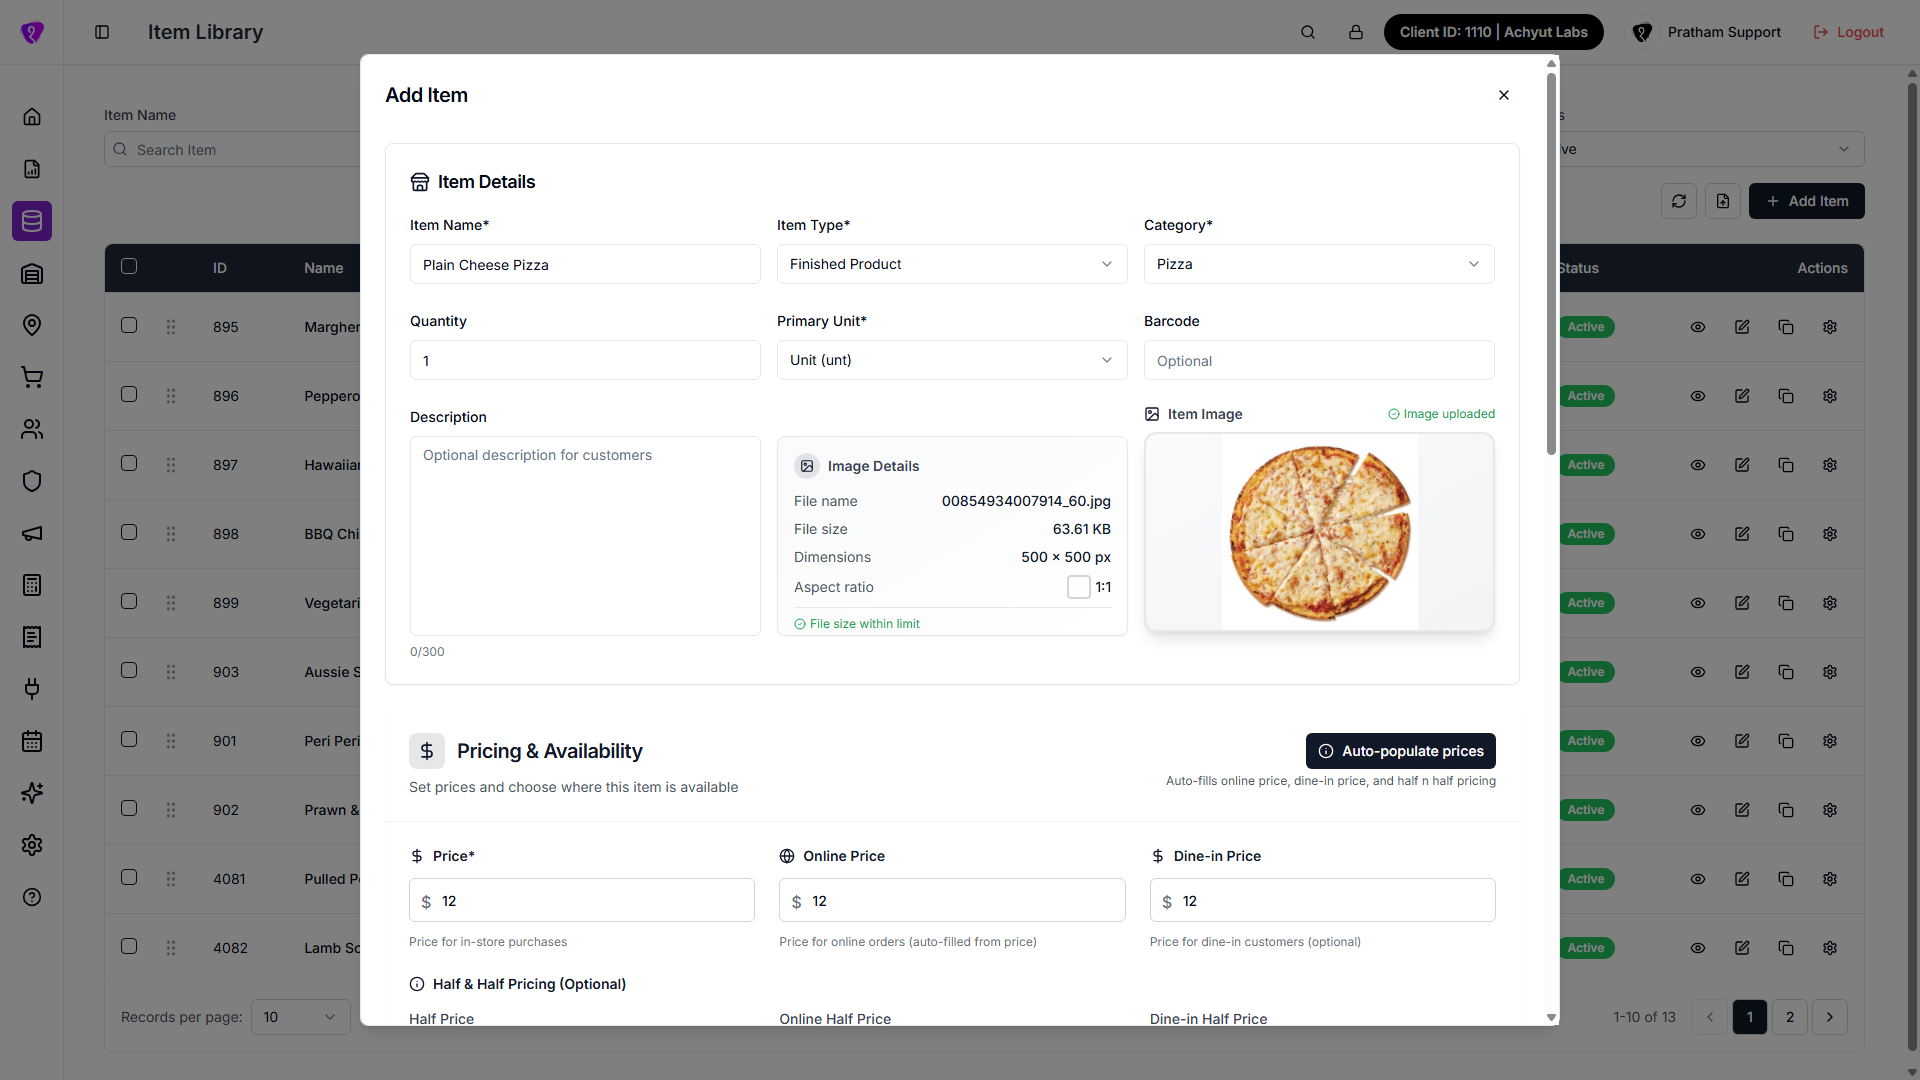
Creates a new product with details, pricing, tax, inventory, and tags.
Step-by-step
- Tap Add Item.
- In the Add Item dialog, fill Item Details — Item Name, Item Type, Category, and Primary Unit. Optionally set Display Names (Online, Receipt/Docket) if they should read differently from the item name.
- Set pricing — Price auto-fills Online Price and Dine-in Price when Auto-populate prices is on; turn it off to set each separately. Fill Half & Half Pricing too if this item can be ordered as a half-and-half portion.
- Available Locations starts with every active outlet pre-selected — untick any that shouldn't sell this item.
- For Finished Product items only, optionally fill Discount Information, Tax Information, Loyalty Program Settings, and Product Tags. These sections don't appear for Ingredient or Packaging Item.
- Optionally fill Inventory Information.
- Toggle Active on or off.
- Tap Submit.
- When successful, you see Item created successfully and the dialog closes.
Add-on features
Loyalty Program Settings and Inventory Information only work if your plan includes the Customer loyalty and Inventory management add-ons — otherwise each section shows dimmed with an upgrade prompt.
Key fields
| Section / field | Required? | What to enter |
|---|---|---|
| Item Name | Yes | Product name shown on menus |
| Item Type | Yes | Finished Product, Ingredient, or Packaging |
| Category | Yes | Menu category — required for every item type |
| Primary Unit | Yes | Sell unit (for example each, kg) |
| Price | Yes | Base price — required for every item type |
| Available Locations | No | Pre-selected to every active outlet; not blocked if you untick them all |
| Active | No | Toggle off to create an inactive item |
Common mistakes / FAQs
- Submit stays disabled. Fill Item Name, Category, Primary Unit, and Price — these are required for every item type, not just Finished Products.
- No units in the dropdown. Add units under Settings → Quantity Units first.
View an item
What it does
Opens a read-only view of all item sections without changing anything.
Step-by-step
- Tap View (eye icon) on the row, or tap the row outside checkbox and actions.
- The dialog title shows View Item. Fields are not editable.
- Browse all sections in the scrollable form.
- Close the dialog — there is no Submit in view mode.
Edit an item
What it does
Updates an existing item’s details, prices, locations, tax, inventory, or tags.
Step-by-step
- Tap Edit (pencil icon) on the row.
- In the Edit Item dialog, change the fields you need.
- Tap Submit.
- When successful, you see Item updated successfully and the dialog closes.
- In edit mode, tap Clone to prepare a duplicate — the name gets a
_clonesuffix; tap Submit to create it.
Reset clears the form, it doesn't undo
Reset wipes the dialog back to a blank Add Item state — it does not restore the item's last-saved values. Close the dialog without saving instead if you want to discard your changes and keep editing the original later.
Common mistakes / FAQs
- Edit is disabled. Ask your administrator for UPDATE permission on Item Library.
Row actions
What it does
Quick actions on each item row beyond view and edit.
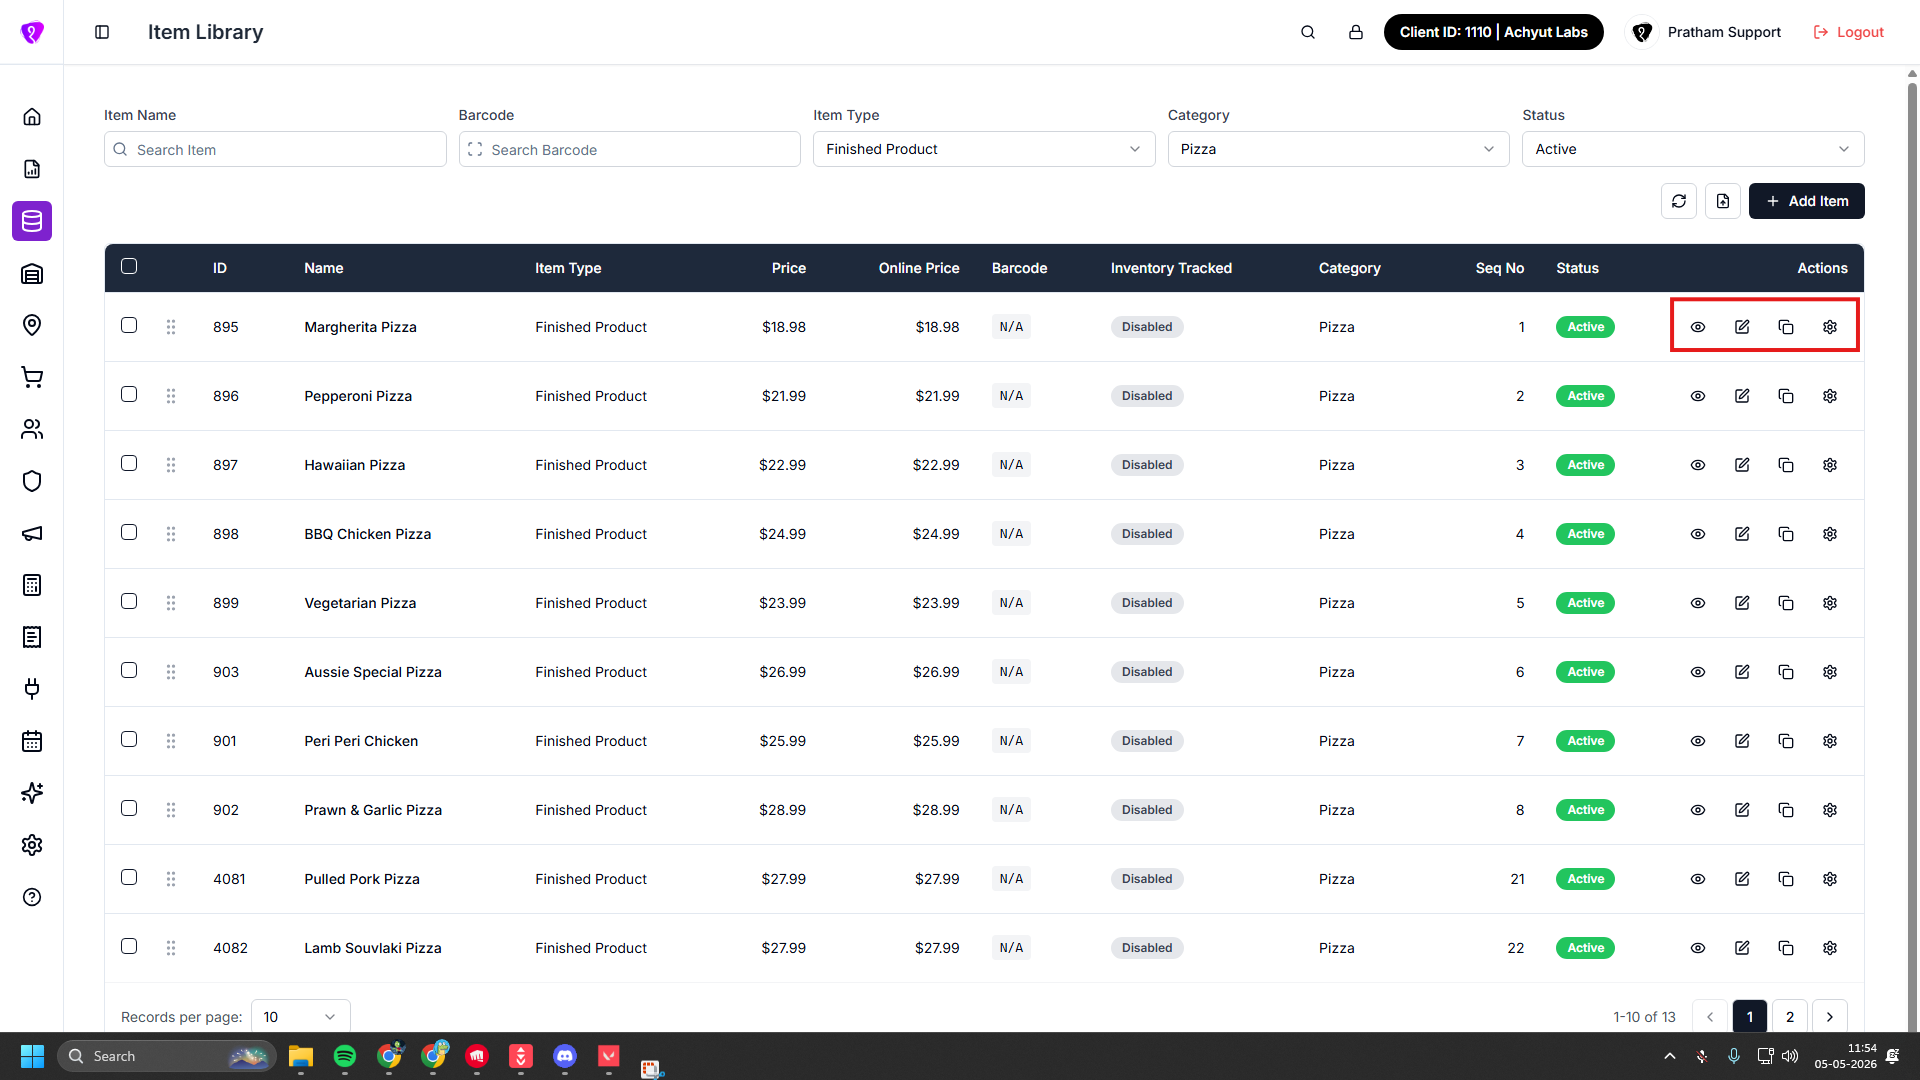
| Action | What it does |
|---|---|
| View (eye) | Open read-only item details |
| Edit (pencil) | Open the edit form |
| Copy | Open Copy Item to duplicate with a new name and target locations |
| Assign Attributes (gear) | Link product attributes with min/max selection rules |
Copy one item
Step-by-step
- Tap Copy on the row — the dialog pre-fills Name as
{item name}-copy. - In Copy Item, adjust Name, Category, Quantity, unit, and Price as needed.
- Optionally set Barcode, Online Price (auto-fills from Price), Discount Type, Discount, Online Discount, a Description, and an Image (PNG/JPG, up to 5MB).
- Toggle Active and Offers Half (Half & Half participation) if needed.
- Pick at least one location under Clone to Restaurants.
- Tap Submit.
Assign attributes
What it does
Links existing product attributes to this item, with per-item minimum/maximum selection rules.
Step-by-step
- Tap Assign Attributes on the row.
- Select an attribute, set Minimum selections and Maximum selections, and toggle Active / Required.
- Tap Add to list.
- Repeat for more attributes, then tap Save N New Attributes (label updates with the count; stays disabled until you've added at least one).
Change or remove an already-assigned attribute
- Edit its Minimum/Maximum/Active/Required values inline, then tap that row's own Save Changes — this saves immediately, separately from the dialog's main save.
- Tap the trash icon to unassign it — confirm Unassign "{name}" from this product? The attribute itself will not be deleted.
Bulk actions
What it does
Applies one action to every selected row at once.
Step-by-step
- Tick the checkboxes on the rows you want.
- A bar shows how many items are selected.
- Tap Set Active, Set Inactive, Bulk Edit, or Clone.
| Button | What it does |
|---|---|
| Set Active | Marks all selected items active |
| Set Inactive | Marks all selected items inactive |
| Bulk Edit | Opens Edit N Products — apply same values to all or edit each row |
| Clone | Duplicates each selected item, name suffixed _copy_clone |
Bulk Edit has two modes
Turn Bulk Edit Mode on to set one set of values — Price, Online Price, Dine-in Price, Half & Half Pricing, Discount, Online Discount, Category, Measurement Unit, Discount Type, and Active — for every selected item at once. Turn it off to edit those same fields per row in a table instead.
Reorder items
What it does
Changes display order within a category. Lower Seq No values appear first on menus.
Step-by-step
- Drag the grip handle on a row up or down.
- Drop the row in the new position.
- Wait for Item sequence has been updated successfully.
Deactivate an item
What it does
Stops an item from being sold without deleting its record.
Step-by-step
- Tap Edit on the item row (or select rows and tap Set Inactive).
- Toggle Active off in the form.
- Tap Submit.
No single-row delete
There is no Delete button on the list. Turn items Inactive instead of deleting them.
Import items from CSV
What it does
Creates many products at once from a spreadsheet file.
Step-by-step
- Tap the Import icon.
- Wait while Import Items loads module types.
- Select or drag a CSV file.
- Tap Import Items.
- When successful, the list refreshes.
CSV column format
| Column | Accepted header names | Notes |
|---|---|---|
| Product name | name or product_name | Optional — falls back to Product {row number} if left blank |
| Description | description | Optional |
| Image | attachment | Optional URL or path |
| Barcode | barcode | Optional |
| Category | category_id or category | Numeric ID; defaults to 1 if empty |
| Price | price | Number; defaults to 0 |
| Quantity | quantity | Defaults to 1 |
| Unit | measurement_unit_id, quantity_unit, or quantity_unit_id | Defaults to 4 if empty |
| Discount | discount | Defaults to 0 |
| Discount type | discount_type or discount_type_id | Defaults to 1 |
| Module type | module_type or module_type_id | Defaults to 2 |
| Locations | restaurant_ids | Comma-separated outlet IDs, e.g. 1,2,3 |
| Status | status | Active or 1 → active; anything else → inactive |
Use UTF-8 for special characters
Save the CSV as UTF-8 if names include accents or non-English characters.
Permissions
| What you need | Why |
|---|---|
| Item Library module permission | See the Item Library menu and list |
| CREATE on Item Library | Add Item, Import, Copy, bulk Clone |
| UPDATE on Item Library | Edit, Assign Attributes, bulk actions |
Reorder isn't permission-gated
Dragging the grip handle to reorder items isn't restricted to a specific permission in the current UI — anyone who can see the list can reorder.