
POS Settings
POS Settings is where managers control how the system behaves - what order types are available, how discounts work, what the screen looks like, receipt printing, and more.
🔒 Manager only - tap Settings in the navigation menu. Regular staff may not see this menu item if Restrict Settings Access to Admins is enabled.
The Settings screen has these sections in the left sidebar:
| Section | What you configure |
|---|---|
| General | Order type default, auto-lock, notification sound, receipt printing behaviour |
| Appearance | Theme, colours, sidebar mode, item grid layout |
| Store Settings | Outlet details, pickup/delivery timing, cashup, loyalty, discounts, security |
| Printers | Bill printer, KOT printers, label printer, receipt settings |
| Payment Gateway | Connect and pair your EFTPOS terminal |
| Pair Gateway | Pair / re-pair the payment terminal |
| Buzz Numbers | Takeaway order number display |
| Payment Methods | Enable/disable payment types, cash drawer behaviour |
| Weight Scale | Connect a CAS weighing scale to sell items by weight |
INFO
Customer Display, Device Settings, Connected Devices, and Weight Scale each have their own dedicated pages - see Device Settings, Customer Display, Connected Devices, and Weight Scale.
General
Controls day-to-day POS behaviour - locking, sounds, and how receipts are printed.
- Tap Settings → General.
- Adjust the settings.
- Tap Save.
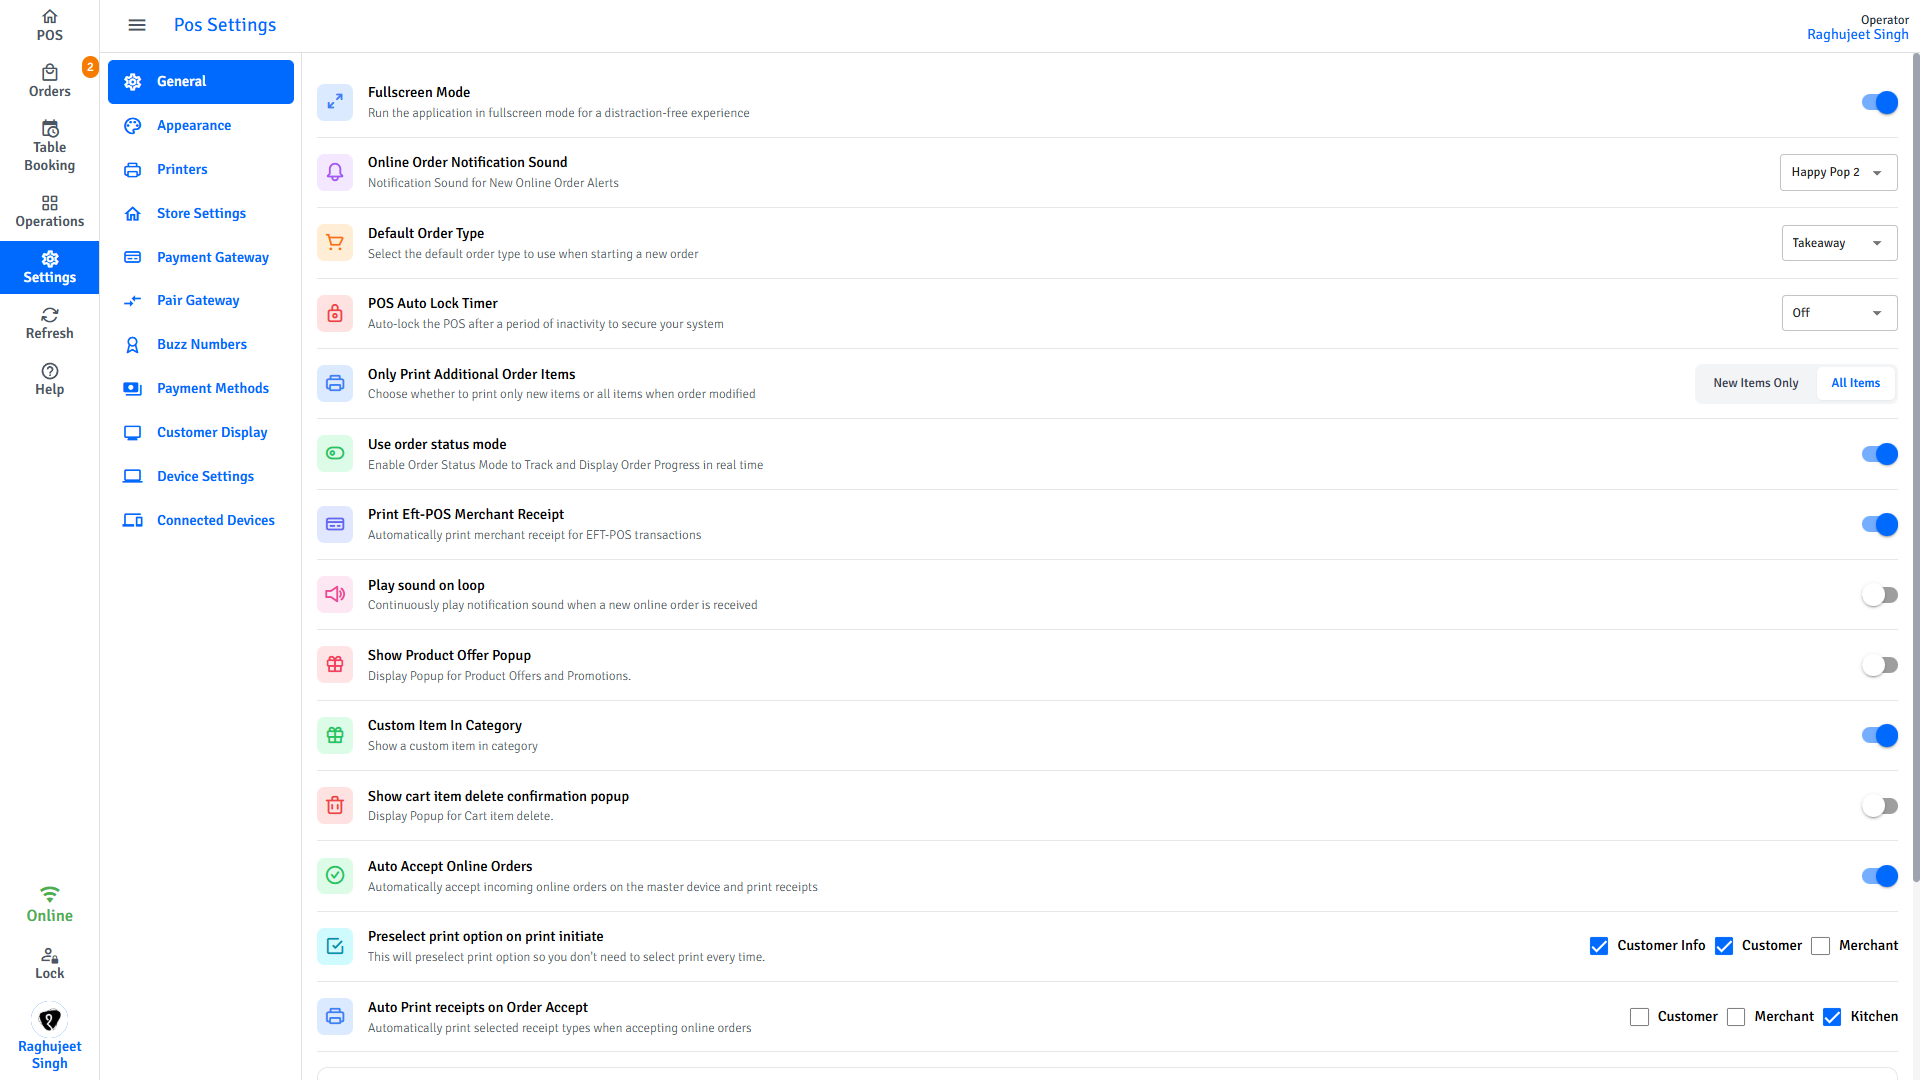
| Setting | What it does |
|---|---|
| Default Order Type | The order type pre-selected when staff start a new order (Dine-In, Takeaway, or Delivery) |
| POS Auto Lock Timer | Automatically lock the screen after inactivity - Off, After Every Order, 1 min, 5 min, 10 min, or 15 min |
| Online Order Notification Sound | Sound played when a new online order arrives - Bell, Happy Pop 2, Level Up, New Notification, System Notification, or Tap Notification |
| Play sound on loop | Keep playing the notification sound until staff acknowledge the order |
| Fullscreen Mode | Run the POS in fullscreen (Windows desktop only) |
| Use order status mode | Enable the order status tracking screen to show order progress in real time |
| Auto Accept Online Orders | Automatically accept incoming online orders on the master device and print receipts without staff review |
| Show Product Offer Popup | Show a popup for product offers and promotions when adding items |
| Custom Item In Category | Show a custom item option inside categories |
| Show cart item delete confirmation popup | Show a "are you sure?" prompt before removing an item from the cart |
Auto-lock
Auto-lock secures the POS after a period of inactivity, or after every order, by clearing the active staff member and showing the staff selection screen. The POS stays on with all session data intact — nobody is fully logged out unless they tap the logout button on the lock screen.
- Tap Settings → General.
- Select the POS Auto Lock Timer dropdown — choose Off, After Every Order, or 1 / 5 / 10 / 15 minutes.
- Tap Save.
For the full list of modes, the lock screen, lock-vs-logout, and FAQs, see the dedicated POS Auto Lock page.
Manual lock
Any staff member can lock the POS at any time by tapping Lock in the left navigation menu, regardless of which auto-lock mode is set.
Receipt printing behaviour
Controls when and what receipts print after payment.
| Setting | Options |
|---|---|
| Only Print Additional Order Items | New Items Only - prints only newly added items when an order is updated · All Items - reprints the full order every time |
| Print Eft-POS Merchant Receipt | Automatically print the merchant copy from the EFTPOS terminal after card payments |
| Receipt Printing on Payment | Ask Every Time - show a popup so staff choose · Do Not Print - skip printing · Auto Print - print automatically |
When Auto Print is selected, choose which copies print automatically:
| Copy | What it is |
|---|---|
| Customer | The customer's receipt copy |
| Merchant | The business's copy |
| Kitchen | Kitchen order ticket |
| Customer Info | Customer detail slip (name, phone, email) |
Auto print on online order accept
When an online order is accepted, these copies print automatically:
| Copy | Toggle |
|---|---|
| Customer | Print customer receipt on accept |
| Merchant | Print merchant copy on accept |
| Kitchen | Send kitchen ticket on accept |
Preselect print options
Preselect which copies are ticked by default when the print dialog opens - staff can still change the selection each time.
| Option | What it preselects |
|---|---|
| Customer Info | Customer detail slip |
| Customer | Customer receipt |
| Merchant | Merchant receipt |
Appearance
Controls how the POS screen looks. These settings are cosmetic and do not affect orders or reports.
- Tap Settings → Appearance.
- Adjust the settings.
- Tap Save.
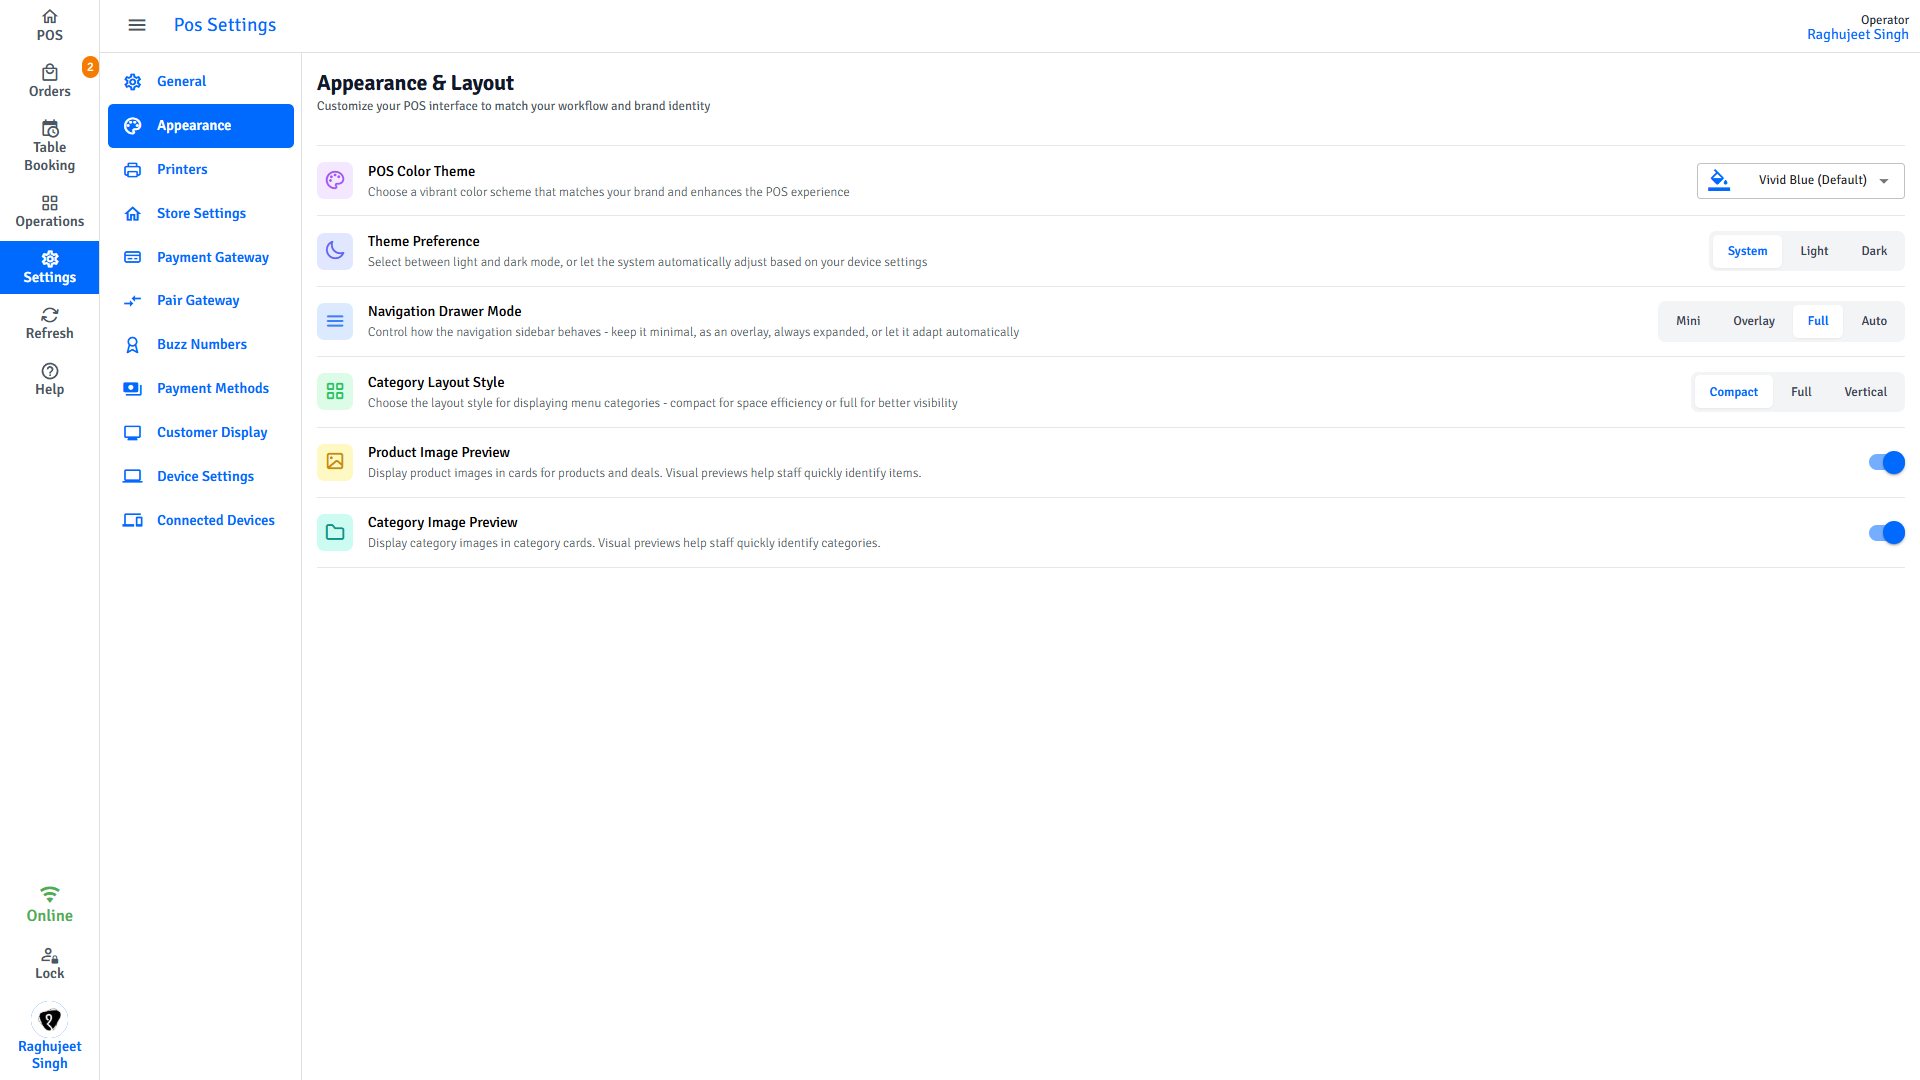
| Setting | Options |
|---|---|
| POS Color Theme | Vivid Blue (default), Hot Pink, Coral Red, Vibrant Teal, Purple, Rose, Indigo, Blue, Cyan, Teal, Green, Sky Blue, Lime, Brown, Gray, Slate |
| Theme Preference | System - follows the device's dark/light setting · Light · Dark |
| Navigation Drawer Mode | Mini - icons only · Full - icons and labels · Overlay - slides over the screen · Auto - adjusts automatically |
| Category Layout Style | Compact - space-efficient · Full - larger tiles · Vertical - stacked layout |
| Item Image Preview | Show item photos on menu grid tiles |
| Category Image Preview | Show images on category tiles |
Store Settings
Holds your outlet's business details, timing settings, security rules, and online order configuration. These values print on receipts and drive pickup/delivery slot calculations.
🔒 Manager only
- Tap Settings → Store Settings.
- Update the fields.
- Tap Save.
Store information
| Field | What to enter |
|---|---|
| Site Reference | Unique code for this outlet - do not change unless instructed by Pratham support |
| Tax ID | Your ABN or tax number - printed on every customer receipt |
| Phone Number | Your outlet's contact number |
| Address Line 1 / 2 | Your outlet's physical address |
| Pickup Time Duration (mins) | Default wait time shown to takeaway customers (e.g., 15 means "ready in 15 minutes") |
| Pickup Time Gap (mins) | Minimum gap between pre-order pickup time slots (e.g., 5 means slots at :00, :05, :10…) |
| Pickup Start Time (mins) | How far ahead the first pickup slot appears (e.g., 10 means the earliest slot is 10 minutes from now) |
| Delivery Time Gap (mins) | Minimum gap between delivery slots |
| Delivery Start Time (mins) | How far ahead the first delivery slot appears |
| Min. Order value for discount | Minimum order total required before a discount can be applied |
| Pre Order Threshold time (mins) | How far in advance a customer must place a pre-order before the cutoff |
| Default waiting time (mins) | Fallback wait time shown when no specific time is calculated |
| Address search area (KM) | Radius for delivery address search suggestions - keeps results local to your area |
| Cashup start time | The time each cashup period begins (e.g., 6:00 AM) - determines which orders fall into each cashup report |
| Floating Amount | The starting cash amount expected in the till at the beginning of each shift |
Online order surcharge
Apply an automatic surcharge to all online orders.
| Field | What to enter |
|---|---|
| Order Surcharge Type | Fixed (flat dollar amount) or Percentage |
| Surcharge Amount | The value to add - set to 0 to disable |
Online order discount
Apply an automatic discount to all online orders.
| Field | What to enter |
|---|---|
| Order Discount Type | Fixed (flat dollar amount) or Percentage |
| Discount Amount | The value to subtract - set to 0 to disable |
Security & Authorization
Controls which actions require manager approval before staff can proceed.
| Setting | What it does |
|---|---|
| Require Admin Approval for Discounts & Surcharges | Staff must enter admin credentials before applying any discount or surcharge. Prevents unauthorised price changes. |
| Require Admin Approval for Refunds | Admin credentials required before processing any refund |
| Restrict Settings Access to Admins | Hides the Settings menu from non-admin staff |
| Require Authentication for Staff Switching | Staff must authenticate when switching between accounts on the same device |
TIP
Enable Restrict Settings Access to Admins to prevent casual changes by counter staff. Once enabled, staff without admin access will not see the Settings option in the navigation.
Buzz Numbers
Buzz numbers print on takeaway receipts so you can call out a number when an order is ready instead of calling a customer's name.
🔒 Manager only
- Tap Settings → Buzz Numbers.
- Toggle Enable Buzz Numbers on.
- Fill in the fields below.
- Tap Save.
A live preview shows exactly how the buzz number will appear on the receipt.
| Setting | What it does |
|---|---|
| Enable Buzz Numbers | Turn buzz numbers on or off |
| Prefix | Text before the number (e.g., # → prints #42) |
| Buzz number | The starting number - the POS counts up from here each order |
| Suffix | Text after the number (e.g., ! → prints 42!) |
Example
Prefix Order + number 42 + no suffix → prints Order 42 on the receipt. The counter resets when it reaches the number you set.
Payment Methods
Controls which payment options appear at checkout and whether each one triggers the cash drawer to open.
🔒 Manager only
- Tap Settings → Payment Methods.
- Toggle each method on or off.
- Toggle Cash Drawer on or off for each method.
- Tap Save.
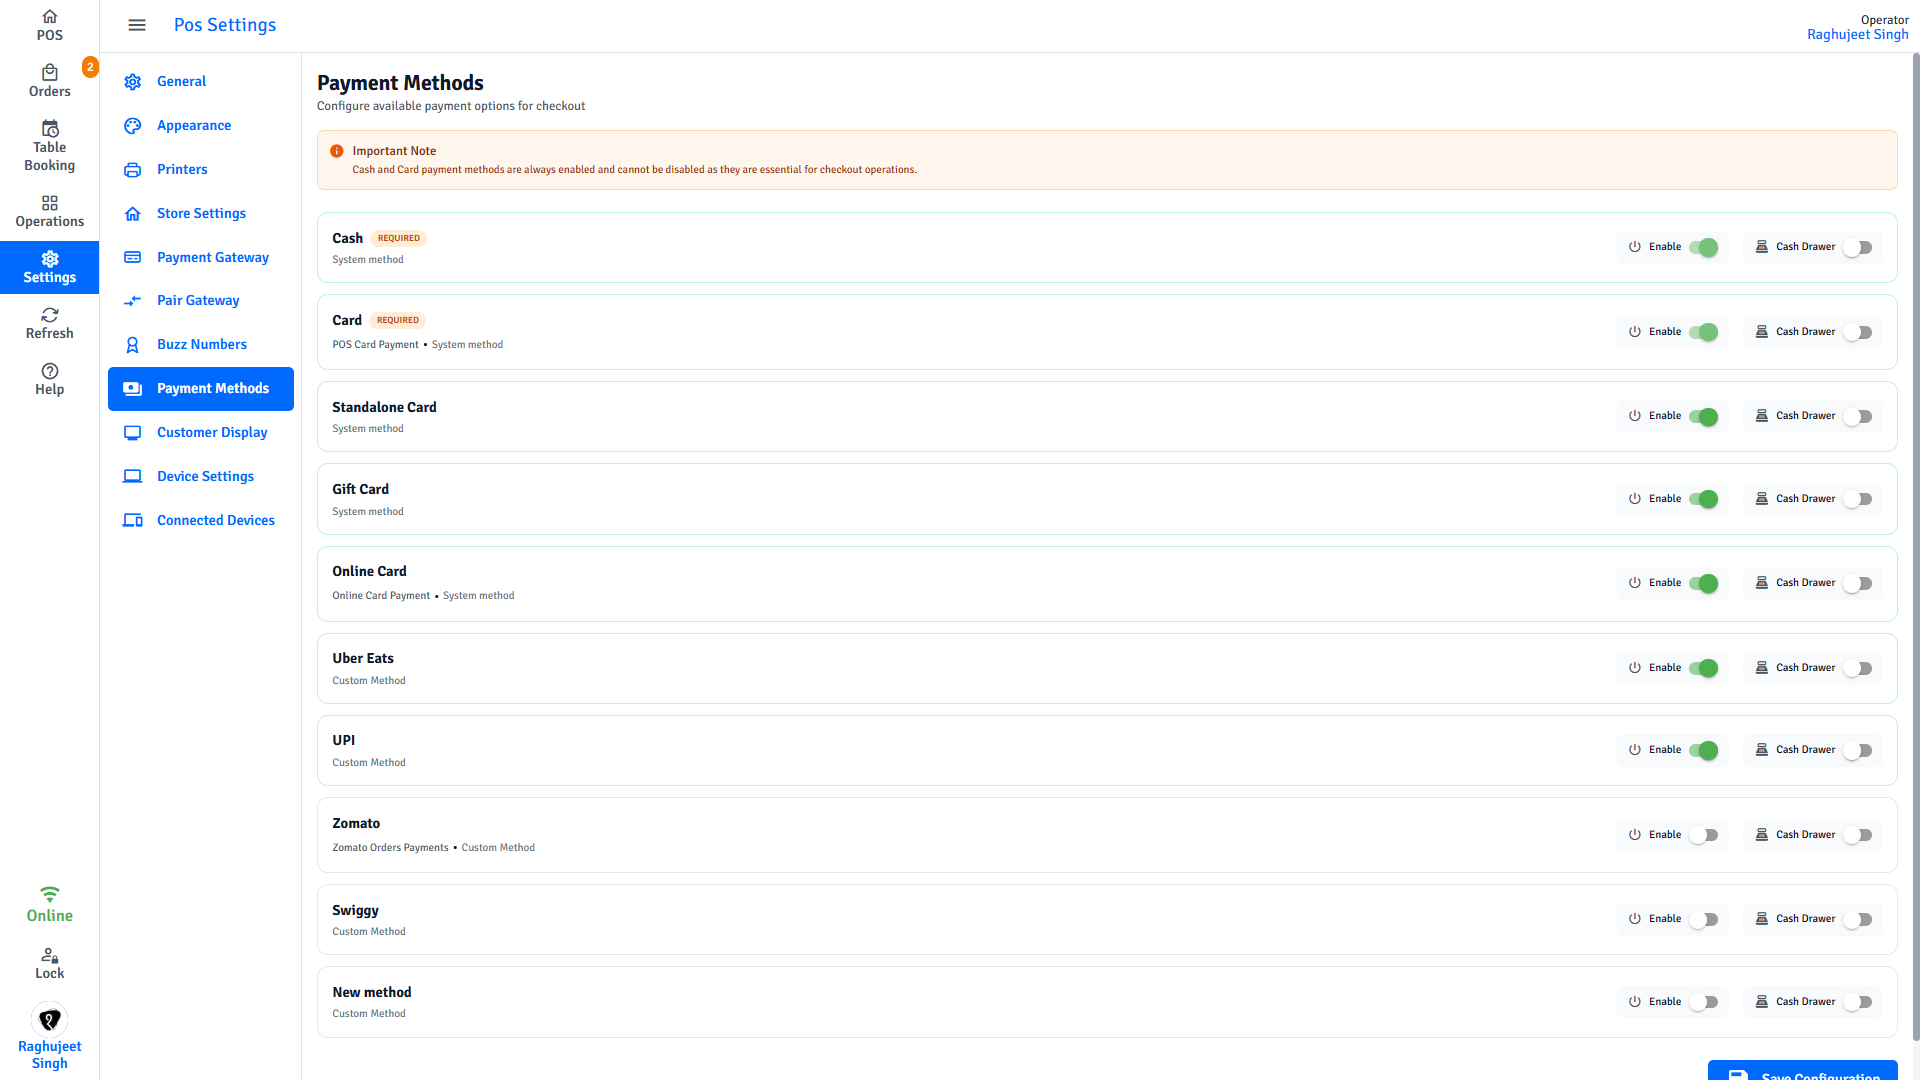
INFO
Cash and Card are required payment methods and cannot be disabled.
| Toggle | What it does |
|---|---|
| Enable | Show or hide this payment method at checkout |
| Cash Drawer | Open the cash drawer automatically when this method is used |
Typical configuration:
| Payment method | Cash Drawer |
|---|---|
| Cash | Yes |
| Card (EFTPOS) | No |
| Gift Card | No |
Next steps
- Printers & Cash Drawer - Add your printer and cash drawer
- Payment Gateways - Connect your EFTPOS terminal
- Device Settings - Configure the terminal and find the IP address for displays
- Customer Display - Configure the customer-facing screen
- Connected Devices - Verify displays are connected
- Receipt Customisation - Choose what prints on receipts