
Receipt Customisation
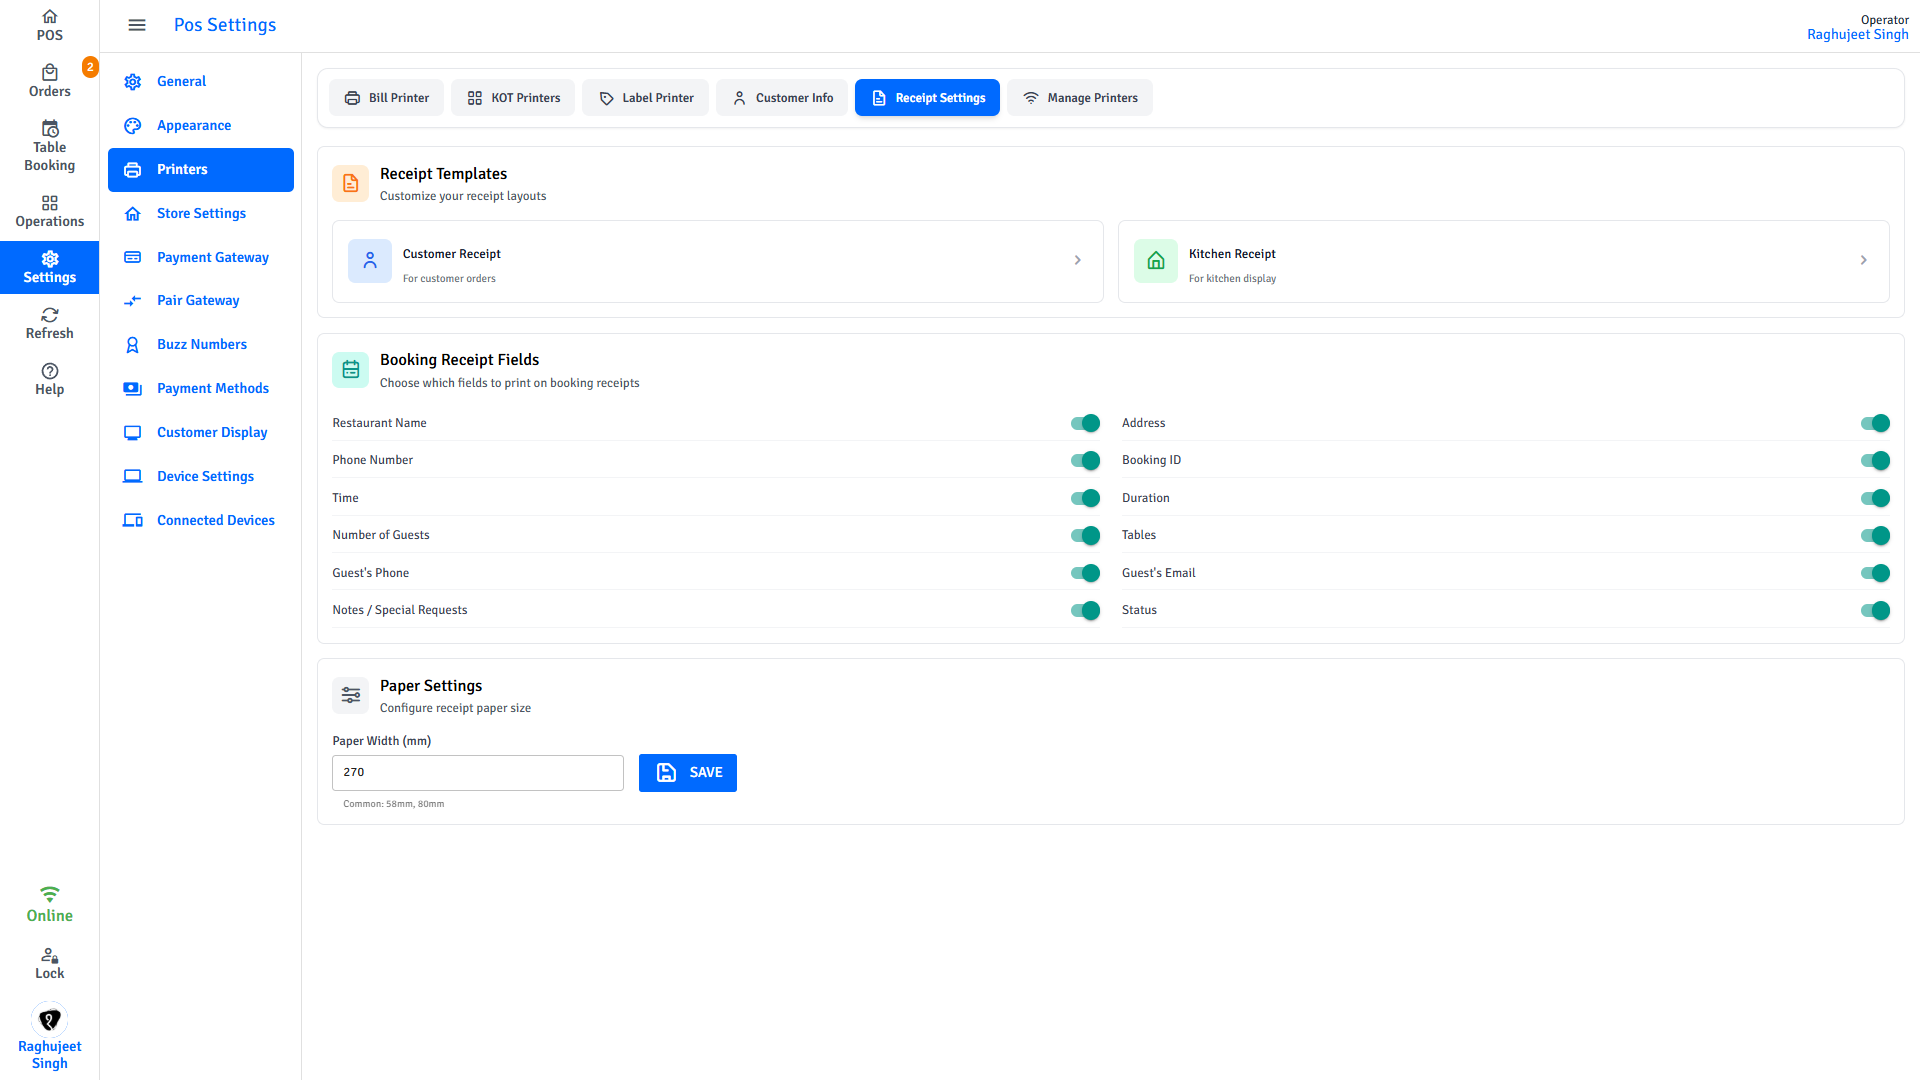
All receipt settings live under POS Settings → Printers. The Printers screen has six tabs - each tab controls a different receipt type.
| Tab | What you configure |
|---|---|
| Receipt Settings | Customer receipt and kitchen receipt layout |
| Label Printer | Item label stickers |
| Customer Info | Customer detail slip for delivery orders |
| Bill Printer | Main bill printer connection |
| KOT Printers | Kitchen order ticket printers |
| Manage Printers | Add, edit, and remove all printers |
This page covers the receipt layout tabs. For adding printers and hardware, see Printers & Cash Drawer.
Customer Receipt
The customer receipt is printed when an order is paid. You can control which fields appear, their order, and their font size.
How to open the customer receipt editor
- Tap Settings in the navigation menu.
- Tap Printers.
- Tap the Receipt Settings tab.
- Tap the Customer Receipt card ("For customer orders").
The receipt editor opens. It has two panels:
| Panel | What it does |
|---|---|
| Left - Live preview | Shows exactly how the receipt will look as you make changes |
| Right - Settings | Controls for header, body, and footer |
When you are done, tap Save & exit. To go back to the factory defaults, tap Reset to default.
Manager only
Only managers and admins can access Printers settings and save receipt changes.
Header fields
The header prints at the top of the receipt - your business details and order summary.
Each row can be:
- Shown or hidden - tap the toggle on that row
- Reordered - drag the row up or down
- Resized - select a font size from the dropdown on that row
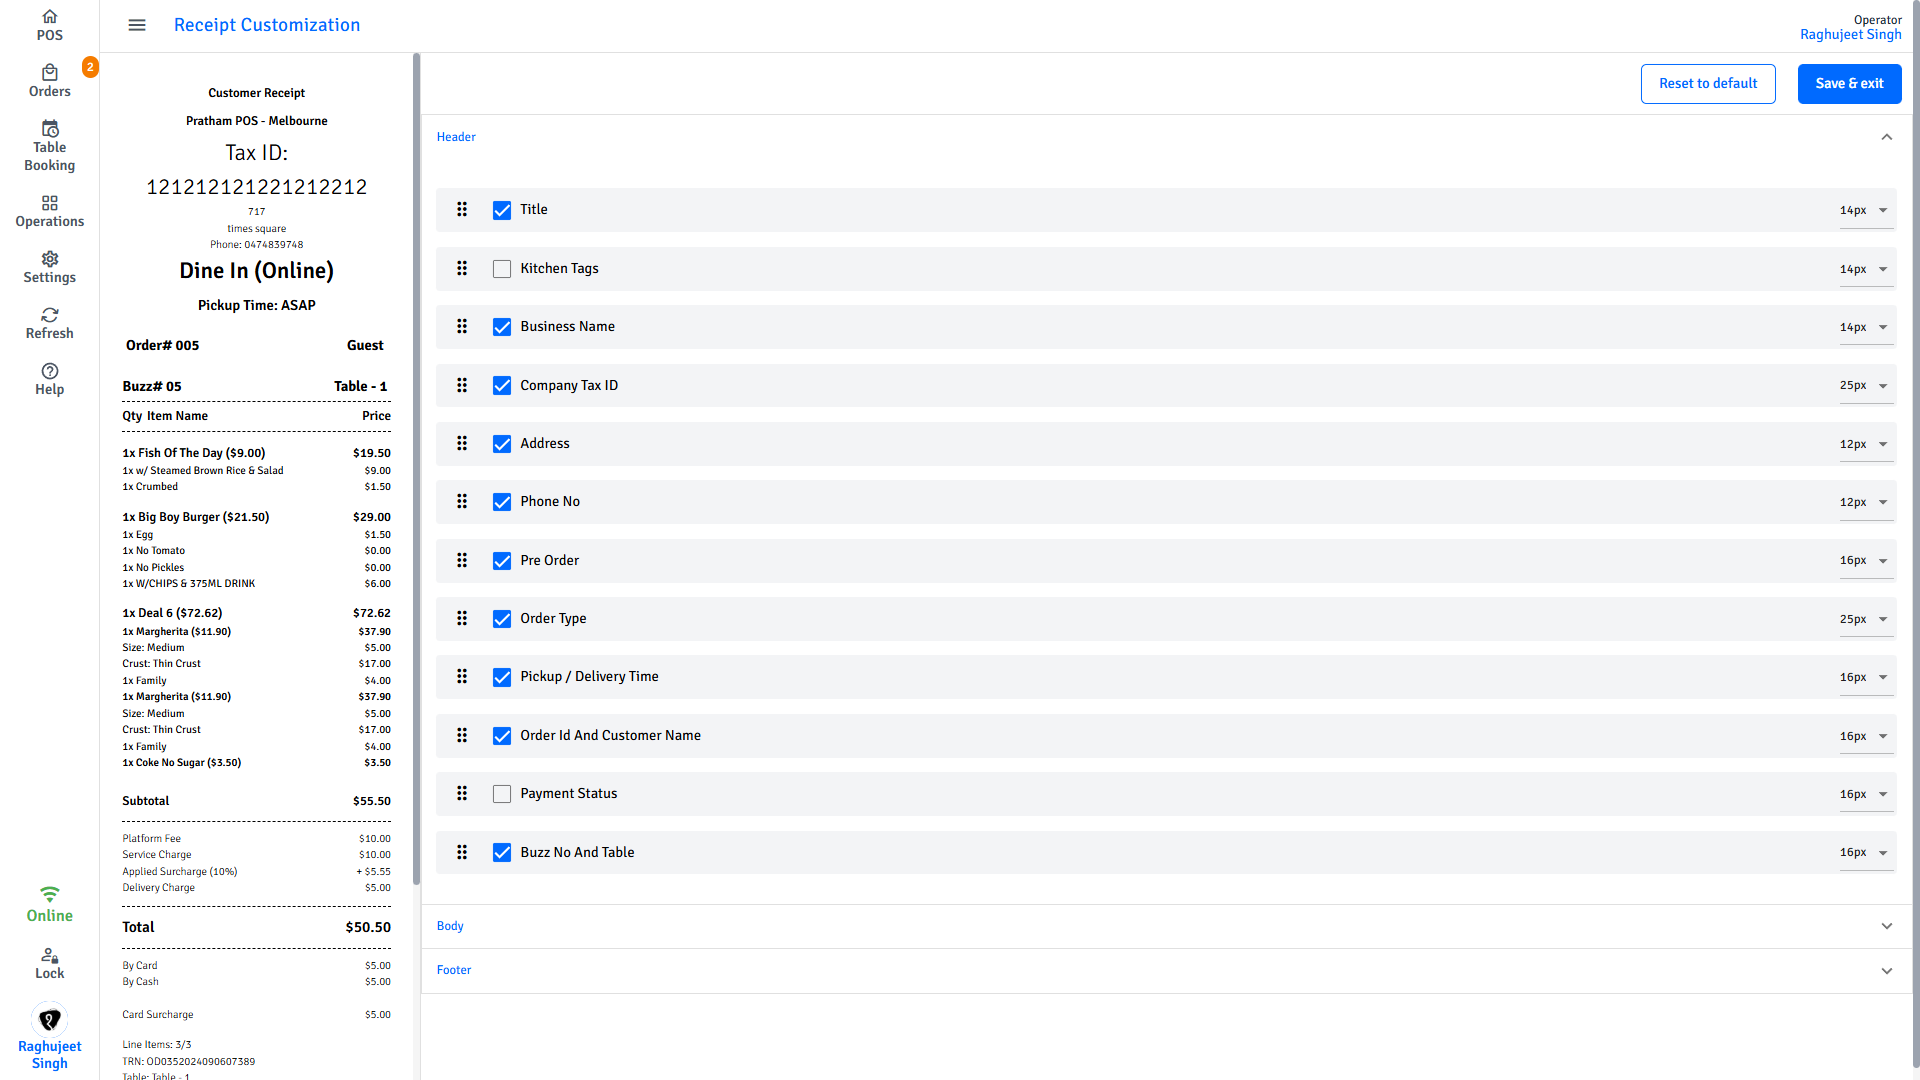
| Field | What it prints |
|---|---|
| Title | A heading label at the very top |
| Business Name | Your restaurant's name |
| Company Tax ID | Your ABN or equivalent tax number |
| Address | The outlet address |
| Phone Number | The outlet phone number |
| Order Type | Dine-In, Takeaway, or Delivery |
| Pre Order | Shown if the order is a pre-order |
| Pickup / Delivery Time | The scheduled pickup or delivery time |
| Payment Status | Paid, Pending, etc. |
| Order ID & Customer Name | Order reference number and customer name on one line |
| Buzz Number & Table | The buzz/pickup number and assigned table on one line |
Body settings
The body controls how the item list in the middle of the receipt is displayed.
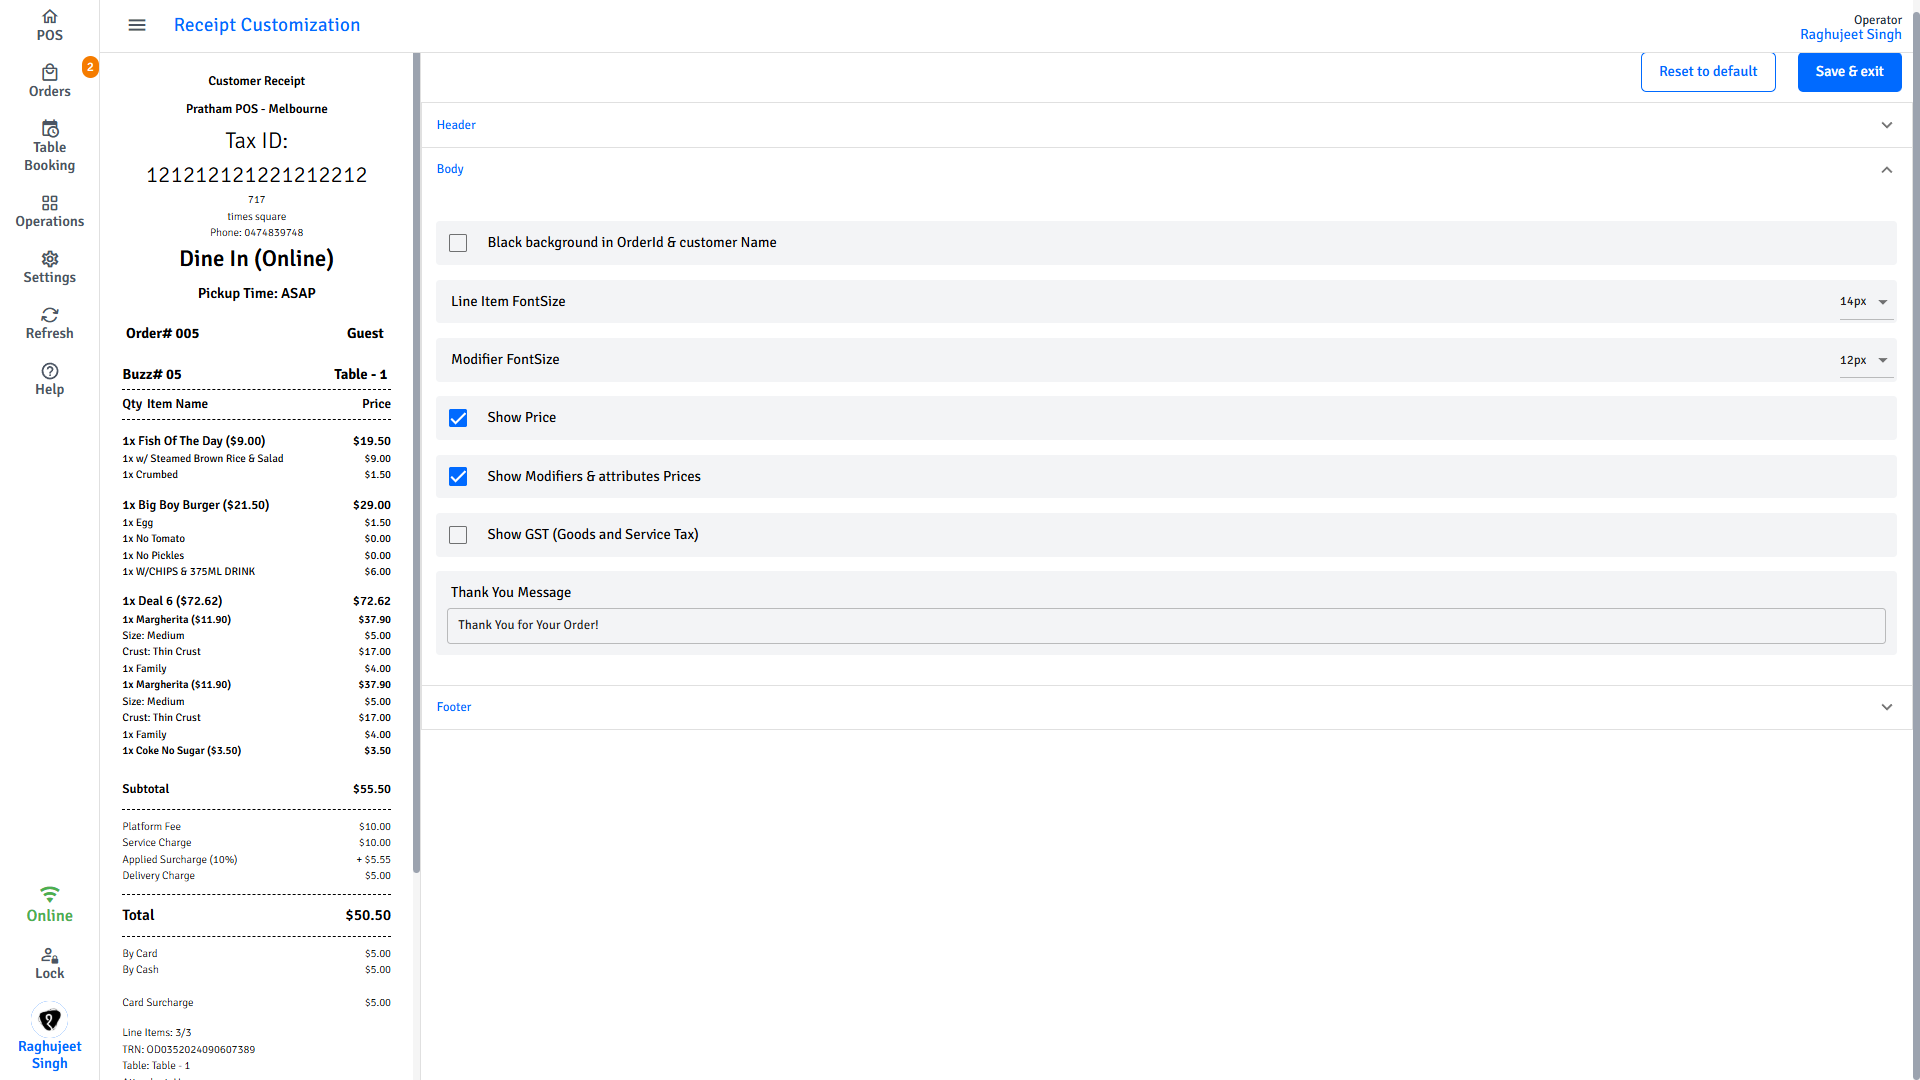
| Setting | What it does |
|---|---|
| Line Item Font Size | Text size for each item name and quantity |
| Modifier Font Size | Text size for modifier lines under each item |
| Show Price | Toggle item prices and line totals on or off |
| Show Modifier & Attribute Prices | Toggle the price of each selected modifier |
| Show GST | Toggle GST amount per item |
| Black background on Order ID & Customer Name | Adds a dark highlight bar behind that header row |
Available font sizes for all fields: 12px · 14px · 16px · 18px · 20px · 22.5px · 25px
Footer fields
The footer prints below the item list - totals, payment summary, and order details.
Each row supports the same toggle, drag-to-reorder, and font size controls as the header.
| Field | What it prints |
|---|---|
| Subtotal | Order subtotal before charges |
| Charges and Discount | Applied surcharges and discounts |
| GST | Total GST on the order |
| Total | Final order total |
| Payments | Payment method(s) and amounts |
| Line Items | A summary list of items |
| TRN | Transaction reference number |
| Table Name | The assigned table |
| Attendant Name | The staff member who served the order |
| Order Date | Date the order was placed |
| Pickup Time | Scheduled pickup time |
| Waiting Time | Estimated wait time |
| Delivery Time | Scheduled delivery time |
| Delivery Address | Customer delivery address |
| Note | Order-level note |
| Printer Name | Name of the printer used |
| Buzz Number | Order buzz / pickup number |
| Payment Status | Paid, Pending, etc. |
| Terminal Name | POS terminal name |
| Customer Phone Number | Customer's phone number |
| Expected Payment Method | Payment method requested for the order |
| Cash Given / Change | Cash tendered and change returned |
Thank You message
At the bottom of the settings panel, enter your message in the Thank You Message field. It prints at the very end of every customer receipt.
Default: Thank You for Your Order!
Kitchen Receipt
The kitchen receipt (KOT - Kitchen Order Ticket) goes to the kitchen printer when an order is placed or updated. It uses the same editor as the customer receipt.
How to open the kitchen receipt editor
- Tap Settings in the navigation menu.
- Tap Printers.
- Tap the Receipt Settings tab.
- Tap the Kitchen Receipt card ("For kitchen display").
The same receipt editor opens. All header and footer fields are identical - only the defaults differ.
How kitchen receipt defaults differ from customer receipt
| Setting | Customer Receipt | Kitchen Receipt |
|---|---|---|
| Kitchen Tags | Hidden | Visible |
| Line Item Font Size | 14px | 16px |
| Modifier Font Size | 12px | 14px |
| Show Price | On | Off |
| Show Modifier Prices | On | Off |
| Payments (footer) | Visible | Hidden |
| Charges and Discount (footer) | Visible | Hidden |
| Printer Name (footer) | Hidden | Visible |
TIP
Set a larger font size on the kitchen receipt - kitchen staff often read tickets at a distance or in low light.
Booking Receipt
The booking receipt is printed for table reservations. Its field visibility settings are also inside the Receipt Settings tab.
How to configure the booking receipt
- Tap Settings in the navigation menu.
- Tap Printers.
- Tap the Receipt Settings tab.
- Scroll down to the Booking Receipt Fields section.
- Toggle each field on or off.
- Scroll further down to Paper Settings and enter the Paper Width (mm) to match your printer's paper roll.
- Tap Save.
| Field | What it prints |
|---|---|
| Restaurant Name | Your restaurant name |
| Address | Outlet address |
| Phone Number | Outlet phone |
| Booking ID | The reservation confirmation code |
| Time | Booking date and time |
| Duration | How long the booking is for |
| Number of Guests | Guest count |
| Tables | Assigned table(s) |
| Guest's Phone | Guest contact number |
| Guest's Email | Guest email address |
| Notes / Special Requests | Any notes on the booking |
| Status | Booking status (Confirmed, etc.) |
TIP
Set Paper Width to match your roll: 58mm for narrow rolls, 80mm for standard rolls.
Label Printer
Labels print one sticker per item. Use them in venues that package individual items - takeaway containers, bakery bags, and similar.
How to set up label printing
- Tap Settings in the navigation menu.
- Tap Printers.
- Tap the Label Printer tab.
- Toggle Enable on.
- Select your printer from the Label Printer dropdown.
- Enter the Label Width (px) to match your label stock.
- Select Item Name Font Size and Modifier Font Size.
- Toggle Show order number and Show item notes as needed.
- Tap Save.
| Setting | What it does |
|---|---|
| Label Printer | Which printer to send labels to |
| Label Width (px) | Width of your label stock in pixels |
| Item Name Font Size | Text size for the item name |
| Modifier Font Size | Text size for modifier lines |
| Show order number | Print the order number on each label |
| Show item notes | Print kitchen notes on each label |
INFO
Label width in pixels: 58mm stock ≈ 270px · 80mm stock ≈ 384px
Customer Info Receipt
The customer info receipt is a small slip printed alongside the order receipt. It always contains: outlet name, customer name, phone number, email, and daily order ID. It is mainly useful for delivery orders.
How to enable the customer info receipt
- Tap Settings in the navigation menu.
- Tap Printers.
- Tap the Customer Info tab.
- Toggle Enable on.
- Select a Font Size.
- Tap Save.
There are no individual field toggles - the slip always prints the same fixed set of details.
Reprinting a receipt
You can reprint any receipt at any time. Auto-print settings do not affect reprinting.
- Tap Orders in the navigation menu.
- Find and open the order.
- Tap Reprint Receipt.
INFO
For card payments, a separate EFTPOS receipt is printed directly by the payment terminal. That slip is independent of all the settings on this page.
Next steps
- Printers & Cash Drawer - Add and test printers
- POS Settings - Auto-print behaviour, payment methods
- Shift Management - Taking orders and processing payments