
Tables
The Tables screen is your live floor plan — a real-time view of every table in the venue. You can open a table, seat guests, move an order to a different table, merge two tables into one bill, and keep an eye on how long each table has been running. Everything happens from this one screen.
Getting to the Tables screen
There are two ways in:
- Tap Tables in the left navigation menu — this takes you straight to the floor plan.
- Tap the table icon button in the cart header at the top of the order screen — useful when you're mid-order and need to switch or assign a table.
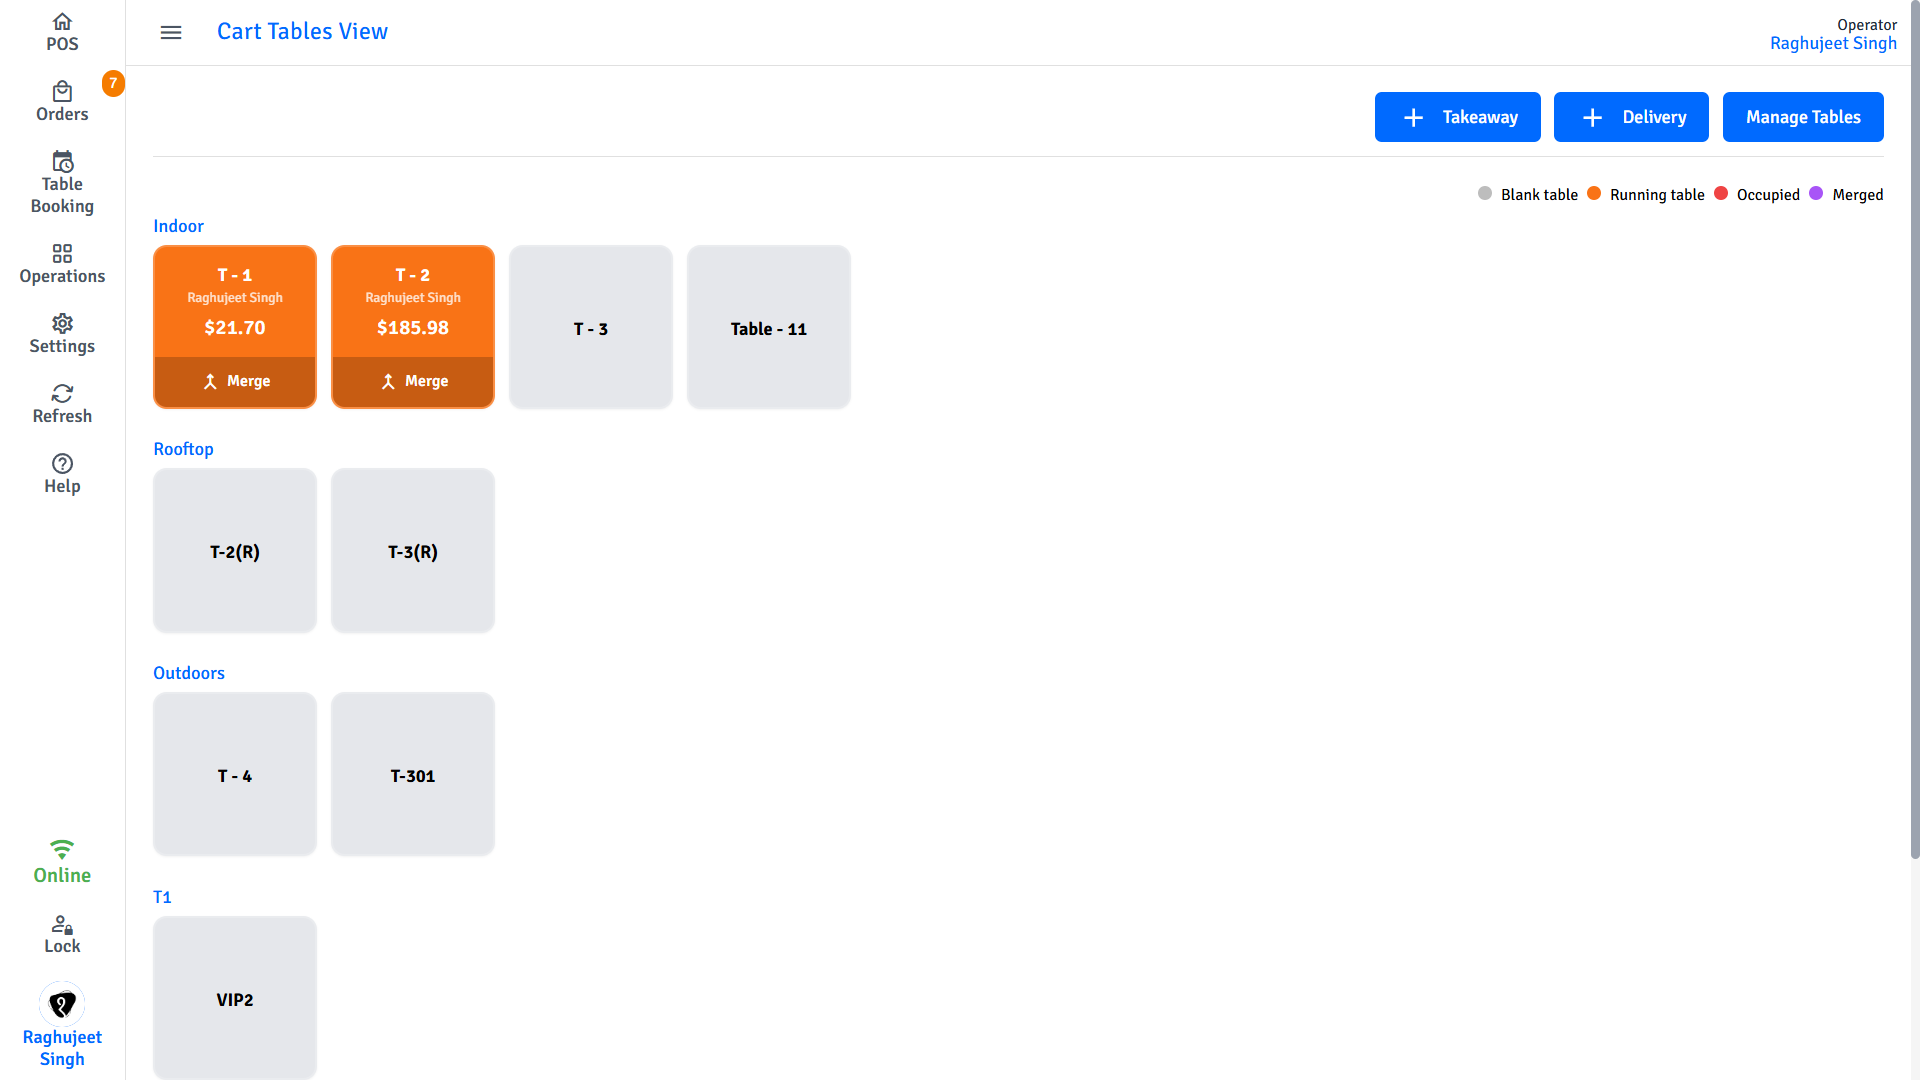
Tables are grouped by table type, and each card is colour-coded so you can read the room at a glance.
What each table card shows
Every table is a card. Here's what you'll find on it:
| Area | What it shows |
|---|---|
| Status bar | Coloured header with the status label, an icon, and the seating capacity |
| Table name | The big bold name in the middle — hard to miss |
| Attendant | Who's serving the table, if assigned |
| Running total | The current order amount |
| Countdown timer | A live timer strip at the bottom showing time remaining (only visible when your manager has enabled it) |
| Reservation strip | The next booking for this table — guest name, time, and party size |
| Merge button | Tap this to start merging the table into another |
Table colours at a glance
| Colour | Status | What it means |
|---|---|---|
| Grey | Open | Empty and ready to seat |
| Orange | Running | Has an active order on this terminal |
| Red | Occupied | In use on a different terminal or device |
| Purple | Merged | Has been combined into another table's order |
What you can do with a table
| Gesture | What happens |
|---|---|
| Tap | Opens the existing order, or links the table to your current order |
| Hold (long-press, ~0.6 sec) | Starts a brand-new order on that table and opens the customer search |
| Tap the timer strip | Opens the Extend Time dialog so you can add more minutes |
| Tap Merge | Enters merge mode with this table as the destination |
Seating a table
From the Tables screen
- Tap Tables in the left navigation menu.
- Tap any Open (grey) table.
- The POS order screen opens with that table assigned — start adding items.
From the cart header
- Tap the table icon in the cart header.
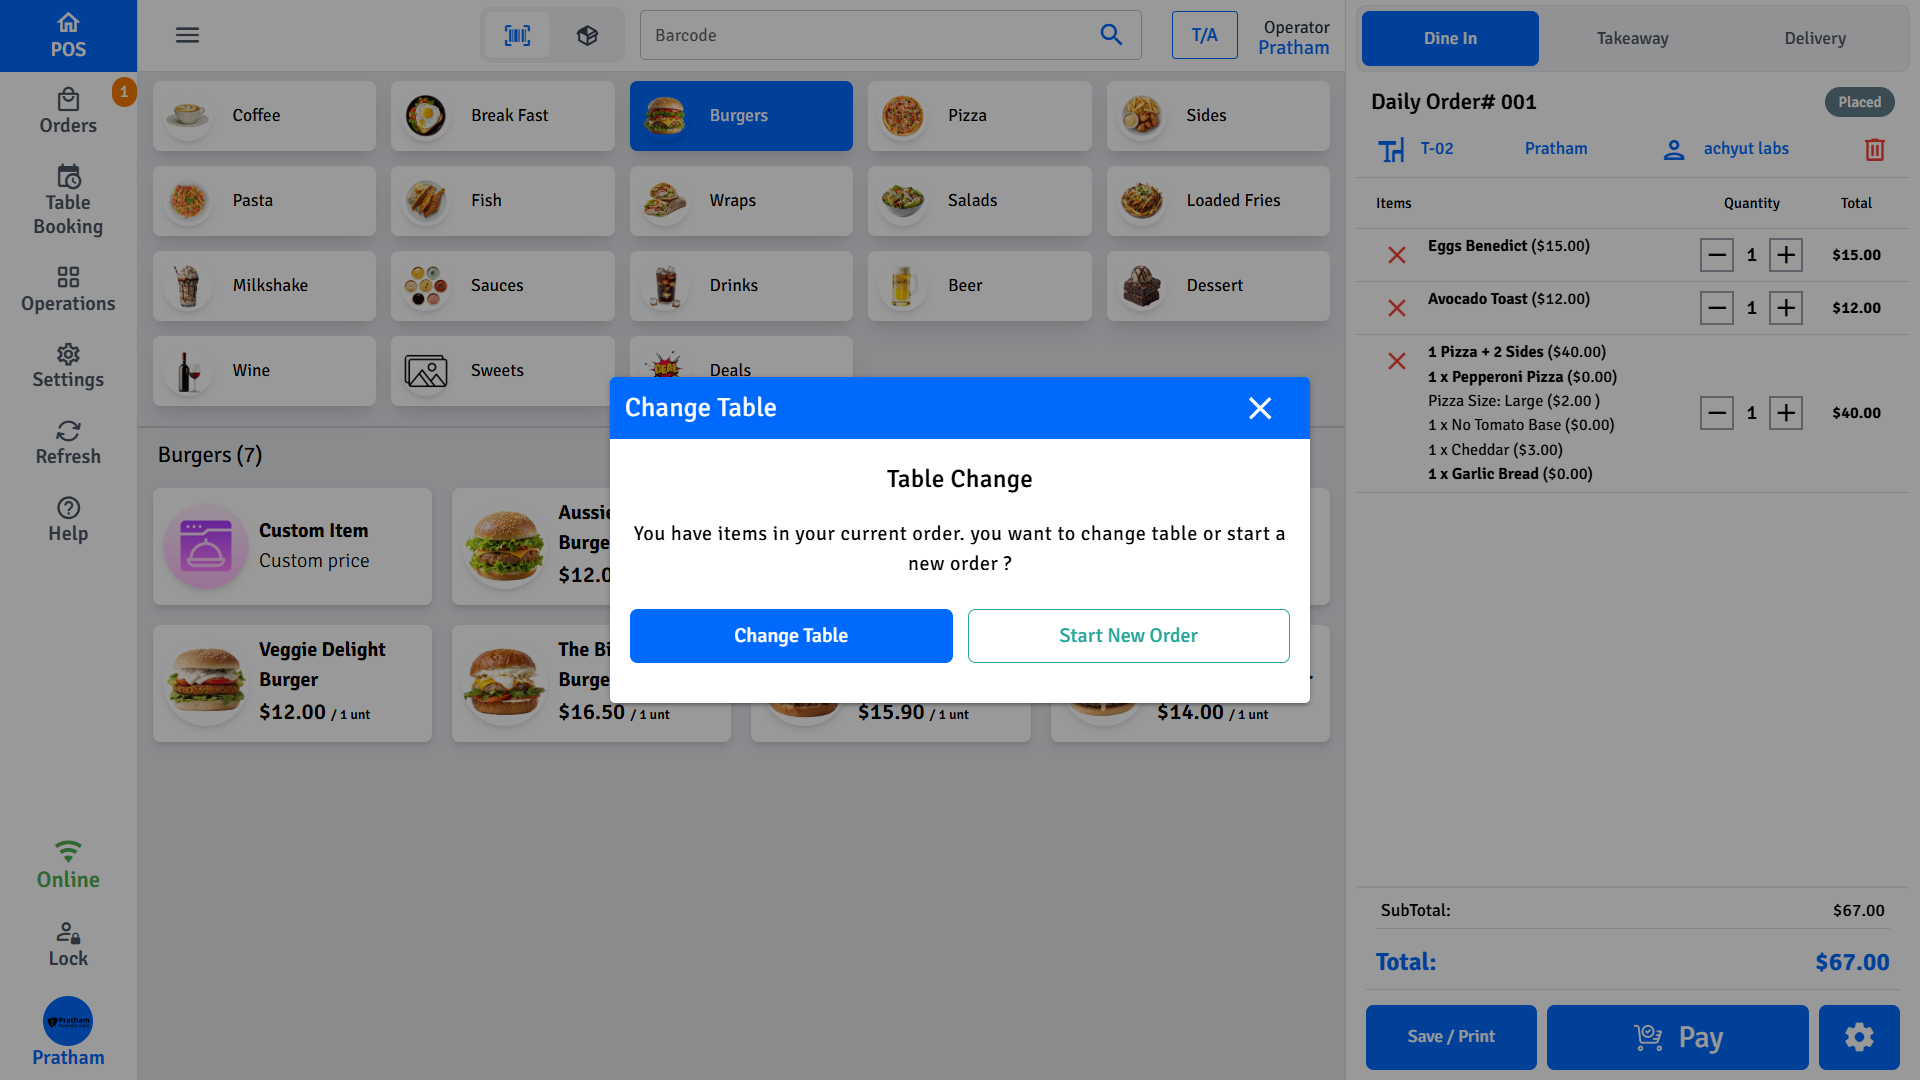
- If you already have items in the current order, a dialog asks what you want to do — tap Change Table to reassign the existing order, or Start New Order to begin fresh on the new table.
- Tap the table you want.
Long-press to seat a specific customer
When you know exactly who's sitting down, long-press an Open table to skip straight to the customer search. Once you've found and selected the customer, the order opens with them already linked.
TIP
Long-press only works on Open (grey) tables. You can't long-press a table that already has an order or is occupied on another device.
Opening an existing order
Tap any Running (orange) table to pick up where you left off. The order opens with all current items still there, ready to add more or go to checkout.
Moving guests to a different table
Sometimes guests settle in somewhere else, or a bigger party arrives and needs the table you've already started an order on. Use Switch Table to move the entire order without losing anything.
- Open the active order at the current table.
- Tap the table icon in the cart header.
- Tap Change Table in the dialog that appears.
- The Tables screen opens in switch mode — only empty tables are selectable.
- Tap the destination table.
- The order moves instantly. The original table goes back to Open.
INFO
The POS keeps a record of which table the order started on, so your reports will reflect where guests were originally seated.
Combining tables into one bill
When a group at two different tables wants to pay together, use Merge. It pulls all items from one table's order into another, leaving you with a single combined order.
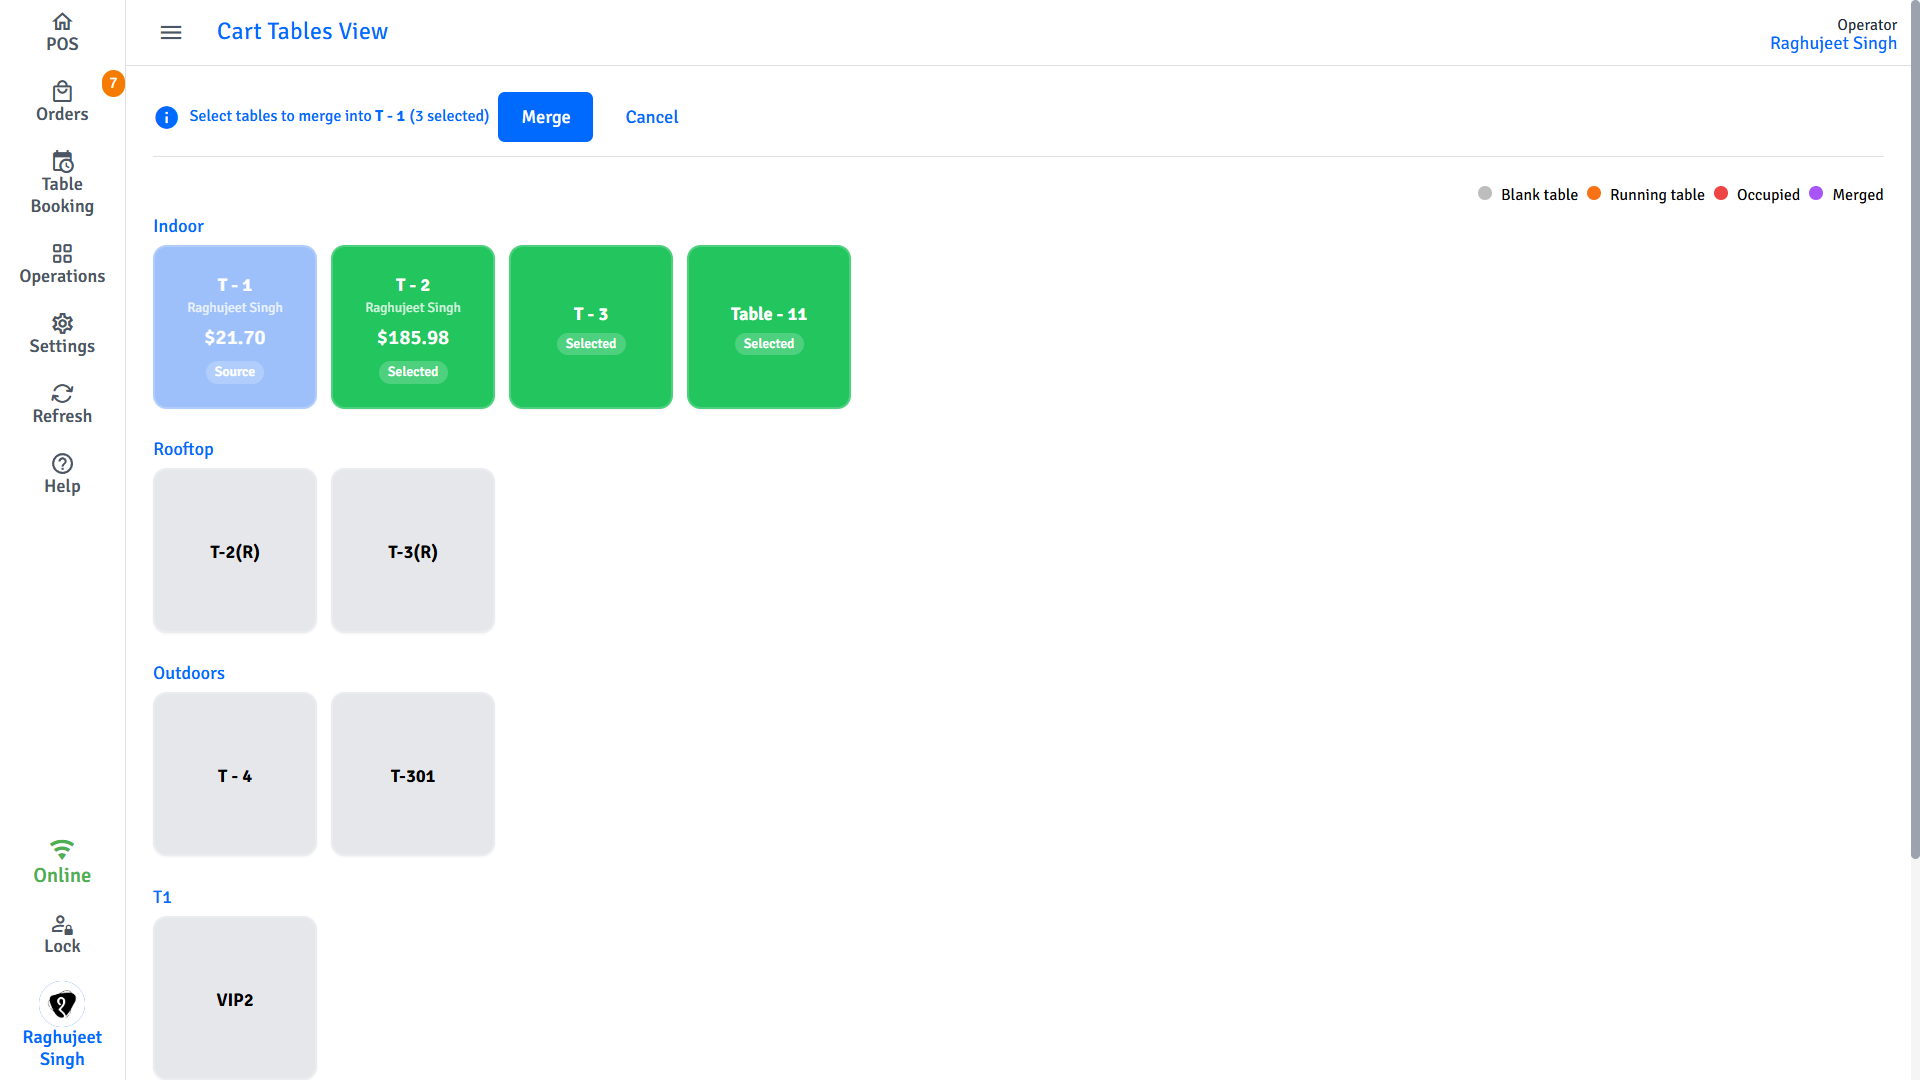
- On the Tables screen, tap Merge on the card of the table that will receive the other orders.
- The screen enters merge mode — the destination card turns blue and a banner appears at the top.
- Tap the table (or tables) you want to absorb. Each one turns green as you select it.
- Tap Merge in the top banner.
- Confirm in the dialog.
All items from the selected tables land in the destination order. The source tables clear and show as Merged (purple).
TIP
You can merge more than two tables at once — just keep tapping in merge mode before you confirm.
Removing a table from a merged order
If you merged a table by mistake, or a guest decides to pay separately after all:
- Tap the Merged (purple) table card on the floor plan.
- Confirm in the dialog that appears.
The table is removed from the combined order.
WARNING
Removing a merged table doesn't move any items back to it. All items stay on the remaining order. If you need to reassign items to the unmerged table, remove them from the current order and add them again on the newly freed table.
Splitting the bill
When guests at the same table want to pay separately, go through checkout:
- Open the table's order.
- Tap Checkout.
- Tap Split Payment on the payment screen.
See Payments - Split Payment for the full walkthrough.
Upcoming reservations
When a table has a booking coming up, a strip appears at the bottom of the card with the guest's name, arrival time, and party size. This gives you a heads-up while you're looking at the floor — no need to check the reservations screen separately.
If the reservation is within 30 minutes, that strip turns red and shows a warning icon. It's a signal to start thinking about turning that table.
Tapping an Open table that has a booking within 30 minutes will show a confirmation — it tells you who's booked and when, and asks if you want to continue seating anyway.
For everything else — creating bookings, updating reservation status, the timeline view — see Table Reservations.
Table countdown timer
The countdown timer helps you keep service moving. When it's switched on, each Running table shows a live timer strip telling you how long the table has been running and how much time is left.
INFO
The timer is off by default. 🔒 Manager only — it can be turned on in POS Settings → Store Settings → Table Timer.
How the timer counts down
The moment a Dine-In order is created, the timer starts counting down from the Initial Table Time your manager has configured. The colour of the progress bar and the time display change as the clock runs down:
| Colour | What it means |
|---|---|
| Green bar | Plenty of time — no action needed |
| Amber bar | Under 15 minutes left — start wrapping up soon |
| Red, pulsing | Under 5 minutes — time to check in with the table |
| Red Time Expired banner | Session is over — shows how long past time the table is (e.g. +12m 30s) |
When the timer expires, the card border turns red and the entire bottom strip becomes a red Time Expired banner. It's hard to miss.
Tables that spend more get more time
Guests who order more naturally earn more time. Every time the table's running total crosses the Spend to Earn Extra Time threshold (multiplied by the number of seats at that table), the timer automatically adds the configured bonus minutes. You'll see this as a small green +Nm indicator next to the base time on the strip.
So a table of 4 that keeps ordering will keep earning time — you don't need to manually extend it just because the bill is growing.
Adding time manually
If a table needs more time regardless of spend — say, a large group that's still on starters — tap the timer strip to open the Extend Time dialog.
- Tap the timer strip at the bottom of the table card (or the red Time Expired banner if it's already expired).
- Choose how many extra minutes to add: 15, 30, 45, or 60.
- Tap Extend.
The timer picks up immediately with the new time added.
Setting up the timer
🔒 Manager only — go to POS Settings → Store Settings → Table Timer.
- Toggle Table Timer on.
- Initial Table Time — how many minutes every new order starts with (default: 60 minutes).
- Spend to Earn Extra Time — the spend amount per seat that triggers a bonus (default: $30 per seat).
- Extra Time Earned — how many bonus minutes are added each time that threshold is reached (default: 30 minutes).
- Tap Save.
To turn the timer off entirely, come back to the same section and toggle it off. The timer strips disappear immediately from all table cards.
Jump to Table Management
Tap Manage Tables in the top-right corner of the Tables screen to go directly to the table setup screen — no need to navigate back through the menu.
🔒 Manager only — creating and editing tables requires manager or admin access. See Table Configuration for the full setup walkthrough.
FAQs
A table shows as Occupied (red) but nobody is sitting there. How do I clear it?
An open order is still attached to that table from another device. You'll need to find and resolve that order — either complete payment or void it. Once the order is closed, the table will return to Open automatically. There's no way to force-clear a table with a live order on it.
What's the difference between Running (orange) and Occupied (red)?
Running means this terminal has an active order open for that table. Occupied means a different terminal or device has the table open — you won't be able to tap into it from here. If a table is stuck on Occupied and you know no one is using it, check whether another device is still holding an open order.
What happens to items when I remove a table from a merge?
Everything stays on the merged order — items don't move back to the original table. After the unmerge, open the order, remove the items that belong to the other table, then re-add them on a new order for that table.
Can I merge more than two tables at once?
Yes. Tap Merge on the destination table, then tap as many other tables as you need. They all turn green as you select them. Confirm once when you're done and everything combines into one order.
A table with a reservation is showing the wrong colour. Why?
The floor plan updates in real time as reservations are created or changed in the Admin Portal. If something looks off, tap Refresh in the navigation to pull the latest data.
The timer expired but the guests are still ordering. How do I add more time?
Tap the red Time Expired banner on the table card. The Extend Time dialog opens — pick 15, 30, 45, or 60 minutes and tap Extend. The timer restarts from the added time.
The table gained extra time automatically. How does that work?
When the Table Timer is enabled, the POS tracks the order total against a per-seat spend target that your manager sets. Every time the table's bill crosses that target, it earns the configured bonus minutes. The green +Nm badge on the timer strip shows how many bonus minutes have been earned so far.
Where do I turn the countdown timer on or off?
🔒 Manager only — go to POS Settings → Store Settings → Table Timer and toggle the switch. Only managers and admins can change this setting.