
Table Reservations
The Table Reservations screen is where staff create new bookings, track guest arrivals, update reservation statuses, and manage blocked periods. It is separate from the floor plan - the floor plan shows a live snapshot of current occupancy, while this screen manages future bookings.
Reservations must be enabled
Table Reservations only appears in the navigation if your location has reservations enabled. If you cannot find it, ask your manager to check the reservation settings in the admin portal.
Opening Table Reservations
Tap Operations → Table Reservations in the navigation menu.
Screen layout
The screen has a toolbar at the top and a main content area that switches between List view and Timeline view.
Toolbar controls
| Control | What it does |
|---|---|
| Status filter (List view only) | Filter by reservation status: All, Requested, Accepted, Arrived, Seated, Completed, No Show, Cancel |
| Date filter | Show reservations for a specific date. Format: DD-MM-YYYY |
| Bookings On / Bookings Off | Toggle to block or unblock all bookings for the selected day. Green = accepting bookings; red = blocked |
| Turn off for interval | Block a specific time window on a date (e.g. 2:00 pm–3:00 pm closed for a private event) |
| Table combinations | Open the table combinations screen to manage multi-table setups for large parties |
| Refresh | Reload the reservations list from the server |
| Print Bookings | Print all reservations shown in the current filtered view |
| List / Timeline toggle | Switch between the table list view and the visual timeline |
| Add booking | Open the booking form to create a new reservation |
List view
The list shows one row per reservation.
| Column | What you see |
|---|---|
| ID | Booking reference number (e.g. #1042) |
| Customer | Guest name and phone number |
| Guests | Party size |
| Date & Time | Booking date, start and end time, and duration in minutes |
| Tables | Table name badges, or "Not assigned" if no table is linked |
| Status | Colour-coded status badge (see Reservation statuses below) |
| Notes | Booking notes, or – if empty |
| Actions | Print, Edit (pencil), and three-dot status menu |
Timeline view
The timeline shows a scrollable horizontal grid:
- Each row is one table (plus a No Table row for unassigned bookings).
- The horizontal axis is time, spanning the venue's operating hours.
- Reservations appear as coloured blocks with the guest name, party size, and a notes indicator.
- A vertical line marks the current time when viewing today.
- Overlapping bookings for the same table stack into multiple lanes.
- A colour legend at the bottom shows what each status colour means.
Use the timeline to spot gaps and overlaps at a glance before assigning a table to a new booking.
Reservation statuses
| Status | Label | Meaning |
|---|---|---|
request | Requested | Booking received, awaiting staff confirmation |
accepted | Accepted | Reservation confirmed |
arrived | Arrived | Guest has arrived at the venue |
seated | Seated | Guest is seated at their table |
completed | Completed | Service finished, table cleared |
no_show | No Show | Guest did not arrive |
cancelled | Cancelled | Reservation cancelled |
Create a reservation
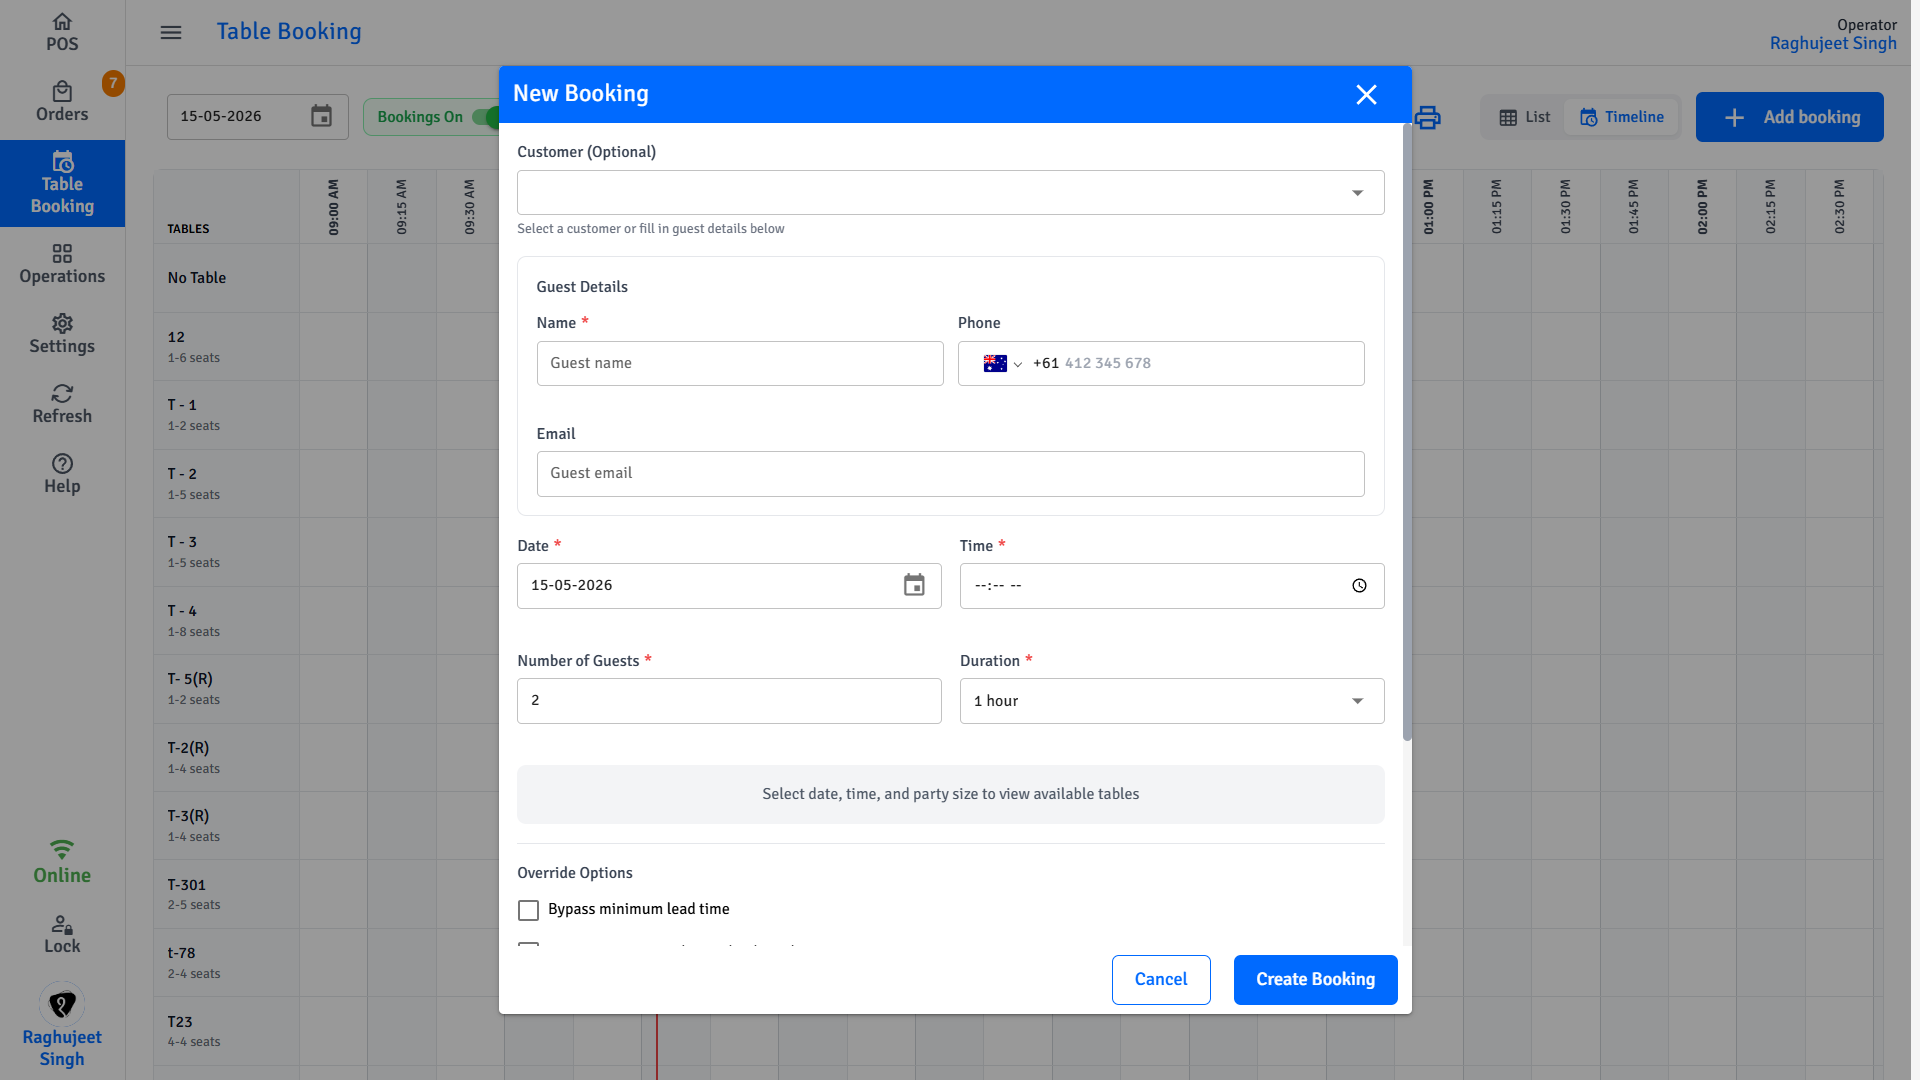
- Tap Add booking.
- The New Booking dialog opens.
- (Optional) Search for an existing customer using the Customer (Optional) field - type a name or phone number to find a match. To add a brand-new customer, tap Add new customer.
- If no customer is selected, enter guest details in the Guest Details section:
- Name (required if no customer selected)
- Phone (optional)
- Email (optional - must be a valid email address if filled)
- Select the Date (today or a future date).
- Select the Time (HH:mm format).
- Enter the Number of Guests (minimum 1).
- Select the Duration from the dropdown:
- 15 min, 30 min, 45 min, 1 hour, 1 hour 15 min, 1 hour 30 min, 1 hour 45 min, 2 hours, 2 hours 30 min, 3 hours
- Once date, time, guests, and duration are filled, the system automatically fetches available tables and table combinations.
- Select a table or combination from the Select Tables section. Each option shows the table name and its seating capacity.
- (Optional) Add Notes - e.g. "birthday", "high chair needed", "window seat requested".
- (Optional) Adjust the Send confirmation notification to customer toggle (enabled by default).
- Tap Create Booking.
No tables showing?
If the "Select Tables" section shows "No tables available for selected slot", try a different date or time. If a suitable table exists but is still not appearing, check that the table is marked as active and available in Table Configuration.
Override options
If your role allows it, an Override Options section appears at the bottom of the booking form. These are for exceptional situations only:
| Override | What it bypasses |
|---|---|
| Bypass minimum lead time | Creates bookings closer to the current time than the minimum lead time setting allows |
| Bypass maximum advance booking days | Creates bookings further in the future than the advance booking limit allows |
| Bypass table capacity restrictions | Assigns a table to a party larger than the table's configured maximum seats |
Use overrides carefully
Overrides skip automated checks that protect against overbooking and operational errors. Only use them when you have a specific reason and manager approval.
Edit a reservation
- In the list view, tap the pencil icon on a reservation row.
- The Edit Booking dialog opens with all fields pre-filled.
- Change any field - date, time, party size, table assignment, notes, or duration.
- The available tables section refreshes when you change date, time, or guest count.
- Tap Update to save.
INFO
The customer linked to a booking cannot be changed when editing - only guest detail fields (name, phone, email) can be updated.
Update a reservation status
- In the list view, tap the three-dot menu (â‹®) on a reservation row.
- Tap the desired status action:
| Action | When to use |
|---|---|
| Requested | Reset a booking back to awaiting confirmation |
| Accepted | Confirm the booking |
| Arrived | Mark guest as arrived at the venue |
| Seated | Mark guest as seated at the table |
| Completed | Mark service as finished |
| No Show | Record that the guest did not arrive |
| Cancel | Cancel the reservation - requires confirmation |
Cancelling a reservation opens a confirmation prompt. Tap Yes, Cancel to confirm or No to go back.
Seat reserved guests (create an order from a reservation)
When reserved guests arrive and are ready to order:
- Open the reservation (from the list or by tapping the Reserved table on the floor plan).
- Tap Seat Guests or Create Order.
- A new Dine-In order is created and linked to the reserved table.
- The reservation status updates to Seated and the table shows as Occupied on the floor plan.
Block bookings for a full day
To prevent any new bookings from being accepted on a specific date:
- Use the Date filter to navigate to the date you want to block.
- Tap the Bookings On toggle.
- A confirmation prompt appears: enter an optional reason.
- Tap Block to confirm.
- The toggle turns red and shows Bookings Off.
To re-enable bookings, tap the Bookings Off toggle and confirm.
Block a time interval
To close a specific time window on a date (e.g. a private event from 6:00 pm–8:00 pm):
- Tap Turn off for interval in the toolbar.
- The Booking Intervals dialog opens.
- Any currently active blocks for the day are listed at the top. Tap the trash icon to remove a block.
- In the Add New Block section:
- Select the Date.
- Enter the Start Time.
- Enter the End Time.
- Tap Turn Off.
- The block is added and appears in the active blocks list immediately.
- Tap Close to dismiss the dialog.
TIP
Blocked intervals prevent new bookings in that window but do not affect reservations already confirmed for that time.
Table combinations
If your venue uses table combinations (multiple tables grouped for large parties), tap Table combinations in the toolbar to manage them. Combinations appear as selectable options in the Select Tables section when creating or editing a booking.
See the Table Combinations - Admin Reference for setup instructions.
Print reservations
- Print all: Tap Print Bookings in the toolbar to print the full list for the current date and filter.
- Print one: Tap the printer icon on an individual reservation row.
Common mistakes and FAQs
How far in advance can a booking be made?
The advance booking limit is set in reservation settings. Staff can bypass it using the override option if needed.
The "Add booking" button is missing
If the button does not appear, reservations may be turned off for your location or your role may not have permission to create bookings. Ask your manager.
Can two reservations be assigned to the same table at the same time?
No. The available tables list only shows tables that are free during the requested slot. If a table is already booked, it will not appear as an option.
Blocking a day does not cancel existing reservations
Using Bookings Off prevents new bookings from being made - it does not cancel reservations that were already accepted. Contact booked guests separately if you need to cancel them.
A reserved table shows as Available on the floor plan
The floor plan only shows a Reserved status when a reservation is within the near-upcoming window. Reservations booked days in advance will show as Available until closer to the booking time.
Related pages
- Tables - floor plan, assigning orders, switching and merging tables
- Table Configuration - create and configure tables, table types, and shapes
- Table Reservations - Admin Reference - reservation settings, lead times, advance booking limits, and notification rules
- Table Combinations - Admin Reference - set up multi-table combinations for large parties