Location items — edit, bulk edit, manage per outlet
Menu: Locations Management → Location items
This screen lists menu items attached to each store (prices, tax, online vs in-store, kiosk, Uber Eats flags, status). You filter by outlet, search, edit one row, or use bulk and toolbar tools for many rows at once.
Filters (top row)
| Filter | Options |
|---|---|
| Location | All locations or pick one outlet (needed for some tools that only work for a single site). |
| Item name or barcode | Free search; X clears. |
| Category | One category from the list your data provides. |
| Availability | All products, Online, or In store only (matches the orange/blue badges in the table). |
| Status | All status, Active, Inactive, or Out of stock. |
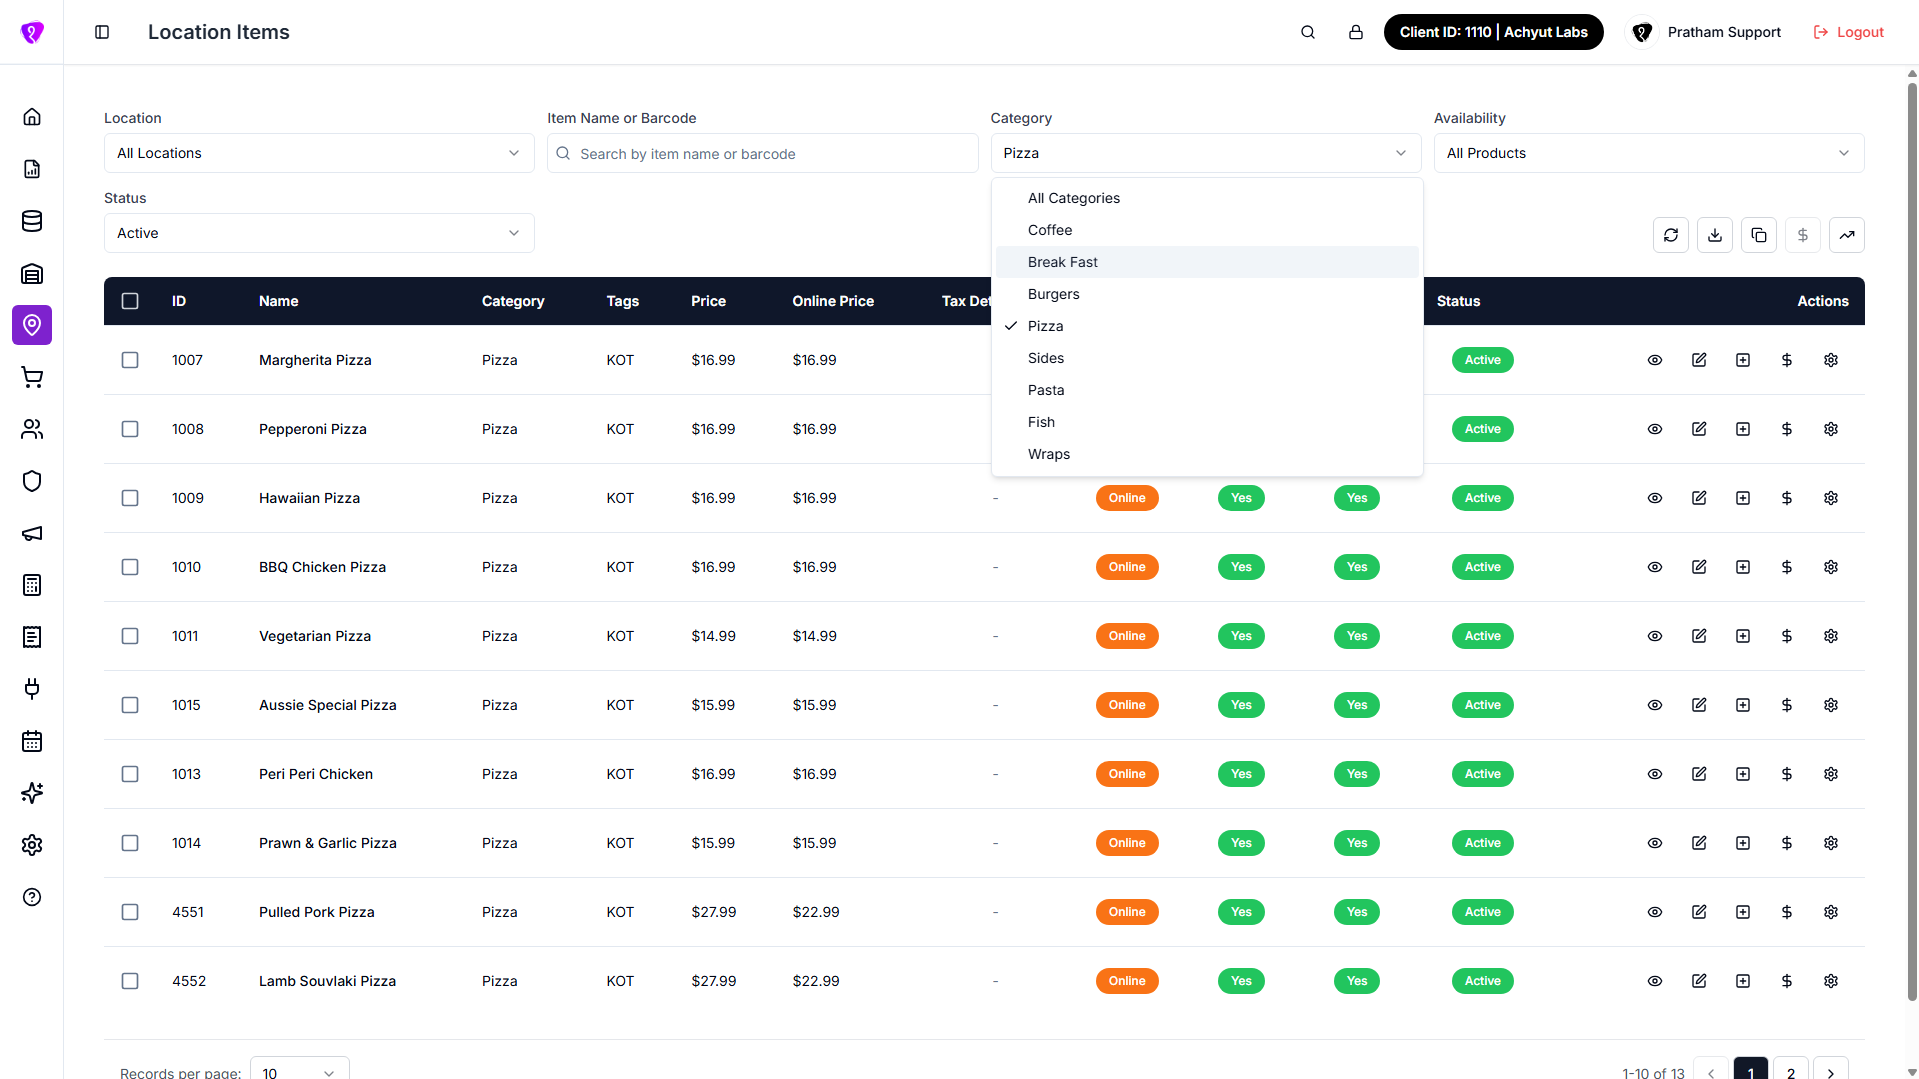 Caption: Filter by location/category/status and access bulk tools
Toolbar buttons (right side)
| Button | Tooltip | What it does |
|---|---|---|
| Refresh | Refresh | Reloads data; icon spins while loading. |
| Download | Export to CSV | Saves the current filtered list to a spreadsheet file; disabled when the list is empty. File name includes location name and date. |
| Copy | Clone items | Opens Clone location items: pick from location and to location, then confirm to copy items between sites (needs permission to add location items). |
| Dollar (single) | Copy prices to channel | Opens a flow to copy prices to another sales channel; disabled until you pick one location in the filter (not “all”). Needs permission to change items. |
| Trending up | Bulk price update | Opens Bulk Price Update — increase or decrease prices for every item at one location using a percentage or flat amount (see below). Does not use row checkboxes. |
Bulk price update (toolbar trending-up icon)
Use this when you need to raise or lower prices across a whole outlet at once (for example a 5% increase on all menu prices after a cost change). It is different from Bulk edit (bulk bar pencil), which only changes rows you have checked and lets you type exact new prices.
| Bulk price update (toolbar) | Bulk edit (bulk bar pencil) | |
|---|---|---|
| Scope | All location items at one restaurant | Only selected rows in the table |
| How prices change | Percentage or flat increase/decrease on existing values | You enter new values (or leave fields empty to skip) |
| Row selection | Not required | Required |
How to open
- Go to Location items.
- Click the trending-up icon on the toolbar (tooltip Bulk price update).
- The dialog title is Bulk Price Update.
You do not need to tick any checkboxes in the table.
Location
- If the Location filter is set to one outlet, that outlet is used automatically and the Location dropdown is hidden in the dialog.
- If the filter is All locations, you must pick a Location in the dialog before you can apply.
Unlike Copy prices to channel, this button is not disabled when the filter is “all locations” — you can still open it and choose a site inside the window.
Dialog fields
| Field | What it does |
|---|---|
| Location | Shown only when the page filter is All locations. The outlet whose item prices will be adjusted. |
| Adjustment type | Percentage (%) — change by a percent of the current price. Flat amount — add or subtract a fixed currency amount. |
| Operation | Increase or Decrease. |
| Value | Positive number. For percentage, 10 means 10%. For flat amount, use your currency (for example 5.00). Empty, zero, or invalid values are rejected. |
| Price fields to update | Check one or more: Regular price, Online price, Dine-in price. At least one must be selected (all three are selected by default). Unchecked fields are left unchanged. |
| Also update half prices | When enabled (default on), half-and-half prices at that location are adjusted the same way (for example half_price, online_half_price, dine_in_half_price where your menu uses them). Turn off if you only want full-item prices to change. |
Apply
- Fill in adjustment type, operation, and value.
- Confirm which price columns and half prices should be included.
- Click Apply.
While the request runs, the button shows Updating…. Cancel closes the dialog without saving (disabled while updating).
On success you see a message such as how many products were updated, and the table reloads. Errors are shown as toast messages from the system.
Examples
- 10% increase on regular and online prices: Adjustment type Percentage, Operation Increase, Value
10, tick Regular price and Online price, leave Dine-in price unchecked if you do not use it. - $2 decrease on all three price columns: Adjustment type Flat amount, Operation Decrease, Value
2, tick all three price fields. - Half-and-half stays in sync: Leave Also update half prices checked so half prices move with the main prices.
Exact rounding (for example to two decimal places) is handled on the server; if a price would go negative, the API may reject or clamp the update — check the error message if apply fails.
Permissions
Applying changes needs permission to update location items (same as other price edits). The toolbar icon may still appear depending on your role; if apply fails, ask an administrator for LOCATION_ITEMS update access.
Table columns
| Column | Meaning |
|---|---|
| Checkbox | Select row for bulk actions; header box selects or clears all visible filtered rows. |
| ID | Internal link id for that product at that restaurant. |
| Name | Product name. |
| Category | Menu category. |
| Tags | Comma-separated tag text, or “No tags”. |
| Price | In-store or base price (formatted with your currency). |
| Online price | Web / app price when different. |
| Tax details | Short tax summary cell (icons or text depending on setup). |
| Online | Badge Online (orange) or In store only (blue). |
| Kiosk | Yes / No badge for self-service kiosk. |
| Uber Eats | Yes / No badge for Uber Eats listing. |
| Status | Active, Out of stock (yellow), or Inactive (red). |
Loading: “Loading location items…”
Empty: “No items found.”
Pagination: Bottom controls change page and page size.
Row actions (each item)
| Icon | Tooltip | What it does |
|---|---|---|
| Eye | View details | Read-only window with full detail for that row. |
| Pencil | Edit item | Change prices, flags, tags, and other fields allowed on the edit form; save applies only to that restaurant item. |
| Plus square | Add modifiers | Attach or adjust modifiers for this item at this location. |
| Dollar | Price rules | Opens price rules for this item (special pricing logic — follow fields in the window). |
| Gear | Settings | Opens a window titled {item name} - Attribute Settings. There you manage attributes for this product at this restaurant (linked choices, add-ons, price adjustments, and similar options tied to that outlet’s menu line). That is separate from editing the same product in Item library for the whole company — here everything is scoped to this location’s copy of the item. |
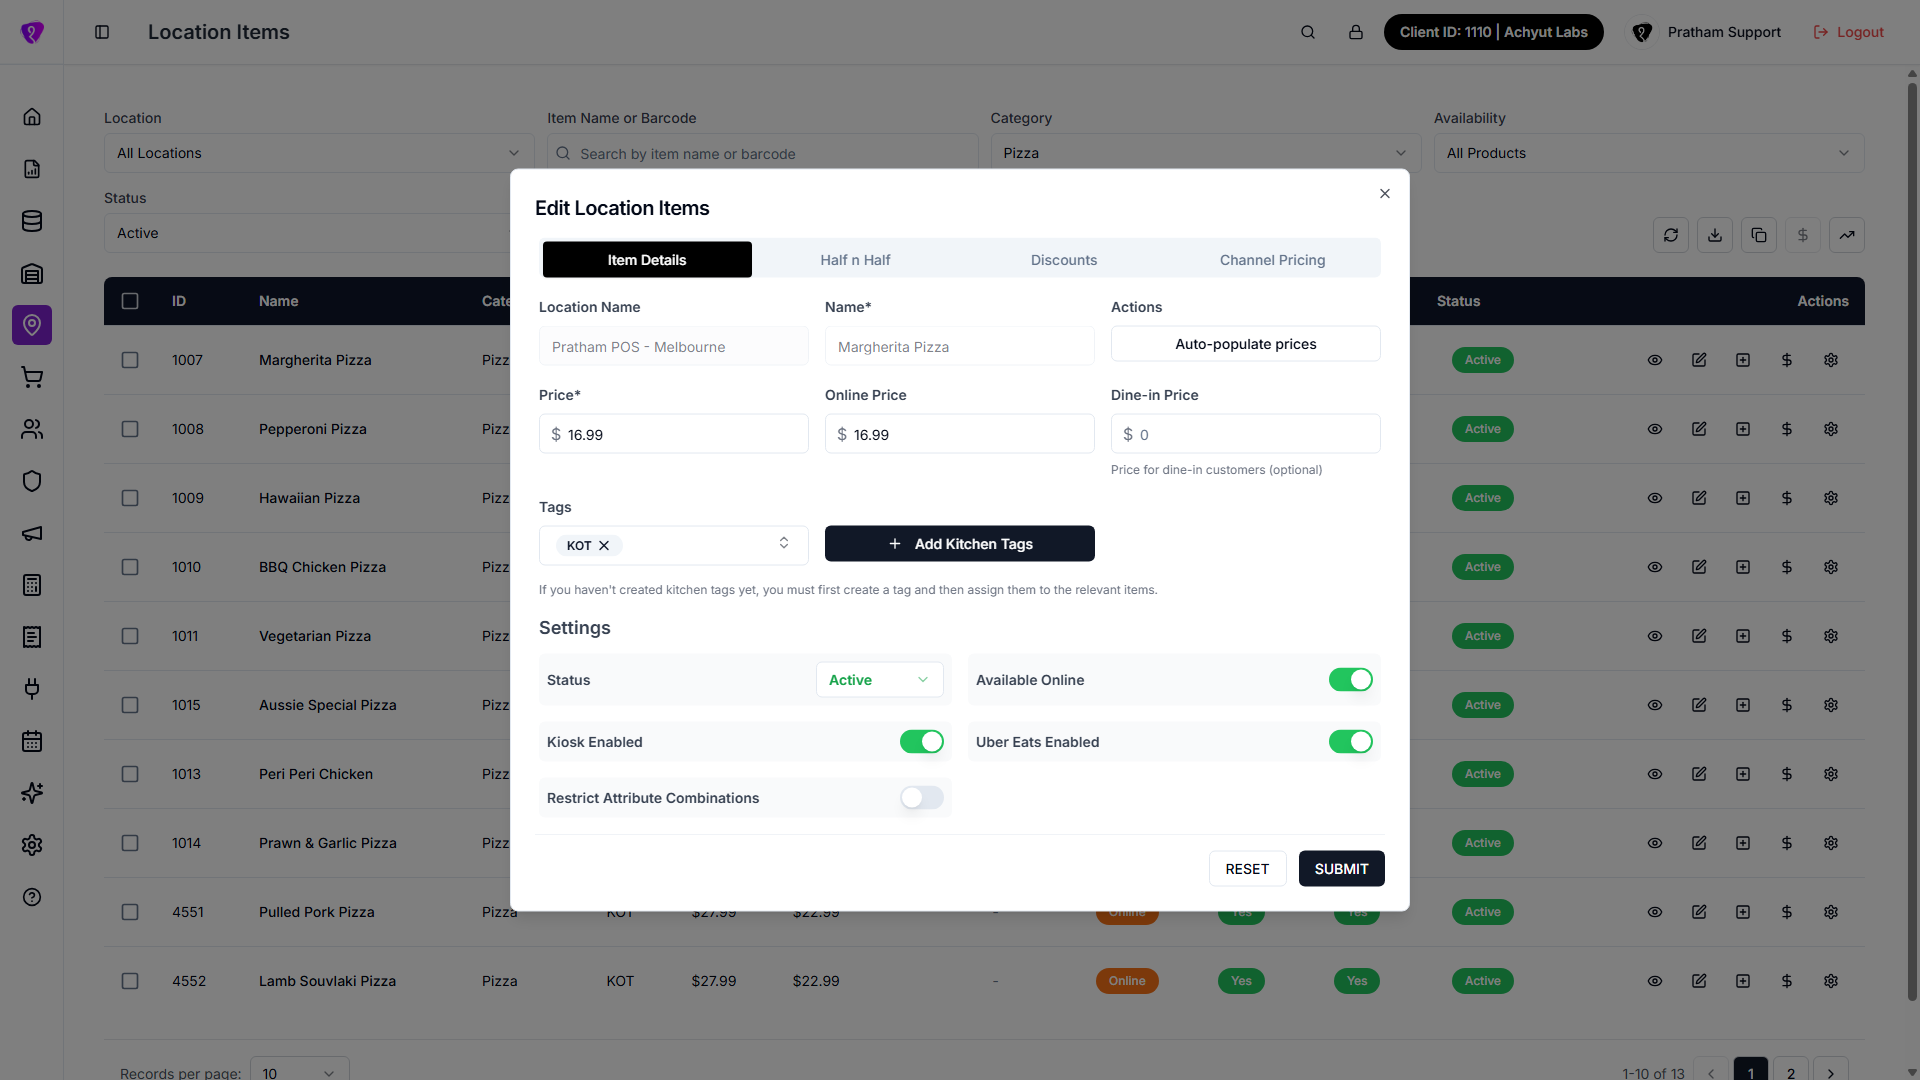 Caption: Edit action form for a location item
Attach modifiers (location items)
Use modifiers when a location item needs selectable add-ons or choices.
- Find the item row in the table.
- Click the Add modifiers action on that row.
- Select or update the required modifiers in the panel/dialog.
- Save changes and verify the item in the same location context.
For multiple items, select rows first and use the bulk Add modifiers action from the bulk bar.
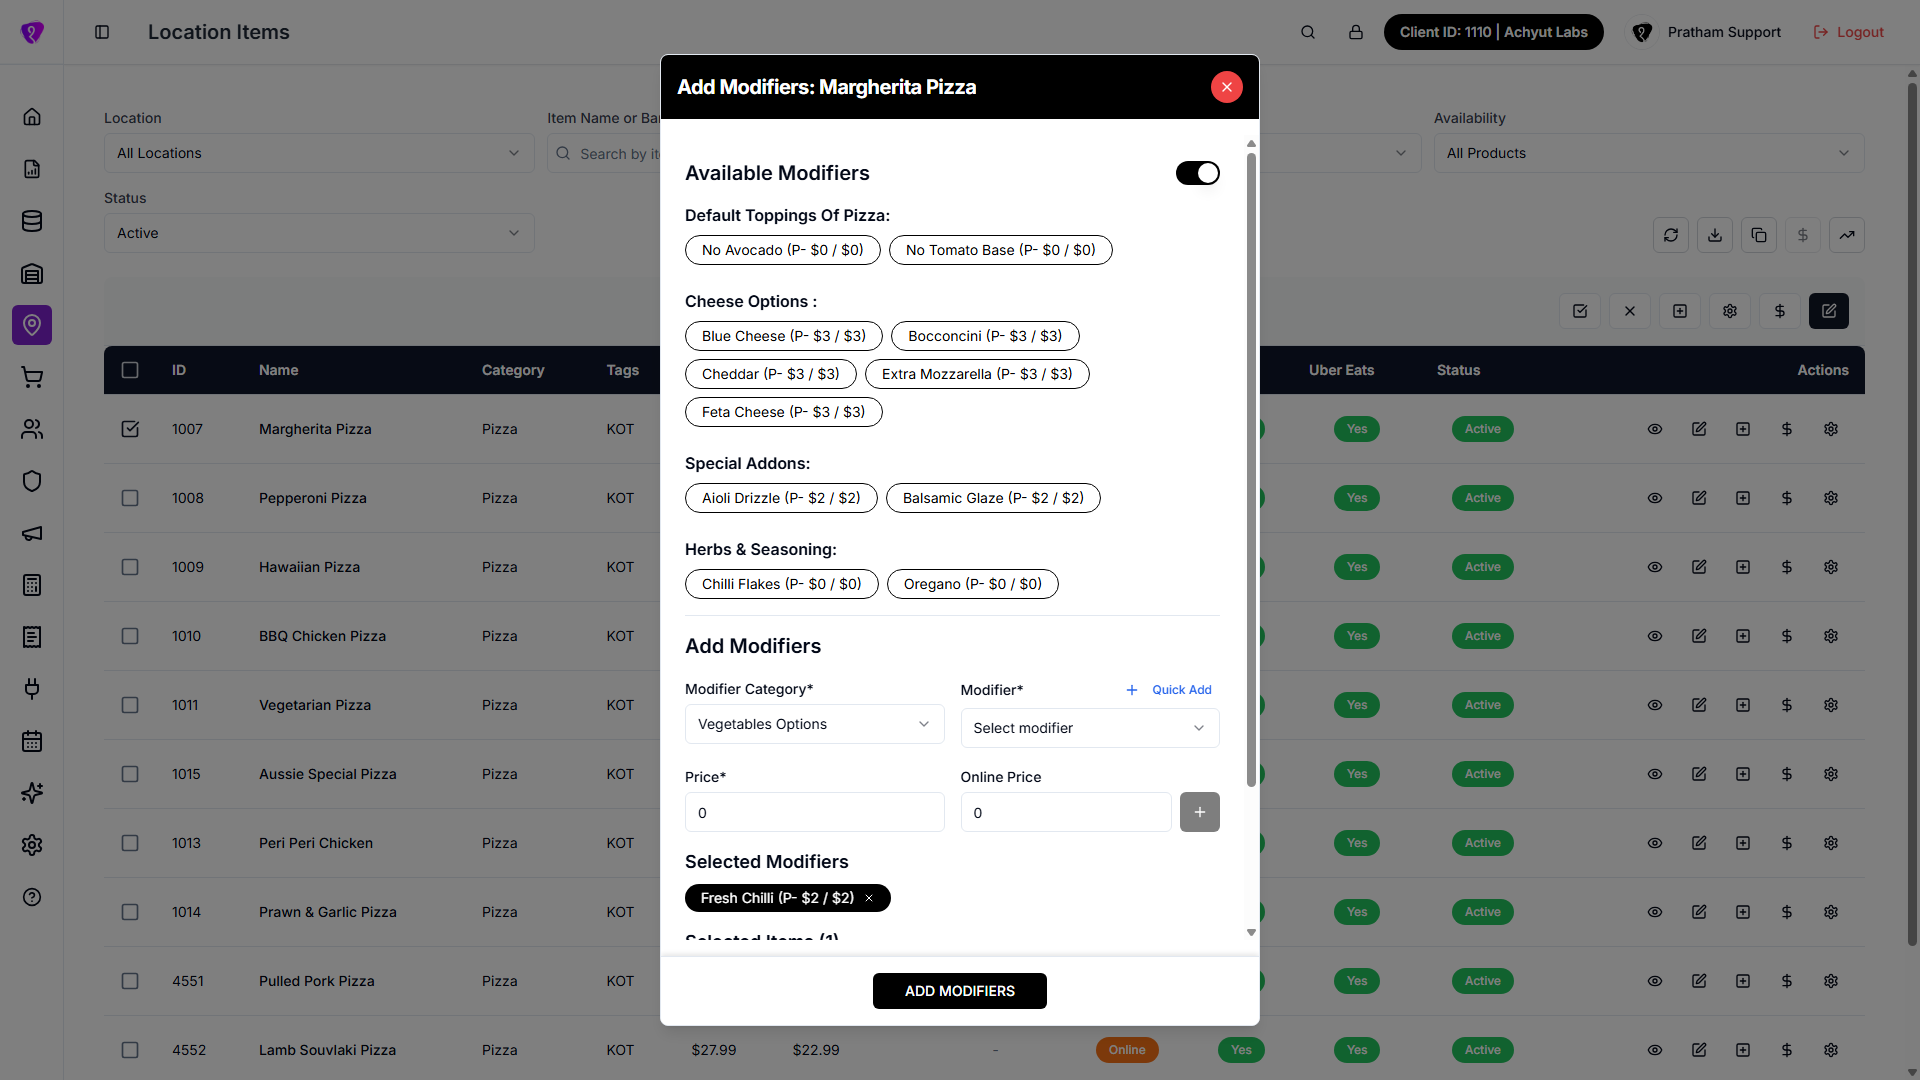 Caption: Add modifiers flow for a selected location item
Attribute rules and modifier rules
Use item Settings (gear) when you need to control how attributes and modifiers behave together.
- Open the item row and click Settings.
- Add or edit attribute rules as shown in the attribute settings panel.
- Link attributes to modifier rules where your build provides that option.
- Set attribute restrictions where needed (for example required choices, allowed combinations, or selection limits as shown in your UI).
- Save and recheck the item flow to confirm rules apply as expected.
Use exact labels from your screen for rule names and mapping options.
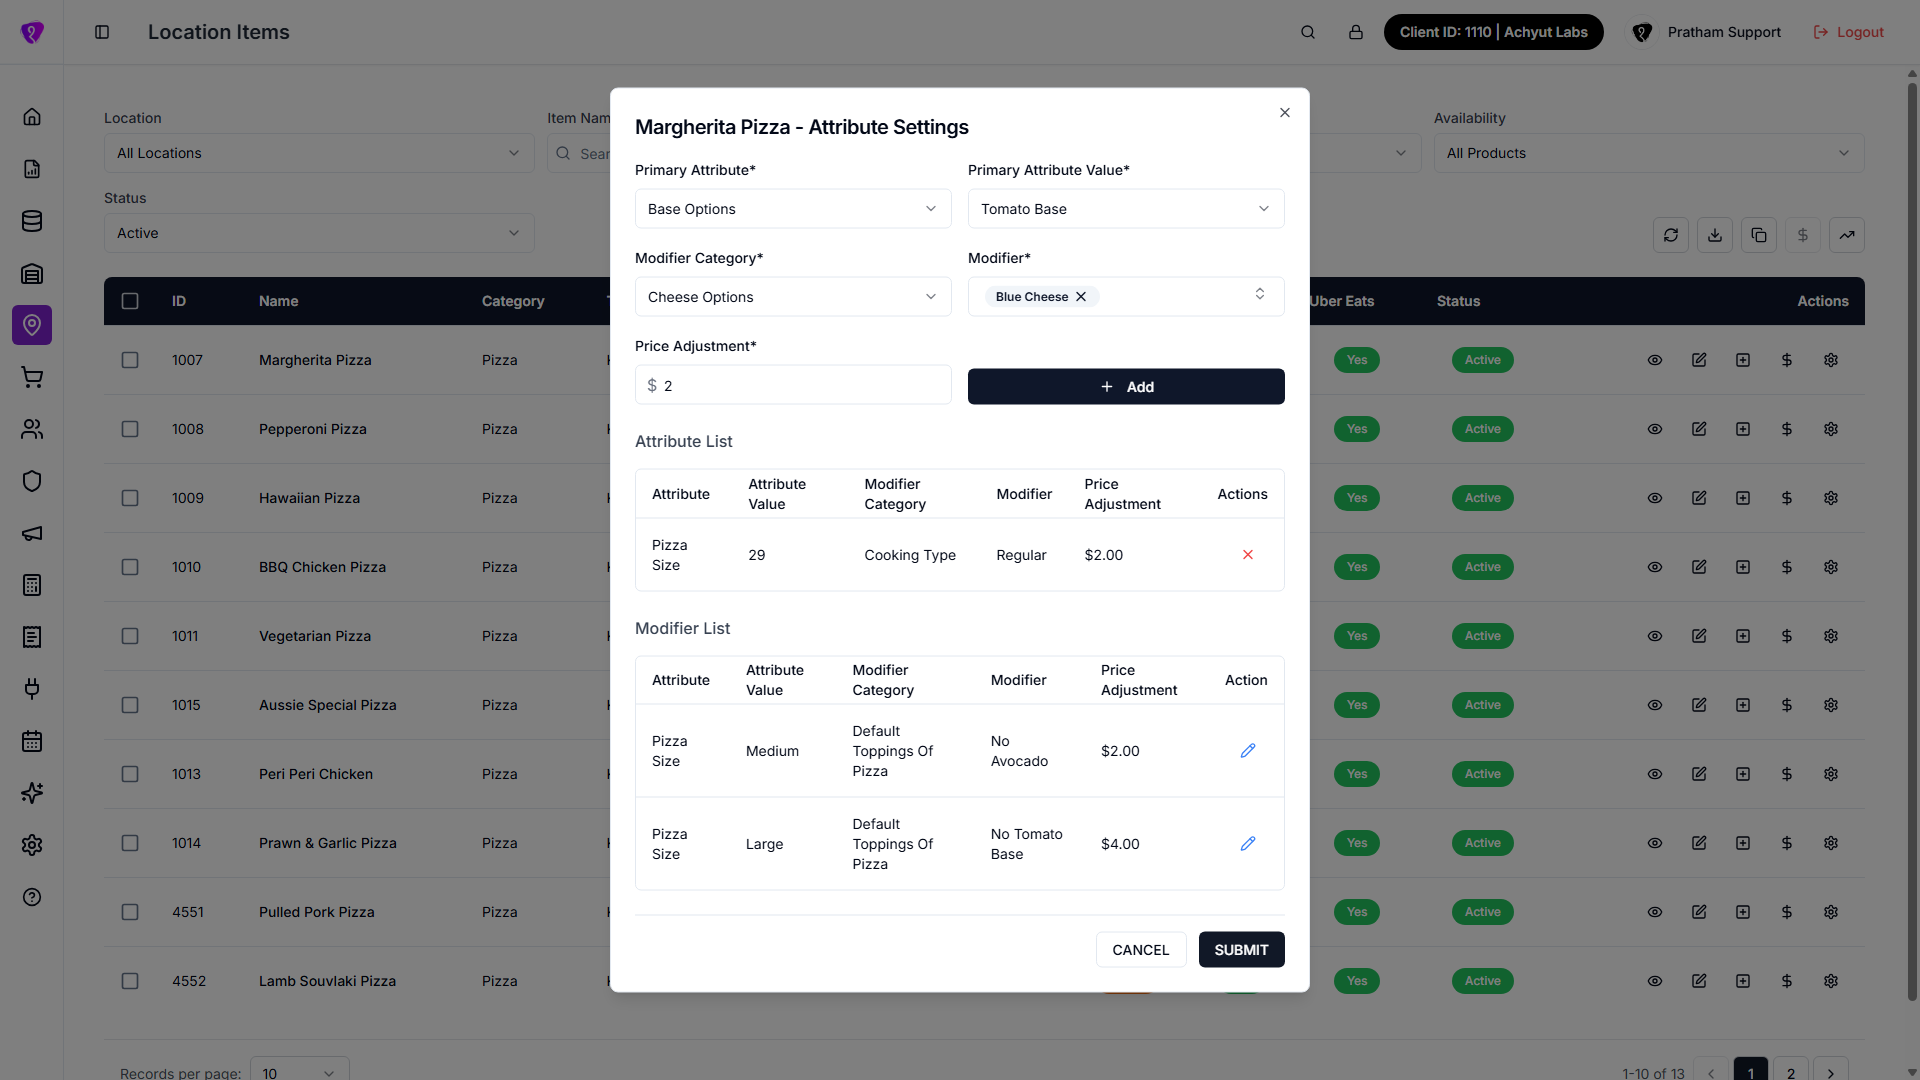 Caption: Attribute settings and rule mapping for a location item
When one or more rows are checked (bulk bar)
A grey bar appears above the table with these actions (tooltips on icons):
| Control | What it does |
|---|---|
| Check in box | Activate all selected rows (green check icon). |
| X in box | Deactivate selected rows. |
| Plus square | Add modifiers to every selected item (opens bulk modifiers flow). |
| Gear | Modifiers price adjustment — change modifier prices across the selection. |
| Dollar | Bulk edit channel pricing — online / kiosk / Uber style channel prices together for selected rows only. |
| Pencil | Bulk edit — opens a full-screen window to set exact prices and flags on selected rows only. It has two tabs: Bulk Edit and Individual Edit (explained below). Not the same as toolbar Bulk price update (percentage/flat change for the whole location). |
Clear selection by unticking rows or toggling the header checkbox.
Bulk Edit Location Items (bulk bar pencil)
When you click Bulk edit (pencil) with one or more rows selected, a dialog opens titled Bulk Edit Location Items.
It has two modes:
Bulk Edit tab (apply the same change to all selected)
Use this when you want one value applied to every selected item (for example set all selected items Out of Stock, or set the same Online Price).
- How it works: fields you leave empty (prices/discounts) or set to Don’t change (toggles/status style fields) are not updated.
- Examples
- Enter only Online Price → only that field changes for every selected item; other fields remain as-is.
- Set Available Online to Yes → turns online on for every selected item; leave the rest as “Don’t change”.
- Fields you can change in bulk include (as your build shows): Price, Online Price, Dine-in Price, Uber Eats Price, half-and-half prices, discounts (and discount type), Tags, Available Online, Status (Active/Inactive/Out of stock), and channel flags like Kiosk / Uber Eats availability.
- Preview Changes: at the bottom of this tab, a preview table shows Current vs New values (for key fields like price/discount/tags). If a value is not being changed it displays Unchanged.
Click Save Changes to apply the update to all selected items.
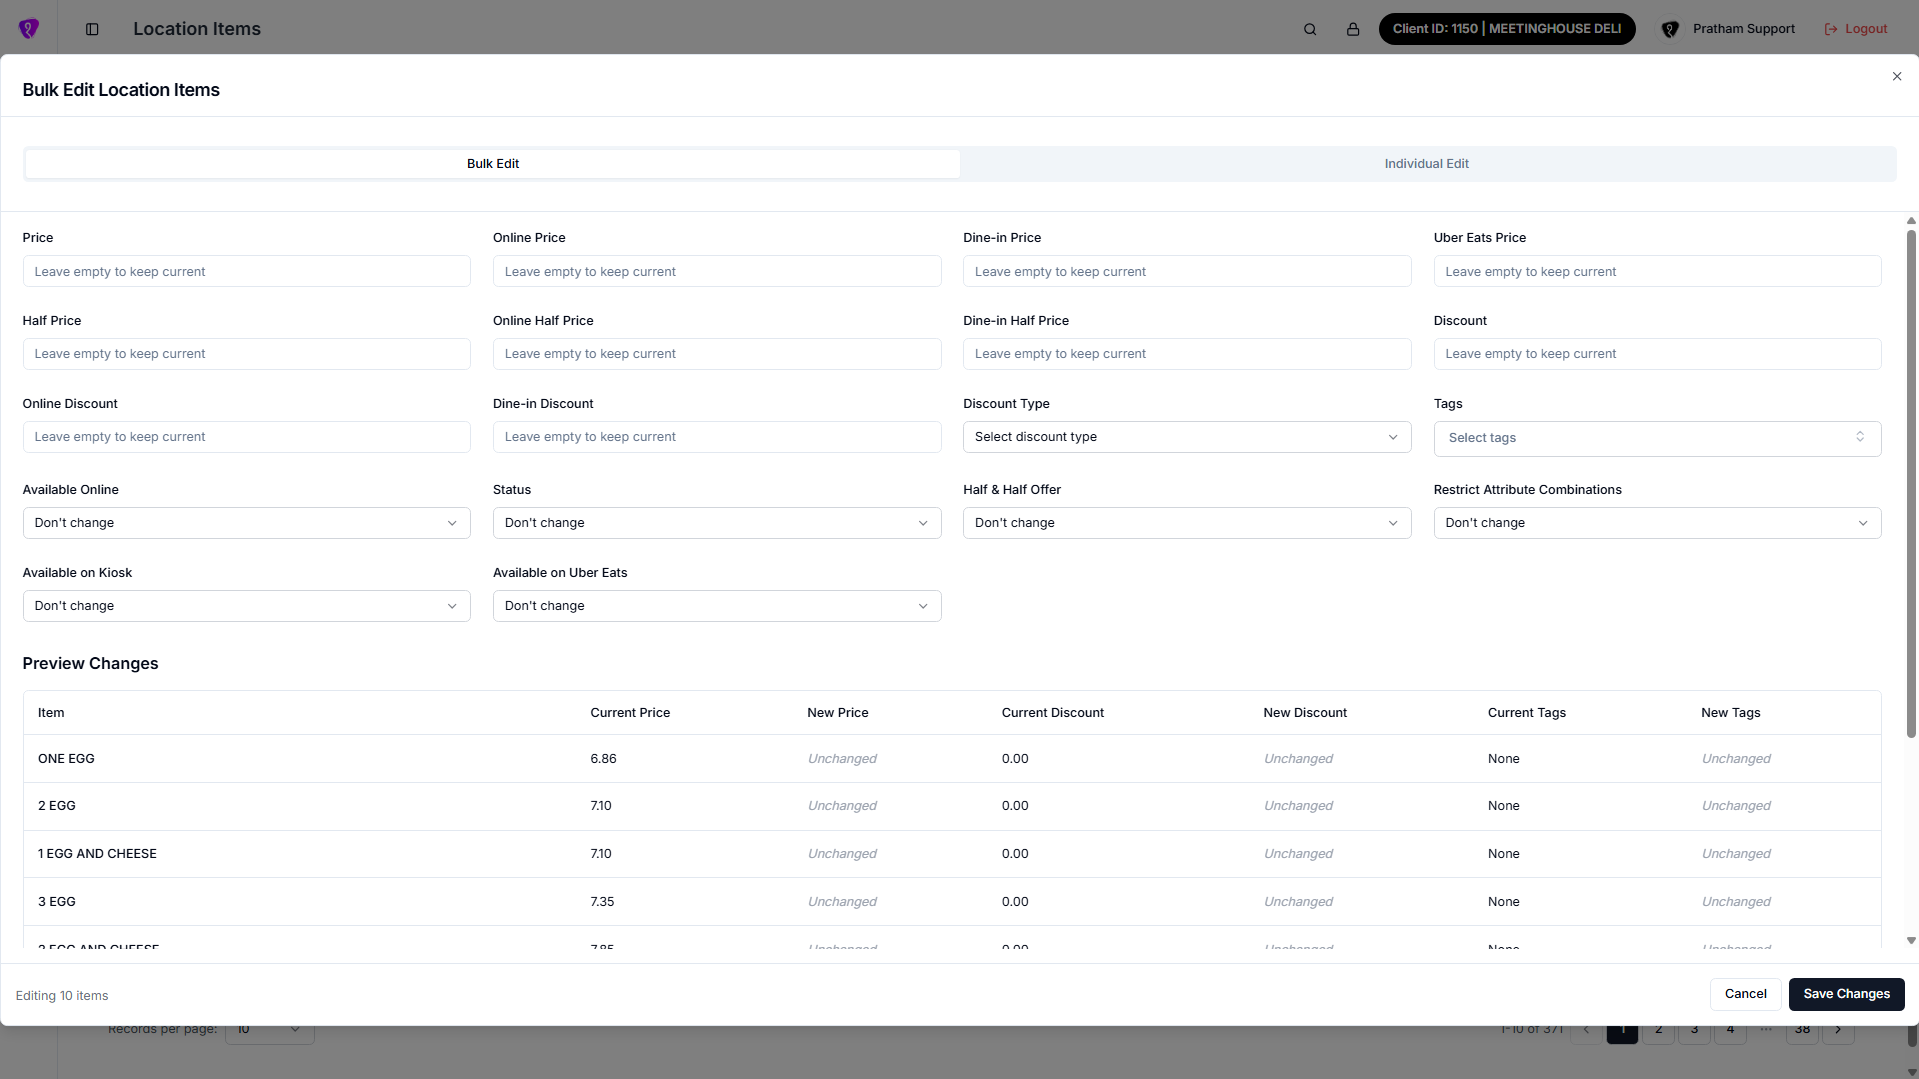 Caption: Bulk Edit tab to apply the same updates across selected items
Individual Edit tab (edit each selected row differently)
Use this when you selected multiple rows but each item needs different values.
- The tab shows a table with one row per selected item.
- Each row has inputs for fields like Price, Online Price, Uber Eats Price, half prices, discounts, Discount Type, Tags, switches (Online / Half & Half / Restrict attributes / Kiosk / Uber Eats), and Status.
- After making changes across one or many rows, click Save Changes once to submit.
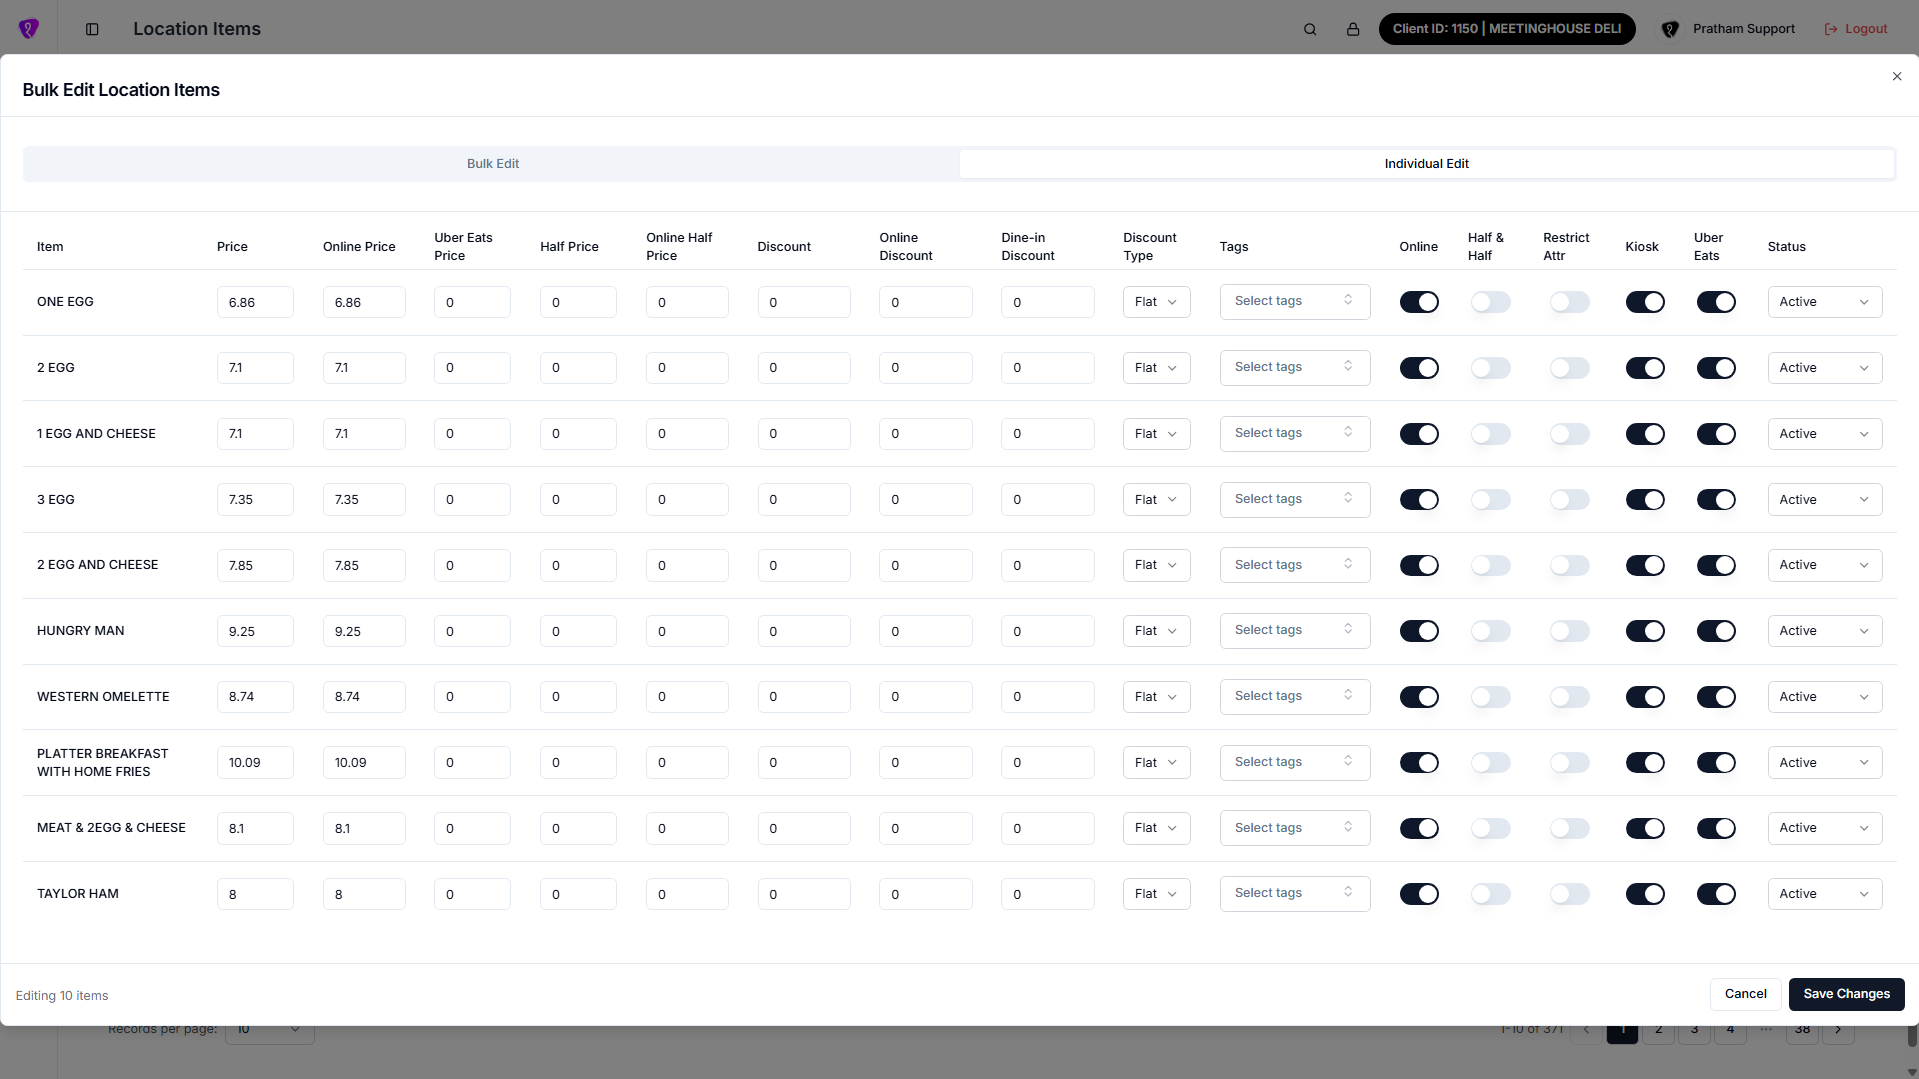 Caption: Individual Edit tab to update each selected item separately
Cancel closes the dialog without saving.
Clone location items (toolbar copy icon)
- Choose source and target location in the dialog.
- Confirm. The list reloads after a successful clone.
- Clone also copies linked item setup such as modifiers (along with product assignment and related item settings shown in your build).
- If you leave fields empty, you get a message asking to pick both locations.
Permissions (plain language)
- Export and view — anyone who can open the screen can usually use these.
- Edit, price rules, settings (gear), bulk actions, copy prices to channel, bulk price update — need a role that may change location items.
- Clone items and add modifiers on rows — need a role that may add or extend items.
If a control is disabled, either your role or the current filter (for example “all locations”) blocks it.